In this day and age of text messaging and
email, it seems to me that the joy of writing a letter or sending a card to
your loved ones is becoming a thing of the past, and for me that’s really sad.
But, I refuse to give up! I know that I cannot stop the technology revolution,
and to be honest I really don’t want to. I just want to remind people to stop
what they’re doing every once in a while and sit down to write your loved ones
a nice note informing them of what’s going on in your life. With those thoughts
in mind, I will continue to create projects around cards and stationery sets.
The project that I’m sharing with you
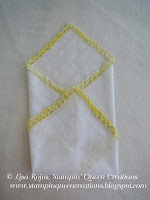
today is a unique way to store your cards and stationery. Handkerchiefs are
very inexpensive and if you can’t find a load of them in your mom’s dresser,
you can pick them up at any thrift store for less than a dollar. The
handkerchief holder is easy to put together. With a few simple folds and a
couple of stitches, you can create this lovely project for yourself or as a
gift that won’t cost you a fortune. Those are the kind of projects I like. How
about you?
Thank
you for joining me. Until next time…
Lisa
Stampin’
Queen Creations
Give The Queen A Call!!!
Tip
from the Designer
If
you don’t have a stylist in your tool box, you can use an empty gel pen. To add
a little glamour to it, fill the empty barrel of the pen with micro beads.
Supplies
Ÿ Handkerchief 12” x 12”
Ÿ Card Stock: dark blue, light blue and
white
Ÿ Black permanent inkpad
Ÿ Olive Grove, Wheat and Light Blue
dye-based inkpads
Ÿ Faber-Castell Chalk Pencils
Ÿ Blue ribbon/ Dark Blue ribbon for bow
Ÿ Therm O Web Super Tape
Ÿ Krylon Preserve It!
Ÿ Lady Bug button
Ÿ Self adhesive Velcro
Ÿ Needle & White Tread
Ÿ Fiskar Paper Edgers
Ÿ Rubber Stampede Daisy Block Print
Ÿ Rubber Stampede Daisy Blossom
Ÿ Close To My Heart Simple Joys
Instructions
for Cards
Cut dark blue card stock to 4 ¼”W x 5 ½”H
to form a card. Cut light blue card stock to 4”W x 5 ¼”H and white card stock
to 3 ¾”W x 4 ½”H. Stamp white card stock with daisy stamps randomly using light
blue, olive grove, and wheat inkpads. Stamp Simple Joys” on lower right side
with black inkpad.
Stamp large daisy stamp twice on a scrap
piece of white card stock with black inkpad. Color images with chalk pencils.
Spray with Preserve It! sealer. Cut out. Adhere white card stock to light blue
card stock Super Tape.
Wrap ribbon around light blue card stock.
Secure in place on the back with tape. Adhere light blue card stock to dark
blue and daisies to front of card with Super Tape.
Instructions
for Handkerchief Holder
Lay handkerchief flat with four corners
facing “north, south, east and west”. Pull bottom corner up to the center about
4 ½” from the bottom. Fold right side to center and then left side to center.
Tack all three sides together at the
center point using a needle and white thread, being careful not to sew them to
the back of the handkerchief.
Fold top corner down to center and place
a small piece of self adhesive Velcro on the back of the top corner and also
where the top corner meets the folded handkerchief. Add bow and button with
glue gun.
Note
from Designer:
The size of you handkerchief holder will
depend on the size of your cards. Always be sure to lay your cards, with their
envelopes, in the center of your handkerchief before you tack the corners into
place, to be sure that they will slide in and out with ease.


3 comments:
Love this Lisa!
These are wonderful, Lisa! Your instructions are great. I do need the reminder to lay the card out before folding the holder :) Thanks for sharing.
~Molly
This is such a sweet gift idea! It would be great for Mother's Day.
Post a Comment