Monday, April 30, 2012

Scrapbooking with Children


Hi Everyone,
I am a firm believer that you should teach children the art of crafting at a young age and continue to nurture them as they grow. For me, there is nothing more exciting than throwing a bunch of craft supplies onto a table and watching to see what a child decides to do with them. But what is really fun to do with children is to scrapbook with them, especially if they use pictures they took by themselves. Kids love that! And instead of worrying about your kids dropping your good camera buy them their own disposable one.
One of the great things about scrapbooking is it is a project that can be worked on and put aside throughout the year. Children from the age of eight and up can create an album on their own. But children under the age of eight will need a little more help.

What do you need to get started? Well, first of all keep in mind that the album you are going to be working on is something for your child, not you. Don’t worry if everything is not perfect or totally acid-free. It’s their project, so let them lead the way. When you’re ready to shop for materials, take them with you to the store and let them pick out all the things they want to include in their album. Your child can make an album without breaking your bank account. You can purchase materials at your local discount store. The items you will need to get started should be some card stock, colored pencils or some of those glitter gel pens kids love to draw with, a few stickers and embellishments and a glue stick. Of course if you are a rubber stamper like me, you’ll also want your children to have a stamp (or two!) And a dye based ink pad probably in black, so they can color the image. Once you have your materials together, you’re ready to start the fun!

©2012 Richelle Rojas Stampin’ Queen Creations
The scrapbook page I have included was created by my daughter Richelle, when she was a little girl. She had found the picture and letter she had made for the tooth fairy that I had saved for her and decided she wanted to create a page using the items. Here’s how she did it-She used decorative scissors around both items and layered them onto yellow card stock. She cut out yellow stars and drew lines and dots around the edges. Next, she glued blue ribbon, the stars and her pictures onto a 12″ x 12″ piece of blue card stock.


©2012 Richelle Rojas Stampin’ Queen Creations
I printed out the text for her on my computer. She made stars from white card stock and glued them onto the yellow stars. I had made her a small pouch from ribbon. She drew a small tooth, cut it out and attached some string to it. She sewed a button on the pouch and attached the small tooth. Then she adhered the pouch to a piece of dark blue card stock, used decorative scissors around the edges and adhered it to her page. The second page was made with pattern paper.  She adhered the ribbon and stars like the first page, then we drew a picture of a tooth on white card stock which sh cut out and added her pictures to.
My little girl is now a beautiful grown woman who is now pregnant with her first child.  We had so much fun creating this page together and my hope for her and her child is that they take the time to create a scrapbook page or two together. Of course with Nana being around, I see lots of different crafting going on in this child's life.  I hope that you find that same joy scrapbooking with your children. It really is a blast!

Thank you for joining me. Until next time...
Crafty hugs,
Lisa
Stampin' Queen Creations
Give The Queen A Call!!!

Friday, April 27, 2012

It's All About the Fur Kids

Hi Everyone,

Since I shared a very simple scrapbook page on Wednesday about fur kids, I decided to follow up with a story about my grandfur kid, Coca Cola. Do you have a pet story to tell? I'd love to hear about it!

Okay, tell me if I’m wrong, but I’m pretty sure most of you have faced this scenario at least once or twice in your lives.
Here goes… you’re lying down on your recliner taking a well-deserved nap, having a wonderful dream about this cool, new product you saw earlier in your scrapbook magazine. You imagine all the great ways you’re going to use it. Then, you’re awoken by a terrible scream, followed by some crying and whining. You immediately realize that it’s not your husband finding the receipt from your most recent scrapbook store excursion; it’s the other love of your life. So, you get up from your recliner, pick her up and snuggle her to your neck, all the while soothing her and asking her what the problem is. As you’re doing this, you look into those big brown eyes and the next thing you know, she presses that cold wet nose to your cheek and starts licking you. Now your heart is breaking because you know that something is wrong with her and she is in pain, but she will never be able to tell you where it hurts because she’s a fur kid. And, unfortunately, we don’t speak the same language. I know that a lot of us have been in this same or similar situation. But, what I really want to know is: when did we become a nation that loves pets so much that we treat them like they’re human? Because, let me tell you, my heart could not have hurt any more if I was staring into my own children’s brown eyes.
The fur kid I’m referring to is Coca-Cola, my son’s (our) black and tan miniature dachshund. Now, I swear I’ve heard this from other pet owners about their own dogs, and I’ve always rolled my eyes, but really, this dog does not know she’s a dog! And even though we don’t speak the same language, I still knew she was in terrible pain, and I needed to do something.


Coca Cola

The next morning we took her to the vet. By this time she was in so much pain she couldn’t even lift her little head to look at me. All she did was whine. It broke my heart. The vet checked her out all over. He took lots of blood work and x-rays. About one hour and $500.00 later we finally had an answer, sort of. He thought there was something wrong with her neck. Are you kidding me? After all that, that was his answer to me? He thought something was wrong with her neck? I wanted to throw something at this man. He just charged me $500.00 to tell me he “thought” something was wrong with her neck. I wanted to yell, “What was your first clue; the fact that she couldn’t move her head without yelping?” I knew there was something wrong with her neck, for goodness sake! Don’t charge me $500.00 to tell me something I already know. Tell me how we are going to fix it. And tell me is exactly what he proceeded to do; I needed to take her to a doggy specialist.
The following day, we drugged her up with some pain medicine and drove two hours away to the doggy specialist. He examined her and took more lab work and x-rays. After waiting what seemed like an eternity and paying another $500.00, we finally had an answer. Our beautiful, Coca-Cola had a ruptured disc in her neck, and she wouldn’t get any better without surgery. I thought my heart was really breaking. We had a tough decision to make. Do we put her down, or do we pay another $3,500 to make her all better. I looked at my son and said, “I need to call your dad.” Now, let me just say that my husband loves our fur kids as much is I do, but he also makes decisions with his head, not his heart like me. Do we really have $3,500.00, especially after just spending $1,000.00 to get a diagnosis? I picked up my cell phone and called my husband. I was truly dreading the call because I was so afraid of what he was going to say. After listening to everything I had to tell him, from what the doctor had to say, to what our son’s and my feelings were, he said, “Do what you have to do to save her.” At that, I burst into tears. Wow! (Have I mentioned how much I love this man?) With that done, my son and I gave our little wiener dog hugs and kisses and left her with this wonderful group of people who were going to look after and take care of our precious little girl. The ride back to our house seemed extra long. I worried so much about her. She was in so much pain and she looked so scared when we left her. The following afternoon, we received one of the best phone calls ever. Our little wiener was out of surgery and doing just fine! I cried my eyes out again. I was so relieved she did well and she would be home in a few days.

I am so happy to say that our little wiener girl is back to normal. She’s not allowed to jump up on things anymore or walk up the stairs in our house. But aside from that, she’s back to her old stubborn, “I’ll come over to you if I want to,” attitude and I’m loving every minute of it! We now also have another weiner dog in our house. After losing my beloved Cocker Spaniel, Tawnee Renee, almost two years ago after 13 years of loving her, we brought home our newest fur kid, Ruby Renee!
Ruby Renee
And after going through all that terrible stress with Cola, I realized something very important. I’m going to have to sell a lot of scrapbook pages and rubberstamped projects to pay for that vet bill. I’d better get busy.
Thanks for joining me. Until next time…
Crafty hugs,

Lisa
Stampin’ Queen Creations
Give The Queen A Call!!!

My Girls!

Thursday, April 26, 2012

Guest Blogger- Nathalie Kalbach

Hi Everyone,

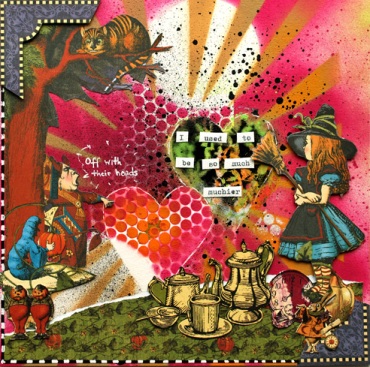
Today I am please to announce that Nathalie Kalbach is my Guest Blogger! Here's a little bit of information about Nathalie-

Nathalie is a European Mixed Media Scrapbooker. Her layered work is an explosion of texture, dimension and jewel tone colors. In her workshops she share her secrets for using paint and ink products to reveal texture, tips and tricks for embedding found objects and embellishments and how to unlock your personal creativity.

She loves to design, teach and write — doing all of it wholeheartedly. Besides her creative passion, she loves to read and travel.

Nathalie was kind enough to share her Wonderland scrapbook page using papers by Graphic 45. To see more of Nathalie's beautiful work, please visit her website at
www.nathaliesstudio.com She has tons of designs in the "N*Gallery" section on her website. Be prepared to be amazed! Thank you so much Nathalie, for sharing your designs!

Thank you for joining me. Until next time...

Crafty hugs,

Lisa
Stampin' Queen Creations

 Give The Queen A Call!!!


©2012 Nathalie Kalbach

Wednesday, April 25, 2012

Wordless Wednesday- Fur Kids Scrapbook Page


Thanks for joining me. Until next time...

Crafty hugs,

Lisa
Stampin' Queen Creations

Give The Queen A Call!!!
Tuesday, April 24, 2012

Scrapbooking Made Simple

Hi Everyone,
With all of the cool stuff out there to make great scrapbooking pages, which products do you choose to create your very first scrapbook page? When you’re a newbie to the scrapbooking world, how can you walk into a scrapbook store and not suffer from what I call “Product Overload?” I can spot a newbie a mile away. They are always the ones you see walking aimlessly around the store looking like their heads are going to explode! And how do I know this, you ask? I was one of those people. Only it was not nearly as bad back then as it is now. So much stuff these days! I thought I would write this article for all the newbies out there so that I can save you from your head exploding. If you’re going to have your head explode, I would much rather it be due to all the great ideas you have for your scrapbook pages.
To begin, you are going to want to try to organize your photos. If you’re like most people, your pictures are probably thrown into boxes somewhere in the back of your closet. Or, due to the digital world, they are in a folder somewhere on your computer waiting to be printed. Either way, getting your photos organized is the first step in scrapbooking. In my opinion, the best way to do that is to sort them by year. Go through them again and decide on a theme for your first scrapbook page/album. Once that task is completed, with your photos in hand, you are ready for your trip to the scrapbook store.
O.K. Lets talk about Acid and Lignin Free papers. Acid Free relates to the PH balance in the paper. Papers and products that you use in your albums should also contain alkaline which will stop the acid from your pictures transferring to your papers. Lignin is a natural material present in plants and should be removed when making paper to ensure the papers are safe for your pictures. Nowadays, almost all of your scrapbooking products are Acid Free and Lignin Free, but it’s always best to double check. If you’re going to spend a lot of time with your pages, you want to be sure that your pictures are safe and will be around for generations to come.
The next step is to pick an album to store all your beautiful pages in. Albums come in all shapes, sizes and colors. I prefer to use a 12”x12” album that is refillable. That way, I can add lots of embellishments to my pages and I’m not limited to the number of pages I can put in my album. I think that picking an album is a personal choice. So, browse through your scrapbook store, look at all the different ones they have, and pick one that will suit your needs the best.
Next up…papers! With all of the wonderful companies out there that produce hundreds of different papers, you could spend all day long just looking at papers. I happen to LOVE papers. I always say that I could use 10 papers a day from my stash from now until the day I die and I would still have enough left over for two more generations of my family to be able to use! I may not be the best person to ask about papers because my advice would be “Buy it All!” But, because I don’t want to be responsible for the rising divorce rate, let me give you a few guidelines. Take your pictures with you to the store. It makes it so much easier to match the colors. I recommend that you mat your pictures with a color card stock instead of a pattern paper. Pattern paper can overwhelm your pictures if you don’t choose the right ones. With your card stock colors picked, now you can play with the pattern papers. Choose your pattern papers to match the theme you have picked out for your scrapbook page/album. Now, you are ready to move onto the embellishments. This would be a really good time for me to reiterate the fact that I mentioned above about picking your theme before you walk into the store. This is still the best way I know of to avoid “Product Overload!” Most scrapbook stores have their products arranged by themes, making it so much easier to choose the papers and embellishments you really want.
You have your pictures, your papers and embellishments. So, how do you stick it all together? Adhesives! There is a huge array of adhesives on the market today. Which ones are best? Again, if you ask 5 different people, you’re likely to get 5 different answers. But here are my favorites. Zip Dry Paper Glue™ by Beacon Adhesives® is my all time favorite. It dries clear and doesn’t wrinkle your papers. My next choice would be the E-Z Runner™ Scrapbook Adhesives by 3L®. It’s quick and easy to use. And, last but not least, I love Terrifically Tacky Tape™ by Provo Craft®. This red liner tape will stick to any and everything, so make sure your papers etc. are exactly where you want them before applying this tape!
Now that I have given you the basics, you are ready to create your own beautiful scrapbook pages. The main thing to remember is that even though there are tons of products to choose from, start off easy. Scrapbooking is all about cherishing those special moments with your family and having a great time doing it.
Thanks for joining me. Until next time…
Crafty hugs,
Lisa
Stampin’ Queen Creations
Give The Queen A Call!!!

Monday, April 23, 2012

Scrap & Stamp Arts Magazine


Hi Everyone, 

I swear my life just keeps getting better and better! And with all the health issues that I face every day of my life, I’ll take all the good news I can get!!!
Last Monday I posted about my becoming a first time grandma. Although that news cannot be beat by anything in my personal life, my good news this week is all about my crafty life. 

I received an email last week from Warren Gruenig. If you’re involved in the craft industry you know all about Warren. Not only is he the husband of one of the most popular rubber stampers on the planet, Dee Gruenig, he is also very involved in the industry himself and he writes a monthly column for Scrap & Stamp Arts magazine. 

Warren contacted me to ask if he could do a feature article on me for his column! I was like Oh My Gosh!! I am going to be the subject of a feature article in my very favorite stamp magazine!!! Holy Moly! How did that happen? When did I become a person that anyone would want to write an article about? Well, I guess that time is now! How very exciting!!! I will be in an upcoming issue in the “Creative Spaces” section of the magazine. Needless to say I am so excited about this I could barely think straight when I read the email. 

After a little bit of time passed and I came back down to the earth plane, that’s when reality set in. My next thought was Oh My Gosh! Now I have to clean up my studio so the readers don’t see the mess that is a part of my everyday life. If I took pictures of it now, everyone would think a bomb went off and I just know that with my luck someone would call the health department and have me arrested! 

I’m thinking that I better get started. I’ll be sure to make the announcement of when my article will be published. Please make sure you keep checking back for that, unless of course I get lost trying to find the bottom of my studio. If that happens I’ll send out an SOS. Please send help!!!

Thanks for joining me. Until next time…

Crafty hugs,

 Lisa
Stampin’ Queen Creations

Give The Queen A Call!!!

Friday, April 20, 2012

What Tools Do I Really Need Just Starting Out?

Hi Everyone,

If you are just starting out in the world of paper arts, going to your local scrapbook or rubber stamp store can be very scary. I know it was for me when I first started out. Even back then when scrapbooking and rubber stamping were first becoming the hot new hobby, there were lots of “tools” to buy. I remember going into my first store and thinking, “Holy Cow! I need to win the lottery to pay for all these great things.” Well, I never did win the lottery, although Rich says you need to play the lottery if you plan on winning the lottery. But, I did learn a few tricks since then. Although I do own most everything you can find in a store, I still have the tendency to return to my tried and true tools. Here are a few of my favorite tools that I think every paper crafter needs in her toolbox.

Ruler, Trimmer, Scissors

Paper Trimmer – I have owned many different paper cutters through the years from the side sliders to the guillotine cutters, but my all time favorite one is the Ultimate Trimmer™ with 11 different click blades from Purple Cows®. This cutter is just awesome and with the 11 different cutting blades included, it alleviates the need for multiple decorative scissors. For something a little smaller that you can travel with, I like the Fiskars® 12 inch Portable Paper Trimmer.

Ruler – My all time favorite ruler is an 18” clear, metal edged, quilter’s ruler. With the ½” squares in the ruler, it makes layering your papers a breeze.

Scissors and Tweezers – Having a nice pair of scissors is a must for your tool box. The Cutter Bee™ by EK Success ® is my favorite. The scissors have a cover on them for safe traveling. I also keep a pair of tweezers in my tool box, but again, my favorite in this category would be a pair of hemostats. I have had mine since my nursing days (more than 25 years ago) and I love to use them for picking up items. This is a wonderful tool if you have long or artificial nails. I even use mine outside of my studio. And don’t forget the Exacto knife. No tool box is complete without one.

Adhesives

Adhesives - For adhesives, I have a few different options that I like to use. First of all, I LOVE Zip Dry Paper Glue™ by Beacon Adhesives®. This is the first glue I have ever worked with that won’t ripple your paper! The next adhesive I like is Scrapbook Adhesives™ E-Z tape runner by 3L®. It goes on smooth and rarely (if ever) gets tangled up in its dispenser. Lastly would be Terrifically Tacky Tape™ by Provo Craft®. This tape can be used on paper, glass, wood, metal and it will hold beads, glitter, foils, etc. You can even emboss with it!

Inks

Inks – O.K. I’ll admit it. My favorite inks are from Clearsnap, and not just because I work for them. In my humble opinion, they have the best inkpads on the planet! For your tool box you’ll need a waterproof dye based inkpad for watercoloring, etc. a pigment inkpad for embossing and a watermark inkpad for a watermark effect (they are also great for embossing). I will go into more detail about inkpads later in my blog series.


Coloring Tools

Coloring Tools – You’ll need to have some kind of coloring tools to add color to your scrapbook page or your rubber stamped cards. You have a few different options for this one. You can use markers, watercolors, watercolor pencils, chalks, chalk pencils, color pencils. The list goes on. My favorite technique is watercoloring. I love the look of watercolors, but I don’t always have the time to pull out my watercolor palettes or pencils and to do watercolor correctly; it sometimes can take time. When I don’t have the time, I use my very favorite coloring tool, chalk pencils and a Dove® Blender Pen™. I can create the beautiful look of watercolors in a lot less time. I buy my chalk pencils from Faber-Castell®, but The General Pencil Company® also has some great chalk pencil sets.

Now that I have given you a few ideas on what tools you need to get started, you can go into your local store and spend your money on some great new pattern paper or maybe that stamp that you’ve been wanting. And, I promise, the rest of those cool tools that are out there… they will eventually find their way to your house! I know they found their way to mine.

Thanks for joining me. Until next time…

Crafty hugs,
Lisa
Stampin’ Queen Creations
Give The Queen A Call!!!

Thursday, April 19, 2012

Guest Blogger- Marilyn Gossett


Hi Everyone, 

On Monday, I posted a project that I designed for a company called CraZy TACKz. I totally love this new product so, I thought who better to have as my guest blogger this week then my designer friend, Marilyn Gossett, who just so happens to be CraZy TACKz lead designer!

I met Marilyn for the first time at the CHA Winter show is Anaheim this last January. We actually met by accident when I went by CraZy TACKz booth at the CHA show with my other great friend designer, Ann Butler. Marilyn & I hit it off immediately!  After chatting for a while and exchanging business cards, we promised to stay in touch after the show. Since that time we email each other at least once a week and we have become good friends!!! I just adore her!!!

Marilyn is an extremely talented designer, author, teacher and consultant who has been working in the craft industry for 20 years. She has authored and co-authored over 40 books and contributed to multiple craft magazines. Marilyn loves to paint, sew and she specializes in paper crafts, painting, doll making, rubber stamp designs and craft books. She loves to experiment with new products and find new uses for the old standards!!!  For more of Marilyn's fabulous designs, check out her blog at www.marilyngossett.blogspot.com

Thanks for joining me. Until next time…

Crafty hugs,

Lisa
Stampin’ Queen Creations

Give The Queen A Call!!!


Wednesday, April 18, 2012

Wordless Wednesday- Flowers for Mommy


A Very Simple Scrapbook Page

Thank you for joinig me. Until next time...

Crafty hugs,

Lisa
Stampin' Queen Creations

Give The Queen A Call!!!


Tuesday, April 17, 2012

Rubber Stamping for the First Time

Hi Everyone,

Since I have already discussed how easy and fun scrapbooking can be, I thought I would now discuss how to rubber stamp for the first time. I don’t know about you, but I really love to send cards in the mail to my friends and family. I began rubber stamping years ago as a young adult. Mostly because I loved all kinds of different crafts and rubber stamping was so new and exciting for me. As my card making progressed, I realized how much cheaper it was for me to make my own cards. And being a young adult with a small child money was very tight and I had to cut corners wherever I could. Of course 15 years later the same could not be said since I own probably every tool, inkpad, and paper on the market today! Maybe for my next article, I can teach you all the different ways to hide receipts and new products from your husband’s! Just kidding! When you delve into the craft of rubberstamping you only need a few materials to get started. You don’t have to buy everything in the rubber stamp store, unless you have the money. In that case, “Go for it!”

So for the beginners, let’s start with the basics.

Card Stock and Pattern Papers- for your rubberstamping projects you don’t need to use acid-free papers (unless there are photographs in your project), but because a lot of the products you can buy for rubber stamping can also be used in your scrapbooking pages, I feel like you should. Besides, almost all of the papers found in rubber stamp and scrapbook stores are acid-free and lignin free. The best way to start is to use white card stock, so you have a base that you can stamp on. You can always layer your card with coordinating card stock colors and pattern papers.

Inkpads-Dye-based or Pigment- Let me begin with explaining the difference between the two types. Dye-based inkpads dry quickly, and most of them are waterproof, which allows you to watercolor your image. Dye-based inkpads, I feel are better for beginners but because the ink may fade over time, you may not want to use them for the projects that you want to last for generations. Pigment pads are wetter, and they will smear if you don’t heat set or embossed them (which I’ll explain later), but they are for the most part all permanent when dry. Archival inkpads are permanent pigment inks that are formulated not to fade. These inkpads are best used in scrapbooks and projects that you want to keep for a long time. Whatever ink pads you choose to use, be sure to give them a test try on a piece of scrap paper before you begin your project.

Embossing- Let’s talk a little bit about embossing. To embossed on a project you will need a pigment or embossing inkpad embossing powder and a heat gun, which can be purchased at any rubber stamp, scrapbook, or hobby store. Embossing powder is made from plastic particles that adheres to the glycerin used in embossing and pigment ink pads. When a heat source (heat gun) is applied to these particles they melt onto the paper giving it a raised image. To begin ink your stamp with the inkpad. There are two ways to do this. The method I prefer is to place my stamp on my worktable with the rubber side of and applied the ink to the stamp. This way you can make sure your stamp is completely covered. The other way is to place the ink pad on the table and press the stamp into the inkpad. Either way works nicely and you’ll decide the more you stamp which way suits you. Once your stamp is inked, press the stamp on the card stock firmly with even pressure over the entire stamp and bring the stamp straight up. Do not rock the stamp back and forth. This will cause the image to blur. After you have stamped your image on the card stock sprinkle the entire image with embossing powder and gently tap off the excess onto a piece of scrap paper. Return the excess power back into the jar. Take a small dry paintbrush to remove stray powder on your project. Apply heat with a heat gun to your image constantly moving the heat gun around the image until the powder is completely melted. Do not hold the heat gun to close as it will burn your project. Always use caution when using a heat gun to avoid burning yourself or your worktable. Once the powder is completely melted, you will have a raised image on your project that is now ready to be colored.

Markers, Colored Pencils, Watercolors and Chalks- are the common items used to add color to your stamped images. I suggest that you play with each of these items until you find the one that you are most comfortable to begin working with. But the more you get into rubberstamping you will find that although you might find a favorite, you will end up using different coloring techniques for different projects. My all time favorite are chalk pencils. I love the fact that they are easy to use but with blending and shading you can achieve stunning results.

“Take Time to Enjoy” Card

Materials

Pink card stock- 5 ½” x 7”
White card stock- 4 ¼” x 5 ½”
Striped pattern paper by Creative Imaginations
Ò- 5” x 6 ½”
Ancient Page
Ô inkpads by ClearsnapÒ- Lime, Lavender, Pink Pizzazz, and Primrose
Ultra-Fine glitter
Lavender ribbon
Zip Dry Paper Glue
Ô by Beacon AdhesivesÒ
6 Lavender eyelets
Silent Setter
Ô by Provo CraftÒ
Rubber Stamps by Hero Arts
Ò

Instructions

1. Apply ink directly to the stamps. Stamp on white card stock. Tear card stock to separate images. Apply ink around the edges.

2. Apply glue around edges of card stock and also on the flowers. Sprinkle with glitter. Add eyelets to images with eyelet setter. Tie ribbon through eyelets.

3. Layer papers and adhere together.


Thank you for joining me. Until next time…

Crafty hugs,

Lisa
Stampin’ Queen Creations

Give The Queen A Call!!!

Monday, April 16, 2012

Home Decor Project with CraZy TACKz?

Hi Everyone,

Yep, that’s what I said. CraZy TACKz! The new household tool has found its way into the craft world! And I for one, am thrilled!!! 

A designer friend of mine, Marilyn Gossett, who designs for CraZy TACKz, sent me some packages of this very cool new tool and asked if I would come up with a design. I am always up for a challenge, so I took and the packages and designed this project. 

The project I designed is a birthday calendar. Sizzix flower die cuts were used to write my families names and birthdates and then hung to the side with the CraZy TACKz. When a birthday comes up, you just move the flower and stick it on the calendar. There is also a place to hangs your keys, glasses, etc. on the CraZy TACKz attached to the birdcage. You can use the additional cork space area on the board to attach notes and other things.  There is also a pocket in the back of the board to keep those extra calendars so they don't get lost!

The additional flowers are also Sizzix die cuts and the centers are embellished with a button and these wonderful new wired fibers/threads by Kreinik, and if you haven’t tried these new wired threads, you need to run to the store to buy some!!! They come in all these luscious colors and are super fun to work with.

This project was blast to make. Who knew I could take something that I consider a household item and turn it into a fabulous home décor item? I just love these new CraZy TACKz!!! Check back with me and see what other totally cool projects I come up with using these great TACKz. 

And better yet, I have a special offer for you. I would love to see what you can create with CraZy TACKz! If you go to their website www.crazytackz.com  and enter the code SQC20F, you’ll receive 20% off of your entire purchase and free shipping when you order 3 or more packz! Just think of all the fabulous things you can do with these great new TACKz!!!


Thanks for joining me. Until next time…
 

Crafty hugs,

Lisa
Stampin’ Queen Creations 

Give The Queen A Call!!!


Friday, April 13, 2012

Live from CHA Summer Show 2012


Hi Everyone, 
    If you have noticed, I have placed a new blinkie on the right side of my blog.
    Charity Wings aka Scrapbook Royalty is presenting a FREE ONLINE STREAMING EVENT (with a purchase of a raffle ticket) that will be benefitting the charity-
    A PLACE TO BARK is a no kill foster and adoption rescue dedicated to the welfare of animals and was founded by Bernie Berlin. Established in 2001, we mainly work with Animal Control Agencies, rescuing animals from high kill shelters and fostering them until they are healthy. This provides an ideal situation for the animals. They are then placed for adoption through Humane Societies in various parts of the country. We cover all costs for the medical care of the animals with no cost to the Humane Societies. We also handle some private adoptions after a strict screening process.
    The event will be held at the CHA Summer Show in Chicago
    July 17 & 18th, 2012
    10am - 6pm daily Chicago time
    Recorded footage to watch whenever you like- All you need is an internet connection
    The raffle tickets prices are- $10 for 1 ticket
                                                        $20 for 5 tickets
    (If you buy $20 in tickets before April 15th you’ll get 5 BONUS tickets)
    YOU HAVE A CHANCE TO WIN $4500 WORTH OF PRIZES!
    To purchase your raffle tickets and for more information please visit the Charity Wings website at
    Interviews & Giveaways

    Each sponsor will be raffling off a prize with a minimum $100 value to a lucky participant during each segment.
    • More than 45 different Manufactures and Designers will be interviewed.
    • Purchase as many raffle tickets as you like. Raffle tickets will be $10 each or $20 for 5 tickets. (Club TLC members get $5 off their total order)
    • Participants do not need to be online to win.
    • To see a list of the  Manufacturers and Artists that will part of the LIVE stream, please check the Charity Wings website
     I will be part of this wonderful event as one of the Artist/Designers that Charity Wings will be interviewing. My interview will take place on Wednesday, July 18th. I will be promoting this event frequently on my blog from now until the show, so be sure to check back for additional information.
     
    Thanks for joining me. Until next time…

    Crafty hugs,
    Lisa
    Stampin’ Queen Creations

    Give The Queen A Call!!!


Thursday, April 12, 2012

Guest Blogger- Jeremy Bright

Hi Everyone,

 Well, as you know today is Thursday, so that means we have a guest blogger here at Stampin' Queen Creations. And Wow! Have I got a special treat in store for you today! I am so happy to intorduce Jeremy Bright as our guest blogger. Jeremy is a very talented young man and I love what he did with this project. For further instructions on this fabulous project, please visit Jeremy's blog at www.vertigographic.com.  Thanks so much Jeremy for sharing your wonderful talent with us. You rock!!!

Thanks for joining me. Until next time...

Crafty hugs,

Lisa
Stampin' Queen Creations

Give The Queen A Call!!!


Jewel Fantasies Mixed Media Canvas Project

Wednesday, April 11, 2012

Wordless Wednesday- Playful Pocket Card-Boy


Thanks for joining me. Until next time...

Crafty hugs,

Lisa
Stampin' Queen Creations

Give The Queen A Call!!!

Tuesday, April 10, 2012

An Unforgettable Wedding

Hi Everyone,

Today I thought I would share an altered book project of my parents wedding. There are tons of altered book ideas out on the internet and some of them are very difficult, but I assure you this is a very simple version of one. So, you don't need to be an expert to create this project. All you need is an old book, some good glue, pictures, and some beautiful papers and embellishments.

If you decide to re-create this project I hope you have as much fun making yours as I did when I designed this one. Get you supplies together and lets make an altered book!

Thanks for joining me. Until next time...

Crafty hugs,

Lisa
Stampin' Queen Creations

Give The Queen A Call!!!


An Unforgettable Wedding

SUPPLIES

Old book
Pattern paper by K & CompanyÒ
Butter cream card stock
Mat board
3D Tags by K & CompanyÒ
Metal charms by Karen Foster DesignsÒ
Soft Spoken EmbellishmentsÔ by Me & My Big IdeasÒ
ArchitextureÔ Stone Frame by E.K. SuccessÒ
Expressions Word Charms by All My MemoriesÒ
Delta CeramcoatÒ Acrylic Paint- AC Flesh
JacquardÒ Lumiere Paint- Metallic Bronze
FrescoÔ Chalk Finish inkpads- Medici Marble, Golden Parchment, Olive Grove, Florentine Rose
VersacolorÔ Pigment inkpad- Ash Rose by TSUNKINEKOÒ
Assorted fibers
Gold string
Beaded trim
Beaded string
Piece of gold netting
Fabric bag filled with rice
Small Glass bottle filled with dried flowers
Perfect Paper AdhesiveÔ- Matte Finish by US ArtquestÒ
Super TapeÔ by Therm O WebÒ
Glue gun
Computer font used- Amazone BT
Rubber stamp- Sprig Engraving by Rubber StampedeÒ

INSTRUCTIONS

Step 1. On card stock type lettering using computer font Amazone BT. NOTE: Leave enough room between the lettering to make your tags. Cut mat board and card stock the size of a 1 ¾”H x 3 ¾”W tag. Adhere card stock to mat board with Super TapeÔ.   

Step 2. Using the Direct to Paper technique, apply Fresco inks to tags. Stamp sprig on tags with Ash Rose inkpad. Adhere metal charms to three of the tags with gold string. Add fibers to all six tags.

Step 3. Paint the cover with acrylic paint. Adhere pages together with Perfect Paper AdhesiveÔ. When dry, paint page edges with Lumiere paint. Adhere pattern paper to the book’s front cover and the book’s center (which is now your focal point).

Step 4. With an exacto knife, make three slits on each side of the book to separate the pages and gently slide tags into place. Glue tags to pages with Perfect Paper AdhesiveÔ.

Step 5. Adhere the picture frames, word tags, charms, and other items to book with Super TapeÔ 
(see picture for placement). Adhere beaded trim and metal charm corners with Super TapeÔ.