Showing posts with label Connie Crystal. Show all posts

Monday, November 18, 2013

Animal Print Headband with Connie Crystal

Hi Everyone,

I absolutely love the versatility that I have with Connie Crystal products!  You can take these gorgeous crystals and beads and add them to just about anything you can think of to add that extra bling to your projects!

For this project, I decided to create a headband that will bring some animal charisma to your look with the leopard print ribbon and of course some Connie Crystal bling!  With the Fall season upon us and the luscious colors that come along with the season, this headband would be great in anyone's wardrobe.  And by adding some Velcro to the headband, you can easily switch the bow out with another embellishment for a whole different look.

Thank you for joining me.  Until next time...
 
Crafty hugs,
 
Lisa
&


Animal Print Headband
 
Materials
 
Crimp Bead
Jump Ring
Headband- Orange
Animal Print Ribbon
Jewelry Wire
 
Instructions
 
Gather all of your supplies.
 
Cut jewelry wire 6" long.  String mini gold beads onto
the wire.  Add a jump ring to the tear drop crystal and
add to the beaded wire.

Pull beaded wire through the sea glass bead and secure
in place with a crimp bead.  Cut off excess wire.
Adhere the beaded wire to the bow with Quick Grip glue.
Attach a Velcro oval to the back of the bow and also to
the headband.  That's it you're done!


Friday, October 25, 2013

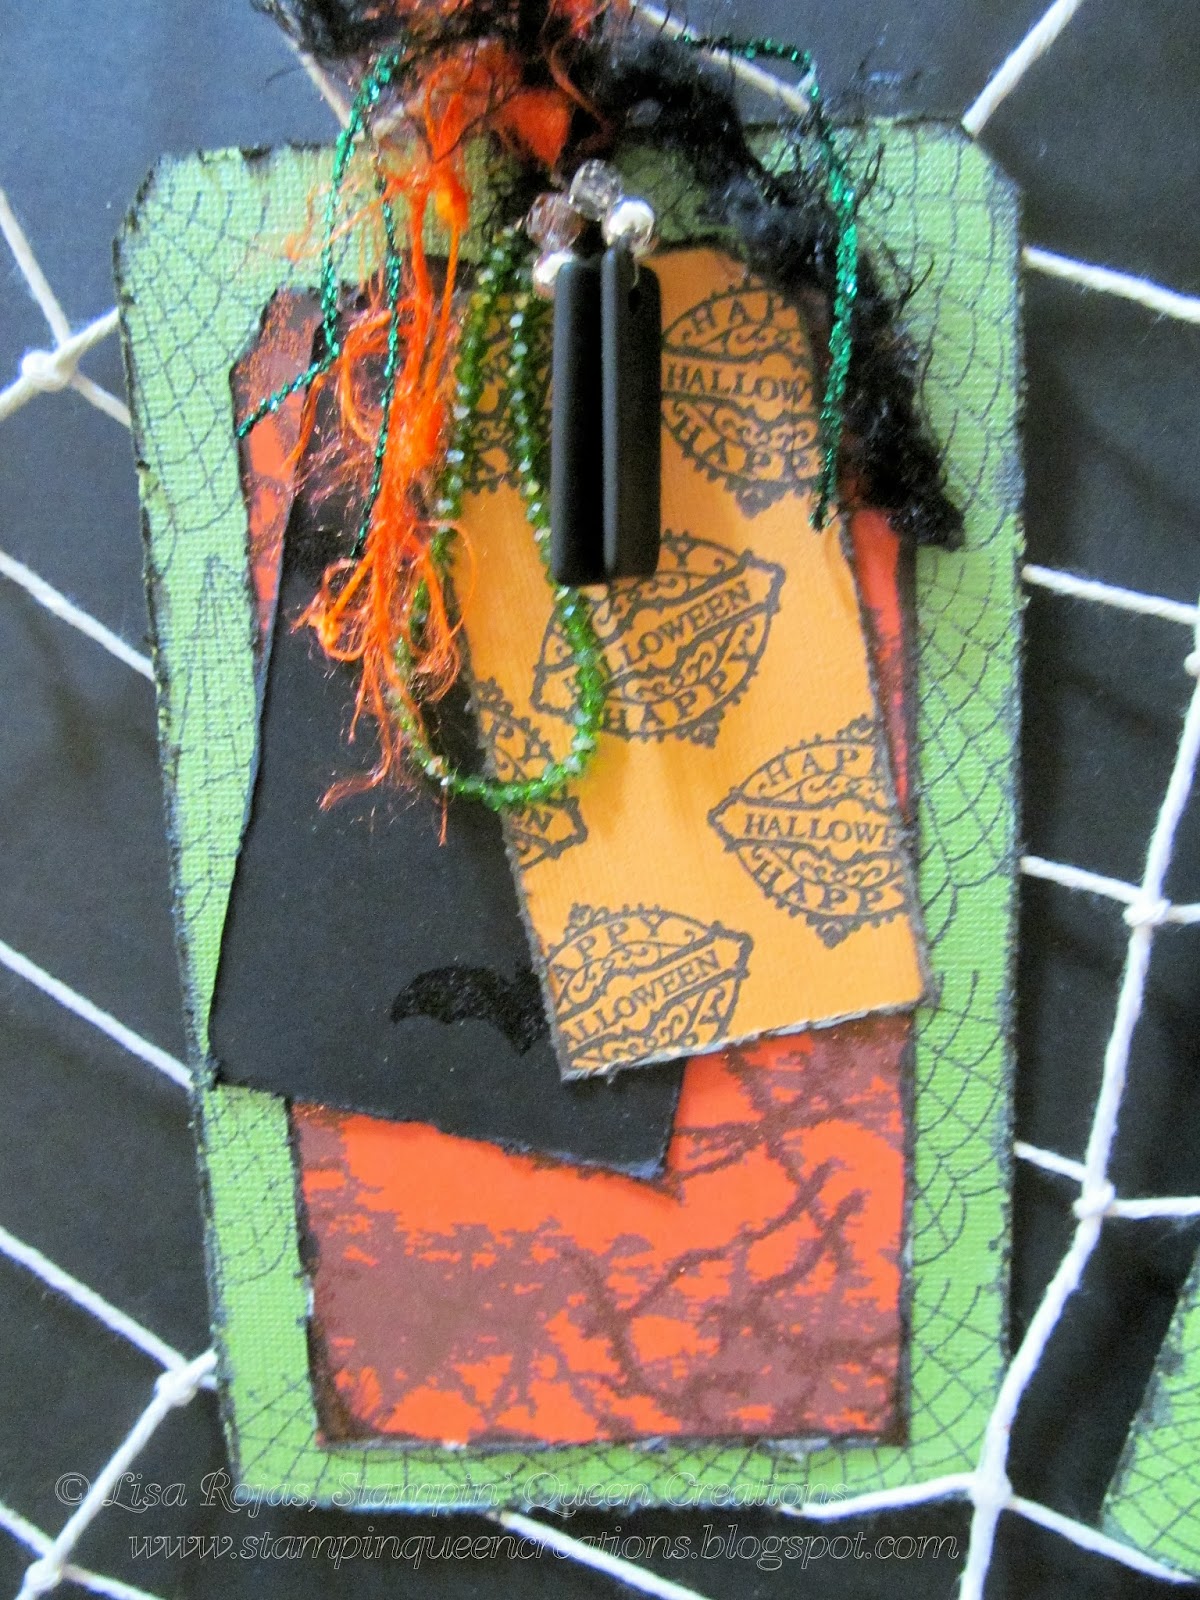
Halloween Tags with Connie Crystal

Hi Everyone,

For this project I will be highlighting two companies, Connie Crystal and Robin's Nest.  I wanted to show you that the beautiful bling from Connie Crystal can be used for more than just jewelry projects.

With Halloween right around the corner, I decided that I wanted to design some tags with these great Halloween themed pattern papers from Robin's Nest. They are easy to create and with Connie Crystal's bling added to them, they're just fabulous!!!

Thank you for joining me. Until next time...
 
Crafty hugs,
 
Lisa
Stampin' Queen Creations
&
 
Bella Crafts LLC
 

Halloween Tags
 
Materials
 
Cardboard- Green & Orange
Various Fibers
Fishing Line
Tim Holtz Paper Distresser
 
Instructions
Gather all f your supplies.  The tag sizes are as follows:
4 1/4"W x 7"H, 3 1/4"W x 6"H, 2 1/2"W x 4 1/4"H and
2"W x 3 3/4"H.  Cut 2 large tags from green cardstock,
cut 2 medium tags from pattern paper, cut 2 small tags
from black pattern paper and 2 extra small tags from
orange cardstock.
Stamp green tags and orange tags with wicked black
inkpad.
Ink edges of all tags and distress tags with tool.

Adhere all tags together with Zip Dry.
Add sea beads and micro beads to fishing line.  Attach
all the beads and fibers to each tag.


Tuesday, October 22, 2013

Adorable Headband & Bracelet

Hi Everyone,

Ever since my daughter gave birth to my beautiful grandbaby my creative spirit has been focused on everything baby!  I've created frames, clothing, etc. all relating to babies and children.  This project is a perfect example of my mind set. 

When I first saw these beautiful pink beads, my first creative thought was that these would make a great project for a baby or child.  I could just picture my little granddaughter wearing this headband and bracelet.  She would look so adorable!  I can't wait to give them to her!

Thank you for joining me. Until next time...
 
Crafty hugs,
 
Lisa
&
 

© Lisa Rojas, Stampin’ Queen Creations

      www.stampinqueencreations.blogspot.com

For a complete material list and
instructions for this project please
visit Connie Crystal Blog at
www.sparklebycc.com
 

Monday, September 9, 2013

An Invitation to Love


Hi Everyone,

When my daughter got married 5 years ago I designed and created everything for her wedding from the invitations to the table decorations and everything in between!  It was such a huge labor of love, but I wouldn't have changed it for anything! It was a wonderful bonding experience for my daughter and me.  With that being said, I'm really happy I only have one daughter!

Now, my son is getting married in a few short weeks and this time around was completely different.  My future daughter-in-law and her mom have been doing a terrific job of putting the wedding together and my role has been limited to the invitations.

My daughter-in-law bought these invitations from the store and although I thought they were pretty, being the designer that I am, I just couldn't stop at pretty, I wanted fabulous!  And by adding some great bling with Connie Crystal products, fabulous is just what I achieved!

Just A Note~ Be sure to head over to our Connie Crystal Facebook Page and give us a "like".  We'll be doing a big give away when we reach 1,000 "likes" so you don't want to miss that!!!  https://www.facebook.com/ConnieCrystal

Thank you for joining me.  Until next time...
 
Crafty hugs,
 
Lisa
Stampin' Queen Creations
&
Bella Crafts LLC


© Lisa Rojas, Stampin’ Queen Creations
      www.stampinqueencreations.blogspot.com
 
For a complete material list and instructions
Please visit the Connie Crystal Blog at~
 

Monday, September 2, 2013

Beautiful Hair Bow with Connie Crystal

Hi Everyone,

I have made no secret of the fact that I love bling!  For me, there is nothing better than taking a plain looking item and adding some bling!  And Connie Crystal has the best bling on the market!

For this project, I took a very plain looking hair bow, and with a needle and some thread, I transformed this hair bow into something you can wear on a wonderful night out with your special someone.

It's a very fast and easy project but the results are so pretty.  This project would be great for a little girl too.  With my son getting married in a month, I just found the solution for the flower girl's hair.  They're going to have their hair bows totally blinged out!!!

For full instructions and material list, please visit the Connie Crystal blog at
www.wegotcrystal.com

Thank you for joining me.  Until next time...
 
Crafty hugs,
 
Lisa
&


© Lisa Rojas, Stampin’ Queen Creations

Thursday, August 8, 2013

Down by the Sea Bracelet

Hi Everyone,

Wow! Things sure have been a little crazy around here!  I got home from our beach vacation and then jumped right in with preparations for the CHA Summer Show is Las Vegas!  I'll share more with you on the show in another post coming soon.

For now, I want to let you know about my newest project with Connie Crystal.  Since I wanted to keep the wonderful feelings alive that I always get from being at the beach, I created this funky beach bracelet.  Please head over to Connie Crystal's blog www.sparklebycc.com for full instructions and material list so you can recreate this bracelet for yourself or make one for your friends.

Stay tuned for more projects from some of Connie Crystal's new products that she featured at the CHA show.  There really is some very beautiful items that I can't wait to create with!

Thank you for joining me.  Until next time...
 
Crafty hugs,
 
Lisa
Stampin' Queen Creations
&
 
Connie Crystal- www.wegotcrystal.com  Retail site
www.conniecrystal.com   Wholesale site
 

Friday, June 28, 2013

Pink Beaded Necklace for Connie Crystal

Hi Everyone,

For my Connie Crystal post today, I was thinking I wanted to create a necklace that was very easy to create, but one that was beautiful to look at.  With any of the product from Connie Crystal, I knew I would have the beautiful part covered. 

 Each of Connie Crystal's beads and crystal are just gorgeous! But could I create a piece of jewelry that would be super easy for the beginner crafter?  Yes, I could and you can too!
For full instructions on creating this necklace, please visit the Connie Crystal Blog at www.sparklebycc.com.  You can find my post here- http://sparklebycc.com/pretty-in-pink-necklace/

Thanks for joining me.  Until next time...
Crafty hugs,
Lisa
&
Pink Beaded Necklace


Supplies

Silver Heart Shaped Bail- (1)
Black Satin Necklace Cord- (1)
Round Nose Pliers

Instructions

Gather all of your supplies.  Remove the end of
the clasp.  Save the clasp to re-attach later.

 Attach the silver bail to the crystal pendant
using the Dazzle Tac glue.  Let dry thoroughly.


String beads and crystals onto the black cord.
Use picture for placement.
 Once beads are to necklace cord, apply s small
amount of Dazzle Tac glue to the clasp.

 Use pliers to close the clasp onto the necklace
cord.  Re-attach the silver lobster claw.
Beautiful finished necklace!

Tuesday, May 21, 2013

Crystal Floral Necklace

Hi Everyone,

For my last two posts for Connie Crystal's blog, I used the beautiful white crystal sheets to design first a cuff bracelet and then I designed a set of earrings to match. I thought I would stop there, but I love these crystal sheets so much that I felt I needed to finished the jewelry set with a matching necklace.

I really hope that you head over to your local craft store and purchase some of these crystal sheets. There are so many fabulous things you could create with these sheets and you'll have so much fun working with it!

I just love this jewelry set so much that I plan on creating a few sets for some birthday gifts that I'll need in the very near future. Don't you have someone in your circle of friends and family that would love a gift like this? Boy, I know I do!!!

For a complete supply list and instructions for this project, please visit the Connie Crystal blog at www.sparklebycc.com. My post will be up tomorrow May 22nd. 

Thank you for joining me. Until next time...
Crafty hugs,
Lisa
&
Crystal Floral Necklace
 
The complete Crystal Floral Jewelry Set
If you missed my post on the cuff bracelet and earrings,
you can find them with the complete instructions on this
Connie Crystal Blog!
 

Monday, April 29, 2013

Crystal Floral Earrings for Connie Crystal

Hi Everyone,

Since I first received all of the product from Connie Crystal when I began working on their design team, I fell in love with the crystal sheets. My mind just exploded with all of the different ideas that I could do with these beautiful sheets. These earrings were just as easy to create as the bracelet. Since you can create them both in very little time, as I stated in my last post, think of all the color possibilities you'll have just by changing the color of the flowers!

For a full supply list and instructions for both of these projects, please visit the Connie Crystal blog at www.sparklebycc.com

Thank you for joining me. Until next time...
Crafty hugs,
Lisa
&

Crystal Floral Earrings


Crystal Floral Earrings & Cuff Bracelet

Wednesday, April 17, 2013

Crystal Floral Cuff Bracelet for Connie Crystal

Hi Everyone,

This beautiful crystal floral cuff bracelet is a project that I designed for Connie Crystal's blog. This cuff bracelet is so simple to create, you'll want to make a different one for each outfit in your closet!

For all of the materials used and instructions for this cuff bracelet, please visit the Connie Crystal blog at www.sparklebycc.com.

Thank you for joining me. Until next time...
Crafty hugs,
Lisa
&
Crystal Floral Cuff Bracelet

Thursday, March 28, 2013

Crystals & Flowers Wall Hanging

Hi Everyone,

For today's Connie Crystal post I was definitely in a Spring mood! For me, nothing says Spring more than pretty flowers. But nothing says a beautiful wall hanging more than pretty flowers with lots of beads & bling!!!

And that is just exactly what I used for this floral wall hanging. This is one of your home decor items that looks nice in your house and is also very simple to create. You can put this project together in about an hour and a half.

So, the next time you have an hour and a half and you're looking for something to do, I hope you'll gather up all of your Connie Crystal beads and crystals and start crafting!
For a complete supply list and instructions for this project, please visit the Connie Crystal Blog at www.sparklebycc.com

Thanks for joining me. Until next time...
Crafty hugs,
Lisa
Stampin' Queen Creations
&
Bella Crafts LLC

Wednesday, March 13, 2013

Connie Crystal Post- A Beaded Birdcage

Hi Everyone,

Birdcages are so popular right now. You can get them in all shapes and sizes. You can get them made from wire or you can make your own out of paper like I did. But whatever way you decide to go, a birdcage is just going to be a birdcage unless you add some bling!

Connie Crystal is the perfect place to get the bling that you need for all of your crafting projects! When I was first asked to be on their design team 6 months ago, I jumped at the chance to work with all of the beautiful crystal and beads that the company carries. With all of the different color choices and the different sizes you can get from the company, it really is your one stop shopping for all of the bling in your life!

Thank you for joining me. Until next time...
Crafty hugs,
Lisa
Stampin' Queen Creations
&
Bella Crafts Quarterly
A Beaded Birdcage
For complete instructions and a material list
please visit Connie Crystal's Blog at
Project will be posted on Thursday, March 14th

Friday, March 8, 2013

A Beautiful Birdcage

Hi Everyone!


I just love birdcages! They are so popular now and you can get them in a variety of styles and colors. When I first saw this birdcage in a craft store, my mind started seeing all of the different things I could do with it. I finally settled on something that’s a little more elegant with the beautiful crystals and lace that I added to it. What type of birdcage would you create?
 
If you would like to recreate this birdcage, you can find the complete material list and instructions in the Spring issue of Bella Crafts Quarterly at bellacraftsquarterly.com

Thank you for joining me. Until next time...
 
Crafty hugs,
 
Lisa
Stampin' Queen Creations
&
Bella Crafts Quarterly

© Lisa Rojas, Stampin’ Queen Creations


Monday, February 25, 2013

Spring Issue of Bella Crafts Quarterly!!!

Hi Everyone,

Spring is right around the corner and I'm happy to say that the new addition of Bella Crafts Quarterly is almost here also!  The next issue will be available for download on March 1st.  This issue is loaded with projects that will have you counting the days until Spring is here.

I found a wire birdcage at my local craft store and turned into a beautiful piece for your home with some floral embellishments and some lovely crystals from Connie Crystal.  I also created a few projects from my dear friend, Eileen Hull's new collections of dies called the Picket Fence Collection that Sizzix will be releasing in June.  Once you see these dies, you'll be counting the days till you can get to the craft store and buy some for yourself.  I know you will love them as much as I did when I saw them being previewed at the CHA show in January!

Of course we'll have lots of other wonderful projects for you to see and hopefully create some for yourself.  And on the business end of crafting, we have articles about beginning  scrapbooking, photography, and social media.  We will also have articles on the craft business from the industry's top designers sharing their expertize and knowledge with you.

The Spring issue is jam packed with lots of projects and articles all relating to the craft industry and you're not going to want to miss it.  Mark your calendars for this Friday, March 1st.  Bella Crafts Quarterly will be at a computer near you.
Don't miss it~ bellacraftsquarterly.com


Thank you for joining me. Until next time...
 
Crafty hugs,
 
Lisa
Stampin' Queen Creations
&
Bella Crafts Quarterly


Friday, November 2, 2012

Guest Blogger- Kristi Parker Van Doren!!!

Hi Everyone,

It's Guest Blogger Day here at Stampin' Queen Creations! What does that mean you ask? Well, it means that every Friday I will take off my crown and pass it on to a fabulous professional designer who's work I respect more than words can say. Today I pass my crown to my friend, professional designer, Kristi Parker Van Doren!!!

Kristi is a new friend of mine. She works on a few Design Teams and she is the head of the Design Team for Connie Crystal. A few months ago she asked me if I would like to join the Connie Crystal Design Team and I jumped at the chance. You all know how much I love bling! And Connie Crystal has nothing but bling!!!  Then we spoke a little while later when she decided to become a professional designer with CHA. I got her all signed up so now she can add that to her already impressive resume.

Kristi is an amazing designer and she is so great at what she does that she works on quite a few different Design Teams! Kristi has been involved with paper crafting for over thirty five years and has taught at her local rubber stamp and scrapbooking stores as well as special events. She is also a previous store owner! Kristi has demonstrated her talents for several companies at the CHA trade shows and she been published in various magazines through the years.

Kristi's project that I'm sharing with you today is just stunning! I am only going to give you a sneak peek of it because I really want you to head over to her blog to get the full instructions and to see the close up pictures of this project. The details on the project are absolutely fantastic!!!  For more information on Kristi's project, visit her blog at
http://www.kristiscreativecafe.blogspot.com/2012/10/spooky-with-happy-haunting-from-graphic.html. Scroll down just a little and you'll see it.

Kristi, thank you so much for allowing me to showcase your work on my blog. It means a lot to me and I appreciate it very much! I look forward to working with you more on the Connie Crystal Design Team and I can't wait to meet you at CHA in January!

Thank you for joining me. Until next time...
 
Crafty hugs,
 
Lisa
Stampin' Queen Creations
Bella Crafts Quarterly
 
Give The Queen A Call!!!