Showing posts with label Bella Crafts LLC. Show all posts

Tuesday, December 3, 2013

Simple Pleasures from Bella Crafts Quarterly

Hi Everyone,

 I'm sure that you have heard by now that Ann Butler, Carol Heppner, Theresa Cifali and I design and publish our FREE online magazine, Bella Crafts Quarterly and I am so excited to announce that the Winter issue Simple Pleasures is here!!!  Our newest issue is bigger and better than before! We have tons of projects ideas, articles on the craft industry to help you build your business, and so much more!

Bella Crafts Quarterly FREE Craft Magazine | @bellacraftsq
 
We had over 96,000 downloads with our Fall issue and we're looking to go over a 100,00 with this new issue.  We would love if you could spread the word to all of your friends and family.  Be sure to tell them that this issue, along with all of our other issues is completely FREE!  And when we say FREE we mean FREE!!!
 
Thank you so much for your continued support of
Bella Crafts Quarterly
 
We all appreciate it!!!
 
Happy Holidays,
 
Lisa
 
Ann, Carol & Theresa too!

Sunday, December 1, 2013

Bella Crafts Quarterly's "Simple Pleasures"

Hi Everyone,

 I'm sure that you have heard by now that Ann Butler, Carol Heppner, Theresa Cifali and I design and publish our FREE online magazine, Bella Crafts Quarterly and I am so excited to announce that the Winter issue Simple Pleasures is here!!!  Our newest issue is bigger and better than before! We have tons of projects ideas, articles on the craft industry to help you build your business, and so much more!

Bella Crafts Quarterly FREE Craft Magazine | @bellacraftsq
 
We had over 96,000 downloads with our Fall issue and we're looking to go over a 100,00 with this new issue.  We would love if you could spread the word to all of your friends and family.  Be sure to tell them that this issue, along with all of our other issues is completely FREE!  And when we say FREE we mean FREE!!!
 
Thank you so much for your continued support of
Bella Crafts Quarterly
 
We all appreciate it!!!
 
Happy Holidays,
 
Lisa
 
Ann, Carol & Theresa too!


Friday, November 22, 2013

Product Review- Multi-Mat from KellyCraft Innovations

Hi Everyone,

This is a recent product review I did on the new Multi-Mat from KellyCraft Innovations. Please let me know what YOU think about this great product!

Thank you for joining me.  Until next time...
 
Crafty hugs,
 
Lisa
Stampin' Queen Creations
&


It all started a year and a half ago.  I was at the CHA summer show in Chicago and found this fabulous new product tool from KellyCraft Innovations called the Get-it-Straight Laser Square™.  This new product makes layering your cards and scrapbook pages a breeze.  I am one of those crafters that can't draw a straight line with a ruler, so when I found the Get-it-Straight Laser Square I knew I was in love.  The more I worked with this tool, the more I loved it.  I never thought I would find a new tool that I had to have as much as the Laser Square...until now.

It's finally here.  The product that I have been waiting for over 6 months!!  The new Multi-Mat
from KellyCraftInnovations in the best new product on the market!

KellyCraft Innovations has just released a great companion for the Laser Square.  The Multi-Mat is a multi-purpose work surface that is designed to work hand-in-hand with the Laser Square.  It has a special cutout area that the Laser Square fits in perfectly that allows you to use the Laser Square without slipping.  The Multi-Mat is self healing and magnetic and provides you a safe surface for setting eyelets or using a piercing tool.  It comes with four small magnets that you can use to secure your project in place on the mat as you work.

These two products are a MUST HAVE for any crafter's tool kit and  I am so excited to be able to share this wonderful news with you.  The Get-it-Straight Laser Square has changed the way I design my projects.  It no longer takes me hours to finish my cards and scrapbook pages because I'm not spending that time trying to make sure everything aligns perfectly, so it frees up my time to add more details to my projects and get more projects created.  By adding the new Multi-Mat,  KellyCraftInnovations has designed the perfect products for any crafter's tool kit.  Be sure to add them to yours!  And for me...I have fallen in love all over again.  Thank you KellyCraft for making my life even better than before!!!


Wednesday, November 20, 2013

Merry Christmas Card

Hi Everyone,

With the holidays being right around the corner, I thought I would share a holiday card with you. I started out as a designer creating cards and I love it, especially now that I have the KellyCraft Laser Square in my tool box!

I did not create this card to be an easy mass production card where you can sit down and create 30 of them in one night. This card will take you a little bit longer to create but it's well worth the time you spend making it. This is the type of card that your recipient is going to want to save and cherish for a very long time. This type of card is my very favorite to create and I hope you'll love it too!

Thank you for joining me. Until next time...
 
Crafty hugs,
 
Lisa
Stampin' Queen Creations
&

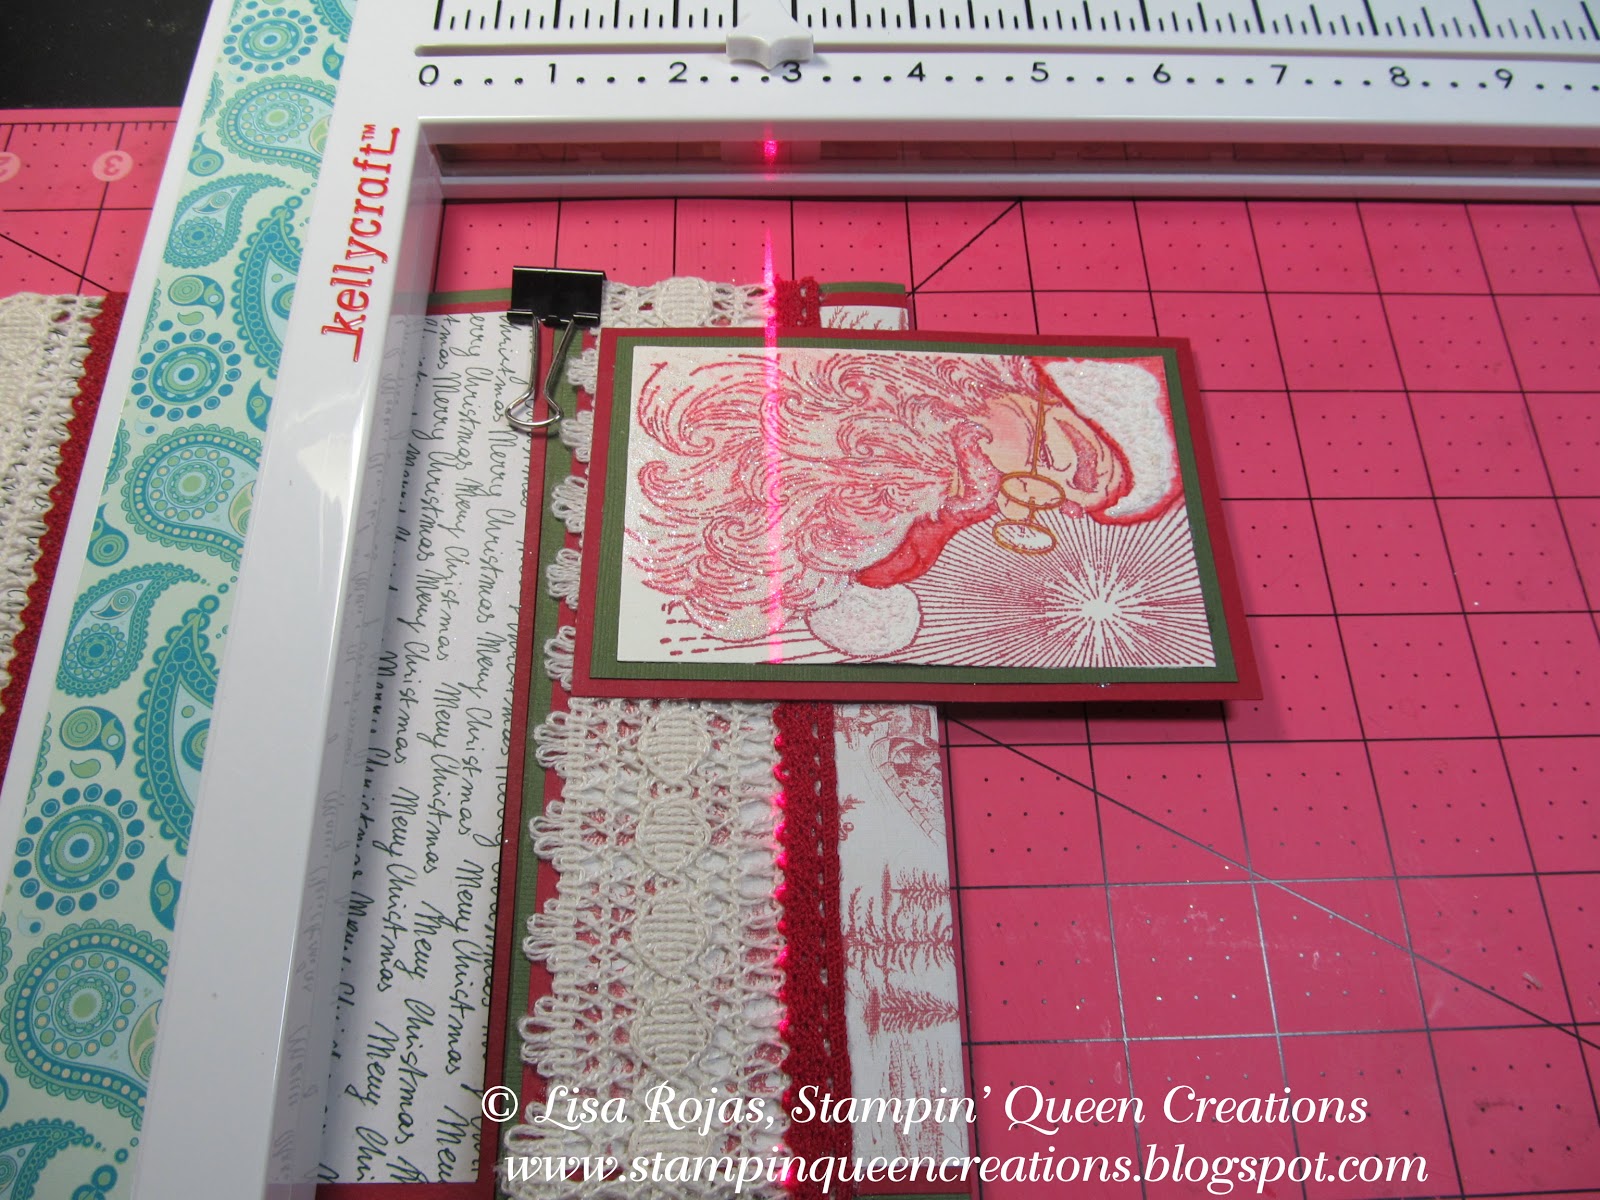
"Merry Christmas" Card
 
 
Supplies
 
Green, Burgundy & Cream Cardstock
Holiday Themed Pattern Paper
Me & My Big Ideas Holiday Stickers
Cream & Burgundy Trims
Beacon Adhesives Zip Dry Paper Glue
Foam Tape
Gamsol Mineral Spirits
Blending Stump
Clearsnap ColorBox Dye Inkpad- Red Devil
Clearsnap Smooch Top Coat- Moonlight
Marvy Uchida Snow Marker
Stampabilities Vintage Santa
Heat Tool
Scissor

Instructions


Using Red Devil inkpad, stamp santa on white cardstock,
trim with scissors
 
 
Color image with color pencils and blend colors with Gamsol
and blending stump. Apply Smooch to santa's beard. 
 
 
 Add Snow Marker
to hat and use heat tool to set. 
 
Tip: Did you know that you can use your
Get-it-Staight Laser Sqaure to score your cardstock?
 
Cut green cardstock 7"W x 11"H.
Use Get-it-Staight Laser Sqaure score at 5 1/2".
Fold card base at score line.
 
 
Cut cardstock- For card front cut burgundy cardstock
6 3/4"W x 5 1/4"H. Pattern paper 6 1/2"W x 5"H
For inside card cut burgundy cardstock 6 3/4"W x 5 1/4"H
Pattern paper 6 1/2"W x 5"H. For Santa cut burgundy
cardstock 3 1/4"W x 4 3/4"H. Green carstock
3"W x 4 1/2"H
 
 
Use Get-it-Straight Laser Square to layer all cardstock pieces
 
 
Fold card front in half


Cut burgundy cardstock 4 1/2"W x 3 1/2"H and green
cardstock 4 1/4"W x 3 1/4"H.
Use  Get-it-Straight Laser Square  to line up stickers


Adhere cardstock and pattern paper to inside of card
with Beacon Adhesives Zip Dry Paper Glue.
Use Get-it-Straight Laser Square to line up trims.
Adhere to inside card base.
 
 
Repeat last step to card front. Adhere santa image to
front of card.
 
 
Finsih card by applying the remainder of the
stickers with glue. For "Merry Christmas" piece,
adhere foam tape to back to give it some height.
 Use picture if needed for placement.


Wednesday, October 30, 2013

Autumn's All Around

Hi Everyone,

I completed this project for the KellyCraft Blog and I thought I would share it here with you!

I am back with another great project using the KellyCraft Get-it-Straight Laser Square. I know that I have said it before, but really, I love this product! This tool is what I call my all-in-one! I have been stamping for many years and I can't tell you how many times my project is almost finished and I stamp that last image only to have it not stamp completely on my paper. How frustrating! Well, with my Get-it-Straight Laser Square not only can I line my page elements up perfectly, I can also use it to re-stamp my incomplete images. I am so in love!

This project is a fairly simple to create and sunflowers for me, always remind me of Autumn. With the stamped sunflower and a few embellishments, you have a wonderful project that you can hang on the wall or sit it on your table. And for a beautiful table centerpiece, place your frame on a table next to a vase filled with sunflowers. Now that would be very, very pretty.

Thank you for joining me. Until next time...
 
Crafty hugs,
 
Lisa
Stampin' Queen Creations
&
Bella Crafts Quarterly
 
Give The Queen A Call!!!


Supplies

8" Square Canvas
Pattern Paper
Cardstock- Tan, Rust, Brown & Yellow
Lace & Trim
Straw Ribbon
Brown Ribbon
Acetate Words
Glue Gun
Micro Beads
Dove Blender Pen
Foam Tape

Instructions
Using the Get-it-Straight Laser Square line the pattern paper
and adhere it to the canvas


Stamp the sunflower on tan cardstock three times
and the butterfly twice.


Color the stamped images with Faber-Castell chalk pencils
and blend the colors with a blender pen


Add Zip Dry Paper Glue to the center of the top sunflower
and cover with micro beads. Pour excess beads back
into the container


Using a Cricut Personal Cutting Machine with the Fancy Frames
cartridge, cut out three frames with yellow, brown & rust
cardstock. Adhere the frames together. Add foam tape to the
back of the frames


Cut out all three sunflowers. Add foam tape between each
sunflower and adhere to the frames. Cut out both butterflies
and adhere them together at the butterfly's bodies, leaving
the wings free


Using the Get-it-Straight Laser Square, line up all of
your elements and adhere to the canvas.


After you have added all of your elements, adhere trim
around outer edge of the canvas with a glue gun.
Add brown bow and you're done!


Monday, October 28, 2013

Creepy Halloween Card

Hi Everyone,

Halloween is one of my favorite holidays! I love all the decorations, food, and all of those little ghouls & goblins ringing the doorbell and screaming "Trick or Treat!" Since my kids are grown now I don't get to take them around the neighborhood with their treat bags, but with my first grandbaby due in December, I'm sure going to take her next year!!!

As I was thinking about my project for this post I was thinking about making a treat bag for my soon- to-be grandbaby but since I can't take her out until next year, I decided to make this fabulous grown up Halloween card. My Get-it-Straight Laser Square made this card a breeze to make. I loved be able to put ribbon on my card and have it straight. I have never been able to do that before!

So, let's get started and I will show you once again why you really need this great tool in your studios!!!

Thank you for joining me. Until next time...
 
Crafty hugs,
 
Lisa
Stampin' Queen Creations
&


Supplies
Black Cardstock- 10"x10"
White Cardstock- Scraps
Green Glitter Paper- 2 3/4"H x 1 1/2"W,  3 1/4"H x 1 1/2"W, 3 3/4"H x 1 3/4"W & 6 1/2"H x 2"W
Pink Paislee Pattern Paper- 6"x6"
Pink Paislee Clear Stamp Set- Phantom                                                                       
Recollections Adhesive Rhinestones- Black
Recollections Glitter on a Roll Stickers
Recollections Glitter Ribbon
K & Company Halloween Stickers
Clearsnap Top Boss Watermark Inkpad
Black Tinsel Embossing Powder
Beacon Adhesives Zip Dry Paper Glue
Westcott Personal Paper Trimmer
Westcott 4"Titanium Scissors
Heat Tool

Instructions:

Gather your supplies


Fold black cardstock in half. Using Zip Dry Paper Glue adhere pattern paper to base card. 
 Line up ribbon on card with the Get-it-Straight Laser Square; and adhere to card.


Stamp images on white cardstock, emboss with black tinsel powder and heat set.
Cut images out and adhere them to the green glitter cardstock.

Layer stamped images on card base using the Get-it-Straight Laser Square.
Adhere the Fleur stickers along top and bottom on card.


Next, add black rhinestones and stickers. 


 That's it. You're done!!!
Created Easily with the Get-it-Straight Laser Square.

Friday, October 25, 2013

Halloween Tags with Connie Crystal

Hi Everyone,

For this project I will be highlighting two companies, Connie Crystal and Robin's Nest.  I wanted to show you that the beautiful bling from Connie Crystal can be used for more than just jewelry projects.

With Halloween right around the corner, I decided that I wanted to design some tags with these great Halloween themed pattern papers from Robin's Nest. They are easy to create and with Connie Crystal's bling added to them, they're just fabulous!!!

Thank you for joining me. Until next time...
 
Crafty hugs,
 
Lisa
Stampin' Queen Creations
&
 
Bella Crafts LLC
 

Halloween Tags
 
Materials
 
Cardboard- Green & Orange
Various Fibers
Fishing Line
Tim Holtz Paper Distresser
 
Instructions
Gather all f your supplies.  The tag sizes are as follows:
4 1/4"W x 7"H, 3 1/4"W x 6"H, 2 1/2"W x 4 1/4"H and
2"W x 3 3/4"H.  Cut 2 large tags from green cardstock,
cut 2 medium tags from pattern paper, cut 2 small tags
from black pattern paper and 2 extra small tags from
orange cardstock.
Stamp green tags and orange tags with wicked black
inkpad.
Ink edges of all tags and distress tags with tool.

Adhere all tags together with Zip Dry.
Add sea beads and micro beads to fishing line.  Attach
all the beads and fibers to each tag.


Tuesday, October 22, 2013

Adorable Headband & Bracelet

Hi Everyone,

Ever since my daughter gave birth to my beautiful grandbaby my creative spirit has been focused on everything baby!  I've created frames, clothing, etc. all relating to babies and children.  This project is a perfect example of my mind set. 

When I first saw these beautiful pink beads, my first creative thought was that these would make a great project for a baby or child.  I could just picture my little granddaughter wearing this headband and bracelet.  She would look so adorable!  I can't wait to give them to her!

Thank you for joining me. Until next time...
 
Crafty hugs,
 
Lisa
&
 

© Lisa Rojas, Stampin’ Queen Creations

      www.stampinqueencreations.blogspot.com

For a complete material list and
instructions for this project please
visit Connie Crystal Blog at
www.sparklebycc.com
 

Friday, October 4, 2013

Bella Crafts Quarterly Turns 1 Year Old!!!!


Hi Everyone,

I am so pleased to announce that our FREE online craft magazine, Bella Crafts Quarterly, is 1 year old!!!   We are so excited to be celebrating our birthday that we wanted to include all of you in our celebration!

We will be hosting a blog hop on October 16th.  We have 15 professional designers that will be creating very cool projects from our sponsoring companies.  We will also be hosting a contest with a fabulous gift package from Graphic 45!  Be sure to stay tuned for all of the upcoming details.

Thank you for joining me. Until next time...
 
Crafty hugs,
 
Lisa
Stampin' Queen Creations
&

Thursday, October 3, 2013

Happy Birthday Bella Cratfs Quarterly

Hi Everyone,


I am happy to announce that it was one year ago today that me and three of my creative friends  released the Premier Issue of Bella Crafts Quarterly.


 It was a Halloween Issue, which was FREE to download as all of our issues are.  If you have not checked it out yet no worries as each edition is always available on our web site.

We will be having a Birthday Celebration Blog Hop on October 16, 2013 with several of our creative friends so watch for details and be sure to join in to see what everyone is crafting!

Monday, July 1, 2013

How Do You Decompress?

Hi Everyone,

As a person living with chronic illness, I get asked this question a lot. Living with a chronic illness is a full-time job. On top of that, you have to include life and all that life brings to the table: a husband, kids, friends, family and also work. With all of those things going on in one's life, how do we decompress? What do we do in our lives that helps us from jumping off the edge of our house? Well, anyone who knows me well knows that my biggest stress reliever is the beach. I am lucky enough to have a husband who loves me and understands that after 55 hospitalizations and 20 surgeries over the last 25 years, I have to be able to decompress. If I didn’t, the result would be devastating for me and my family.

So, each year for the last twelve years, my husband has rented a beach house in June for me to stay. I have never quite been able to put into words what that beach house get-away means to me. The closest thing I can say about being there is that it rejuvenates my soul. Sitting on my beach chair, staring out at the water, enables me to put everything into perspective. I can take long looks at my life and be reminded of all the wonderful things that I have in my life. It reminds me that every day is a blessing. (And who doesn't need to be reminded of that from time to time?) I often say that I wish I could live there, to be able to have that feeling of contentment each day. What could be better? But, my husband reminds me that I would never get anything done. I would sit in my beach chair all day and ponder about having a great life instead of living one. I know he's right, but still… 

What I wanted to accomplish by sharing this story with you is to remind you that no matter what is going on in your life, you have to learn to decompress. You can achieve that goal in many different ways. Each person needs to figure out what works best for them.  Although I look forward to my beach trip every year, and being there does alleviate a lot of problems, I still have to deal with those everyday stresses too. For those times in-between my beach days, I do a few different things to help with the stress. I have to say that aside from the beach, rubber stamping and scrapbooking are my favorite! When I start to feel a little overwhelmed, I go into my studio, pull out supplies, and I either work on a project or I play. And in no time at all, I'm feeling better and more relaxed. So, the next time life seems to be too much, pull out those craft supplies and play. You'll be smelling the salty beach air in no time. I know I do! 

Thanks for joining me. Until next time…
 

Crafty hugs,
 
Lisa
Stampin’ Queen Creations
&

Friday, May 24, 2013

Colorful Floral Centerpiece

Hi Everyone,

I created this beautiful floral centerpiece for the Spring issue of Bella Crafts Quarterly.  I absolutely love color and this centerpiece has lots of it!

If you haven't seen our Bella Crafts Quarterly publication, I would love to have you check it out for yourself. It's a craft publication that is full of wonderful projects and articles about crafting and the craft industry. The best part of our magazine is that it's FREE! Your can either download it to your computer, iPad or other electronic device or you can view it online. Either way, it's free, free, FREE!!!

If you want more information about our magazine and/or you would like to learn how to create this colorful centerpiece, please visit our website at bellacraftsquarterly.com. You can also check out our Bella Blog at bellacraftsquarterly.com/bella-blog. Or when you visit our website you can simply click on the Bella Blog tab at the top of our page. The Bella Blog has additional information that is not in the magazine and you won't want to miss!

I would love to hear from you! Let me know what you think about our magazine. Our Summer issue will be out in less than two weeks on June 1st. It too, is full of summer projects and great new articles. My "Lessons with Lisa" column will share a brand new product from Clearsnap that has just recently hit the stores!

Thank you for joining me. Until next time...
 
Crafty hugs,
 
Lisa
Stampin' Queen Creations
&
Bella Crafts LLC


Colorful Floral Centerpiece