Showing posts with label Handmade Jewelry. Show all posts

Saturday, March 1, 2014

Bella’s Spring Issue is Here!


Hi Everyone,
I am so excited about the newest issue of Bella Crafts Quarterly!  This issue is full of craft projects and business articles about the craft industry.  In my column Lesson with Lisa, I share the history of Artist Trading Cards and how you can create you own.
As always, Bella Crafts Quarterly is available to view online or download to all of you devices like your computer, iPad, etc. and it’s always FREE! You may purchase a print version of the magazine from MagcloudBella Crafts does not profit in any way from the print version of the magazine.
I would love to hear what you think of our newest issue.  You can leave comments here for me or email me at info@bellacraftsquarterly.com.  So be sure to get this new issue for yourself and please tell your friends!

Thanks for joining me.  Until next time…
Crafty hugs,
Lisa
BCQ Spring 2014 Ad

Monday, November 18, 2013

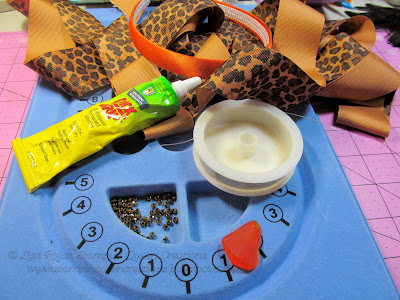
Animal Print Headband with Connie Crystal

Hi Everyone,

I absolutely love the versatility that I have with Connie Crystal products!  You can take these gorgeous crystals and beads and add them to just about anything you can think of to add that extra bling to your projects!

For this project, I decided to create a headband that will bring some animal charisma to your look with the leopard print ribbon and of course some Connie Crystal bling!  With the Fall season upon us and the luscious colors that come along with the season, this headband would be great in anyone's wardrobe.  And by adding some Velcro to the headband, you can easily switch the bow out with another embellishment for a whole different look.

Thank you for joining me.  Until next time...
 
Crafty hugs,
 
Lisa
&


Animal Print Headband
 
Materials
 
Crimp Bead
Jump Ring
Headband- Orange
Animal Print Ribbon
Jewelry Wire
 
Instructions
 
Gather all of your supplies.
 
Cut jewelry wire 6" long.  String mini gold beads onto
the wire.  Add a jump ring to the tear drop crystal and
add to the beaded wire.

Pull beaded wire through the sea glass bead and secure
in place with a crimp bead.  Cut off excess wire.
Adhere the beaded wire to the bow with Quick Grip glue.
Attach a Velcro oval to the back of the bow and also to
the headband.  That's it you're done!


Tuesday, October 22, 2013

Adorable Headband & Bracelet

Hi Everyone,

Ever since my daughter gave birth to my beautiful grandbaby my creative spirit has been focused on everything baby!  I've created frames, clothing, etc. all relating to babies and children.  This project is a perfect example of my mind set. 

When I first saw these beautiful pink beads, my first creative thought was that these would make a great project for a baby or child.  I could just picture my little granddaughter wearing this headband and bracelet.  She would look so adorable!  I can't wait to give them to her!

Thank you for joining me. Until next time...
 
Crafty hugs,
 
Lisa
&
 

© Lisa Rojas, Stampin’ Queen Creations

      www.stampinqueencreations.blogspot.com

For a complete material list and
instructions for this project please
visit Connie Crystal Blog at
www.sparklebycc.com
 

Monday, September 2, 2013

Beautiful Hair Bow with Connie Crystal

Hi Everyone,

I have made no secret of the fact that I love bling!  For me, there is nothing better than taking a plain looking item and adding some bling!  And Connie Crystal has the best bling on the market!

For this project, I took a very plain looking hair bow, and with a needle and some thread, I transformed this hair bow into something you can wear on a wonderful night out with your special someone.

It's a very fast and easy project but the results are so pretty.  This project would be great for a little girl too.  With my son getting married in a month, I just found the solution for the flower girl's hair.  They're going to have their hair bows totally blinged out!!!

For full instructions and material list, please visit the Connie Crystal blog at
www.wegotcrystal.com

Thank you for joining me.  Until next time...
 
Crafty hugs,
 
Lisa
&


© Lisa Rojas, Stampin’ Queen Creations

Thursday, August 8, 2013

Down by the Sea Bracelet

Hi Everyone,

Wow! Things sure have been a little crazy around here!  I got home from our beach vacation and then jumped right in with preparations for the CHA Summer Show is Las Vegas!  I'll share more with you on the show in another post coming soon.

For now, I want to let you know about my newest project with Connie Crystal.  Since I wanted to keep the wonderful feelings alive that I always get from being at the beach, I created this funky beach bracelet.  Please head over to Connie Crystal's blog www.sparklebycc.com for full instructions and material list so you can recreate this bracelet for yourself or make one for your friends.

Stay tuned for more projects from some of Connie Crystal's new products that she featured at the CHA show.  There really is some very beautiful items that I can't wait to create with!

Thank you for joining me.  Until next time...
 
Crafty hugs,
 
Lisa
Stampin' Queen Creations
&
 
Connie Crystal- www.wegotcrystal.com  Retail site
www.conniecrystal.com   Wholesale site
 

Friday, June 28, 2013

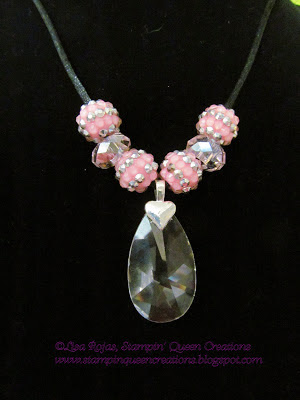
Pink Beaded Necklace for Connie Crystal

Hi Everyone,

For my Connie Crystal post today, I was thinking I wanted to create a necklace that was very easy to create, but one that was beautiful to look at.  With any of the product from Connie Crystal, I knew I would have the beautiful part covered. 

 Each of Connie Crystal's beads and crystal are just gorgeous! But could I create a piece of jewelry that would be super easy for the beginner crafter?  Yes, I could and you can too!
For full instructions on creating this necklace, please visit the Connie Crystal Blog at www.sparklebycc.com.  You can find my post here- http://sparklebycc.com/pretty-in-pink-necklace/

Thanks for joining me.  Until next time...
Crafty hugs,
Lisa
&
Pink Beaded Necklace


Supplies

Silver Heart Shaped Bail- (1)
Black Satin Necklace Cord- (1)
Round Nose Pliers

Instructions

Gather all of your supplies.  Remove the end of
the clasp.  Save the clasp to re-attach later.

 Attach the silver bail to the crystal pendant
using the Dazzle Tac glue.  Let dry thoroughly.


String beads and crystals onto the black cord.
Use picture for placement.
 Once beads are to necklace cord, apply s small
amount of Dazzle Tac glue to the clasp.

 Use pliers to close the clasp onto the necklace
cord.  Re-attach the silver lobster claw.
Beautiful finished necklace!

Tuesday, May 21, 2013

Crystal Floral Necklace

Hi Everyone,

For my last two posts for Connie Crystal's blog, I used the beautiful white crystal sheets to design first a cuff bracelet and then I designed a set of earrings to match. I thought I would stop there, but I love these crystal sheets so much that I felt I needed to finished the jewelry set with a matching necklace.

I really hope that you head over to your local craft store and purchase some of these crystal sheets. There are so many fabulous things you could create with these sheets and you'll have so much fun working with it!

I just love this jewelry set so much that I plan on creating a few sets for some birthday gifts that I'll need in the very near future. Don't you have someone in your circle of friends and family that would love a gift like this? Boy, I know I do!!!

For a complete supply list and instructions for this project, please visit the Connie Crystal blog at www.sparklebycc.com. My post will be up tomorrow May 22nd. 

Thank you for joining me. Until next time...
Crafty hugs,
Lisa
&
Crystal Floral Necklace
 
The complete Crystal Floral Jewelry Set
If you missed my post on the cuff bracelet and earrings,
you can find them with the complete instructions on this
Connie Crystal Blog!
 

Wednesday, April 17, 2013

Crystal Floral Cuff Bracelet for Connie Crystal

Hi Everyone,

This beautiful crystal floral cuff bracelet is a project that I designed for Connie Crystal's blog. This cuff bracelet is so simple to create, you'll want to make a different one for each outfit in your closet!

For all of the materials used and instructions for this cuff bracelet, please visit the Connie Crystal blog at www.sparklebycc.com.

Thank you for joining me. Until next time...
Crafty hugs,
Lisa
&
Crystal Floral Cuff Bracelet