Showing posts with label Crafts. Show all posts

Saturday, December 13, 2014

Ann Butler Designs & ETI Blog Hop


Hi Everyone!

Welcome to the Ann Butler Designs/ETI Blog Hop! Please visit each blog and leave a comment to be entered for the blog candy. YES, a comment on EACH blog gets you an entry for the BLOG CANDY shown below! Share the fun with your friends! We will Pick the winner on Saturday the 20th and announced on the Ann Butler Blog and ETI blog! Again, make sure and visit all the links and leave a comment. 
Happy Hopping!
Lisa 
Stampin' Queen Creations


Here is my project for the hop.
© Lisa Rojas, Stampin’ Queen Creations

Materials
Ann Butler's EZ-De's 1" Stamp Set- Rail Fence
Heart to Heart Stamp Set by Hot Off The Press
EnviroTex® Jewelry Resin
Ann Butler's Crafter's™  Ink by Clearsnap®- Limelight, Aquamarine
Cardstock- Aqua, Vanilla
Cardboard
Pattern Paper
Various Fibers
Metal Jewelry Frame
Metal Key
Metal Alphabet Charms
Key Ring
Zip Dry Paper Glueby Beacon Adhesives®

Tools
Westcott ® Personal Paper Cutter
Heat Tool
Round Nose Pliers 

Instructions


1.  For the card base, cut aqua cardstock  5 3/4"W x 11 1/4"H.  Score at 4" and 9".  Cut pattern paper 5 1/2"W x 3 3/4"H and adhere to bottom potion of the card base.  Cut another piece of pattern paper 5 1/2"W x 2"H and adhere to the top of the card base.


2.  Cut vanilla cardstock 5"W x 1 1/4"H.  Using the limelight inkpad, stamp the cardstock with striped stamp.  Cut vanilla cardstock 2"W x 1 1/4"H.  Stamp the word image with the limelight inkpad.  Cut 3 pieces of the vanilla cardstock 1 1/4"W x 1 1/4"H.  Stamp the images with the aquamarine inkpad.  Ink the edges of all of the cardstock papers.

3.  Cut a piece of aqua cardstock 1/4" larger than each of the stamped images.  Adhere the aqua cardstock to the stamped images with Zip Dry glue.  Next, adhere all of the stamped images to the card base.  Note: See picture for placement.

Instructions
For the Key Ring


1.  Cut the pattern paper and cardboard 3/4"W x 2 3/4"H and adhere together with Zip Dry glue.  Place the papers into the metal frame.  Adhere the metal charms to the papers with glue.


2.  Following the manufacturer's instructions for mixing the resin together.  Once the resin is mixed together, pour the resin into the jewelry frame until it's full.  Let the resin dry completely for a hard cure 48 hours.  For more information on EnviroTex® Jewelry Resin and other products, please visit their website at

© Lisa Rojas, Stampin’ Queen Creations


© Lisa Rojas, Stampin’ Queen Creations

Please visit these blogs for the hop!

      Lisa Rojas  (You are Here)
Vishu Reberholt


This is the fabulous prize package!


The giveaway includes:


EasyCast


Jewelry Resin


Mold


Resin Spray


2 colors


All 4 of the 1" Faux Quilting Stamp Sets


Wednesday, March 26, 2014

Easter Baskets for Sale!

Hi Everyone,


I am super excited to bring this post to you today! As crafters, most of us catch the crafting bug after being exposed  to it as children. For me, it was growing up watching my mom and grandma as they created beautiful hand sewn items and quilts. As a grown up myself, when my children were small I started off with sewing their Halloween costumes and then went on to do other crafts until I found my true love, rubber stamping.

Now I'm happy to share that my daughter Richelle, who grew up watching me craft, is carrying on the tradition! She is creating these fabulous, colorful Easter baskets and I'm delighted to show them off to all of my wonderful friends and followers.

Wouldn't your little one look so cute in these tutus!!!


The Tutu Easter baskets come with a removable, wearable tutu and 2 hair bows for $20.00 or a non-removable tutu for $15.00 plus shipping and handling. Shipping in the US only. The baskets can be made in your choice of colors and also sports team colors!!!

To order these cute baskets send an email to Richelle's email address 


Saturday, March 1, 2014

Bella’s Spring Issue is Here!


Hi Everyone,
I am so excited about the newest issue of Bella Crafts Quarterly!  This issue is full of craft projects and business articles about the craft industry.  In my column Lesson with Lisa, I share the history of Artist Trading Cards and how you can create you own.
As always, Bella Crafts Quarterly is available to view online or download to all of you devices like your computer, iPad, etc. and it’s always FREE! You may purchase a print version of the magazine from MagcloudBella Crafts does not profit in any way from the print version of the magazine.
I would love to hear what you think of our newest issue.  You can leave comments here for me or email me at info@bellacraftsquarterly.com.  So be sure to get this new issue for yourself and please tell your friends!

Thanks for joining me.  Until next time…
Crafty hugs,
Lisa
BCQ Spring 2014 Ad

Friday, June 28, 2013

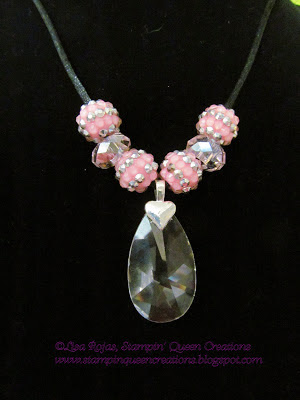
Pink Beaded Necklace for Connie Crystal

Hi Everyone,

For my Connie Crystal post today, I was thinking I wanted to create a necklace that was very easy to create, but one that was beautiful to look at.  With any of the product from Connie Crystal, I knew I would have the beautiful part covered. 

 Each of Connie Crystal's beads and crystal are just gorgeous! But could I create a piece of jewelry that would be super easy for the beginner crafter?  Yes, I could and you can too!
For full instructions on creating this necklace, please visit the Connie Crystal Blog at www.sparklebycc.com.  You can find my post here- http://sparklebycc.com/pretty-in-pink-necklace/

Thanks for joining me.  Until next time...
Crafty hugs,
Lisa
&
Pink Beaded Necklace


Supplies

Silver Heart Shaped Bail- (1)
Black Satin Necklace Cord- (1)
Round Nose Pliers

Instructions

Gather all of your supplies.  Remove the end of
the clasp.  Save the clasp to re-attach later.

 Attach the silver bail to the crystal pendant
using the Dazzle Tac glue.  Let dry thoroughly.


String beads and crystals onto the black cord.
Use picture for placement.
 Once beads are to necklace cord, apply s small
amount of Dazzle Tac glue to the clasp.

 Use pliers to close the clasp onto the necklace
cord.  Re-attach the silver lobster claw.
Beautiful finished necklace!

Friday, May 24, 2013

Colorful Floral Centerpiece

Hi Everyone,

I created this beautiful floral centerpiece for the Spring issue of Bella Crafts Quarterly.  I absolutely love color and this centerpiece has lots of it!

If you haven't seen our Bella Crafts Quarterly publication, I would love to have you check it out for yourself. It's a craft publication that is full of wonderful projects and articles about crafting and the craft industry. The best part of our magazine is that it's FREE! Your can either download it to your computer, iPad or other electronic device or you can view it online. Either way, it's free, free, FREE!!!

If you want more information about our magazine and/or you would like to learn how to create this colorful centerpiece, please visit our website at bellacraftsquarterly.com. You can also check out our Bella Blog at bellacraftsquarterly.com/bella-blog. Or when you visit our website you can simply click on the Bella Blog tab at the top of our page. The Bella Blog has additional information that is not in the magazine and you won't want to miss!

I would love to hear from you! Let me know what you think about our magazine. Our Summer issue will be out in less than two weeks on June 1st. It too, is full of summer projects and great new articles. My "Lessons with Lisa" column will share a brand new product from Clearsnap that has just recently hit the stores!

Thank you for joining me. Until next time...
 
Crafty hugs,
 
Lisa
Stampin' Queen Creations
&
Bella Crafts LLC


Colorful Floral Centerpiece
 

Monday, April 29, 2013

Crystal Floral Earrings for Connie Crystal

Hi Everyone,

Since I first received all of the product from Connie Crystal when I began working on their design team, I fell in love with the crystal sheets. My mind just exploded with all of the different ideas that I could do with these beautiful sheets. These earrings were just as easy to create as the bracelet. Since you can create them both in very little time, as I stated in my last post, think of all the color possibilities you'll have just by changing the color of the flowers!

For a full supply list and instructions for both of these projects, please visit the Connie Crystal blog at www.sparklebycc.com

Thank you for joining me. Until next time...
Crafty hugs,
Lisa
&

Crystal Floral Earrings


Crystal Floral Earrings & Cuff Bracelet

Friday, April 19, 2013

Love is the Master Key Card

Hi Everyone,

This is a card that I created for another design team that I'm on for KellyCraft Innovation's Get-it-Straight Laser Square. I have been talking and promoting this fabulous product since I first saw it at the CHA summer show in 2012.

I love creating cards that are somehow different from the normal. I love cards that fold different, are shaped different, or maybe a card that moves, or shakes...you get the idea. 
Every month on the KellyCraft blog, I'll teach you how to create different types of cards, but always made with my favorite tool, the Get-it-Straight Laser Square!

If you would like to get the material list and full instructions for each card that I create every month using this great tool, please visit the KellyCraft blog at www.kellycraftblog.blogspot.com.

Thank you for joining me.  Until next time...
 
Crafty hugs,
 
Lisa
Stampin' Queen Creations
&


Love is the Master Key Card

Thursday, March 28, 2013

Crystals & Flowers Wall Hanging

Hi Everyone,

For today's Connie Crystal post I was definitely in a Spring mood! For me, nothing says Spring more than pretty flowers. But nothing says a beautiful wall hanging more than pretty flowers with lots of beads & bling!!!

And that is just exactly what I used for this floral wall hanging. This is one of your home decor items that looks nice in your house and is also very simple to create. You can put this project together in about an hour and a half.

So, the next time you have an hour and a half and you're looking for something to do, I hope you'll gather up all of your Connie Crystal beads and crystals and start crafting!
For a complete supply list and instructions for this project, please visit the Connie Crystal Blog at www.sparklebycc.com

Thanks for joining me. Until next time...
Crafty hugs,
Lisa
Stampin' Queen Creations
&
Bella Crafts LLC

Saturday, March 16, 2013

Floral Memo Board


 Hi Everyone,
 
I am so excited to share this new design with you. This project was created with a new set of dies designed by my friend, Eileen Hull, for Sizzix. Her new collection is called Picket Fence and this project features her "Box Window & Clay Pot" dies. The dies will be available for purchase in June 2013.
Bella Crafts Quarterly Spring Edition | @bellacraftsquarterlyI used the dies in a different way to create this memo board. I used the window box to hold Post-it notes, created a couple of pens that I placed in the flower pot. The project is in the current Spring issue of my magazine, Bella Crafts Quarterly. You can get a complete material list and instructions by going to our website at bellacraftsquarterly.com. The magazine is always a FREE download and you can view it for free by visiting the website. You will love the magazine from the moment you see it!
 
Thank you for joining me. Until next time...
 
Crafty hugs,
 
Lisa
Stampin' Queen Creations
&
Bella Crafts Quarterly


© Lisa Rojas, Stampin’ Queen Creations


Friday, March 8, 2013

A Beautiful Birdcage

Hi Everyone!


I just love birdcages! They are so popular now and you can get them in a variety of styles and colors. When I first saw this birdcage in a craft store, my mind started seeing all of the different things I could do with it. I finally settled on something that’s a little more elegant with the beautiful crystals and lace that I added to it. What type of birdcage would you create?
 
If you would like to recreate this birdcage, you can find the complete material list and instructions in the Spring issue of Bella Crafts Quarterly at bellacraftsquarterly.com

Thank you for joining me. Until next time...
 
Crafty hugs,
 
Lisa
Stampin' Queen Creations
&
Bella Crafts Quarterly

© Lisa Rojas, Stampin’ Queen Creations


Friday, March 1, 2013

Oh Boy! Baby Outfit

Hi Everyone,

If you're looking for a fun & easy gift for a friend's baby shower or to welcome a new baby boy, I have the project for you!

I purchased this outfit at my local Target store, added a few stamped images and some buttons and I was done. I just love projects that I can create in just a short amount of time! Wouldn't this little outfit make a great gift for that little boy in your life?

Stay tuned to next week and I'll share with you a birthday scrapbook album that is perfect for a little guys first birthday! I'll also share a sweet outfit for a little girl that didn't take hardly any time to make.

SSA APRIL 2013And speaking of baby outfits, don't forget to check out the newest issue of Scrap & Stamp Arts magazine. On page 25 you'll find my Pirate Princess Baby Outfit that I designed. I guess with my new granddaughter, I have babies on the brain!!!

Thank you for joining me. Until next time...
 
Crafty hugs,
 
Lisa
Stampin' Queen Creations
&
Bella Crafts Quarterly


Oh Boy! Baby Outfit

 
Designer Note~For All Fabric Stamped Projects: Before stamping any outfit, be sure to wash the outfit first without fabric softener. After stamping, heat set outfit with an iron or the dryer. Wash outfit by turning it inside-out on a gentle cycle. 
Materials
Ÿ  3 piece baby outfit
Ÿ  Mica Magic Pigment InkÔ- Baby Blue by Clearsnap Inc.Ã’
Ÿ  Hand buttons- Blue by Blumenthal Lansing Co.Ã’
Ÿ   Needle & Thread
Ÿ  Rubber Stamps- Baby Boy and Handprints by Fiskars Brand Inc.Ã’
                           “Oh Boy” by Limited EditionÃ’
Instructions 
Step 1. Using Baby Blue inkpad, stamp “Oh Boy” three times on the bottom of the shirt and once on each leg. 
Step 2. Stamp “Baby Boy” randomly on hat with blue inkpad. Stamp handprints along the edge of hat. 
Step 3. With needle and thread, sew buttons on front center of hat. Place outfit in dryer for 15 to 20 minutes to heat set ink.

Wednesday, February 27, 2013

"Take Time to Enjoy Life" Card

Wordless Wednesday's are the days that I post just a project without instructions or a supply list.
 
Hi Everyone,
 
For today's Wordless Wednesday's post, I thought I woud share a very simple card that took no longer than 1/2 hour to make. The hardest part to this card (if you could call it that!) was the eyelets. That's it! Super easy but super cute!

 
Thank you for joining me. Until next time...
 
Crafty hugs,
 
Lisa
Stampin' Queen Creations
&
Bella Crafts Quarterly


Monday, February 25, 2013

Spring Issue of Bella Crafts Quarterly!!!

Hi Everyone,

Spring is right around the corner and I'm happy to say that the new addition of Bella Crafts Quarterly is almost here also!  The next issue will be available for download on March 1st.  This issue is loaded with projects that will have you counting the days until Spring is here.

I found a wire birdcage at my local craft store and turned into a beautiful piece for your home with some floral embellishments and some lovely crystals from Connie Crystal.  I also created a few projects from my dear friend, Eileen Hull's new collections of dies called the Picket Fence Collection that Sizzix will be releasing in June.  Once you see these dies, you'll be counting the days till you can get to the craft store and buy some for yourself.  I know you will love them as much as I did when I saw them being previewed at the CHA show in January!

Of course we'll have lots of other wonderful projects for you to see and hopefully create some for yourself.  And on the business end of crafting, we have articles about beginning  scrapbooking, photography, and social media.  We will also have articles on the craft business from the industry's top designers sharing their expertize and knowledge with you.

The Spring issue is jam packed with lots of projects and articles all relating to the craft industry and you're not going to want to miss it.  Mark your calendars for this Friday, March 1st.  Bella Crafts Quarterly will be at a computer near you.
Don't miss it~ bellacraftsquarterly.com


Thank you for joining me. Until next time...
 
Crafty hugs,
 
Lisa
Stampin' Queen Creations
&
Bella Crafts Quarterly


Monday, February 11, 2013

Cupid's Vase

Hi Everyone,

I thought with Valentine's Day being right around the corner, I'd share a couple of projects this week that I designed for the latest issue of my online digital magazine, Bella Crafts Quarterly. To see more projects for the upcoming holiday created by myself and my talented business partners, Ann Butler, Carol Heppner and Theresa Cifali, please check out the Valentine's issue at bellacraftsquarterly.com. It is a FREE online magazine that you can view online, download to your computer, or for a small printing fee, you can get a printed copy through Magcloud at www.magcloud.com.

In case your significant other buys you a beautiful bouquet, you don't want to put it in any old vase. You want to put them in something as pretty as the flowers themselves. Not only is this vase pretty, it's also very simple to create. I hope you decide to create one for yourself or a friend!

Thank you for joining me. Until next time...
 
Crafty hugs,
 
Lisa
Stampin' Queen Creations
&
Bella Crafts Quarterly
 
Give The Queen A Call!!!


For full instructions and material list, please visit
Bella Crafts Quarterly Magazine at