Monday, November 25, 2013

Tis the Season Card

Hi Everyone,

The holidays are right around the corner (geez, did I just say that?) and we all need to get ready to create our holiday cards.  I will be sharing two different cards, this one and another for December.  When you're creating cards for the holidays you want them to be simple but pretty!  Of course with the Get-it-Straight Laser Square you'll have the simple part down!  And with your creativity if you choose to design your own, or even if you recreate this one, you'll definitely have the pretty!

Thank you for joining me.  Until next time...
 
Crafty hugs,
 
Lisa
Stampin' Queen Creations
&

'Tis the Season Card
Finished Size- 4 3/4"W x 7"H

Materials

Cardstock- Dark Green, Burgundy & Off-White
Holiday Pattern Paper
Holiday Themed Stickers
Pearl Stickers
Ribbon- Green
Ribbon Thread- Gold
Blending Stump
Holly Rubber Stamp

Instructions

Gather all of your supplies.  Cut papers as follows-
Dark Green- 4 3/4"W x 7"H, Burgundy- 3 3/4"W x 5 1/2"H
Off White- 3 1/4"W x 3 1/2"H and Pattern Paper
4 1/4"W x 2 1/2"H.


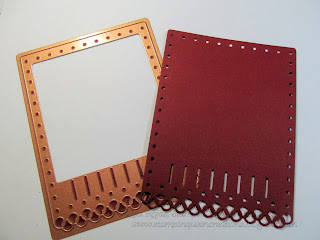
Run burgundy cardstock through the
Grand Calibur machine with die cut.

Stamp holly on off white cardstock.  Color with color
pencils.  Blend colors with Gamsol solution and a stump.

Run ribbon through bottom of card.  Attach gold thread ribbon to cardstock with needle.
Ink edges of papers.
Adhere stamped cardstock to
burgundy cardstock with Zip Dry.

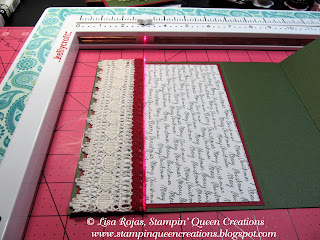
to align papers

and adhere papers together with Zip Dry glue.

Align pearls to the top of the card with the
Adhere sticker to the bottom of the card.




Friday, November 22, 2013

Product Review- Multi-Mat from KellyCraft Innovations

Hi Everyone,

This is a recent product review I did on the new Multi-Mat from KellyCraft Innovations. Please let me know what YOU think about this great product!

Thank you for joining me.  Until next time...
 
Crafty hugs,
 
Lisa
Stampin' Queen Creations
&


It all started a year and a half ago.  I was at the CHA summer show in Chicago and found this fabulous new product tool from KellyCraft Innovations called the Get-it-Straight Laser Square™.  This new product makes layering your cards and scrapbook pages a breeze.  I am one of those crafters that can't draw a straight line with a ruler, so when I found the Get-it-Straight Laser Square I knew I was in love.  The more I worked with this tool, the more I loved it.  I never thought I would find a new tool that I had to have as much as the Laser Square...until now.

It's finally here.  The product that I have been waiting for over 6 months!!  The new Multi-Mat
from KellyCraftInnovations in the best new product on the market!

KellyCraft Innovations has just released a great companion for the Laser Square.  The Multi-Mat is a multi-purpose work surface that is designed to work hand-in-hand with the Laser Square.  It has a special cutout area that the Laser Square fits in perfectly that allows you to use the Laser Square without slipping.  The Multi-Mat is self healing and magnetic and provides you a safe surface for setting eyelets or using a piercing tool.  It comes with four small magnets that you can use to secure your project in place on the mat as you work.

These two products are a MUST HAVE for any crafter's tool kit and  I am so excited to be able to share this wonderful news with you.  The Get-it-Straight Laser Square has changed the way I design my projects.  It no longer takes me hours to finish my cards and scrapbook pages because I'm not spending that time trying to make sure everything aligns perfectly, so it frees up my time to add more details to my projects and get more projects created.  By adding the new Multi-Mat,  KellyCraftInnovations has designed the perfect products for any crafter's tool kit.  Be sure to add them to yours!  And for me...I have fallen in love all over again.  Thank you KellyCraft for making my life even better than before!!!


Wednesday, November 20, 2013

Merry Christmas Card

Hi Everyone,

With the holidays being right around the corner, I thought I would share a holiday card with you. I started out as a designer creating cards and I love it, especially now that I have the KellyCraft Laser Square in my tool box!

I did not create this card to be an easy mass production card where you can sit down and create 30 of them in one night. This card will take you a little bit longer to create but it's well worth the time you spend making it. This is the type of card that your recipient is going to want to save and cherish for a very long time. This type of card is my very favorite to create and I hope you'll love it too!

Thank you for joining me. Until next time...
 
Crafty hugs,
 
Lisa
Stampin' Queen Creations
&

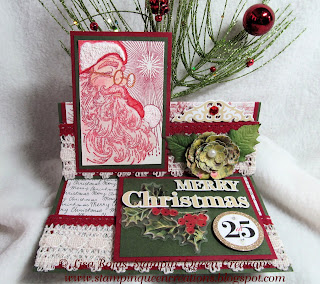
"Merry Christmas" Card
 
 
Supplies
 
Green, Burgundy & Cream Cardstock
Holiday Themed Pattern Paper
Me & My Big Ideas Holiday Stickers
Cream & Burgundy Trims
Beacon Adhesives Zip Dry Paper Glue
Foam Tape
Gamsol Mineral Spirits
Blending Stump
Clearsnap ColorBox Dye Inkpad- Red Devil
Clearsnap Smooch Top Coat- Moonlight
Marvy Uchida Snow Marker
Stampabilities Vintage Santa
Heat Tool
Scissor

Instructions


Using Red Devil inkpad, stamp santa on white cardstock,
trim with scissors
 
 
Color image with color pencils and blend colors with Gamsol
and blending stump. Apply Smooch to santa's beard. 
 
 
 Add Snow Marker
to hat and use heat tool to set. 
 
Tip: Did you know that you can use your
Get-it-Staight Laser Sqaure to score your cardstock?
 
Cut green cardstock 7"W x 11"H.
Use Get-it-Staight Laser Sqaure score at 5 1/2".
Fold card base at score line.
 
 
Cut cardstock- For card front cut burgundy cardstock
6 3/4"W x 5 1/4"H. Pattern paper 6 1/2"W x 5"H
For inside card cut burgundy cardstock 6 3/4"W x 5 1/4"H
Pattern paper 6 1/2"W x 5"H. For Santa cut burgundy
cardstock 3 1/4"W x 4 3/4"H. Green carstock
3"W x 4 1/2"H
 
 
Use Get-it-Straight Laser Square to layer all cardstock pieces
 
 
Fold card front in half


Cut burgundy cardstock 4 1/2"W x 3 1/2"H and green
cardstock 4 1/4"W x 3 1/4"H.
Use  Get-it-Straight Laser Square  to line up stickers


Adhere cardstock and pattern paper to inside of card
with Beacon Adhesives Zip Dry Paper Glue.
Use Get-it-Straight Laser Square to line up trims.
Adhere to inside card base.
 
 
Repeat last step to card front. Adhere santa image to
front of card.
 
 
Finsih card by applying the remainder of the
stickers with glue. For "Merry Christmas" piece,
adhere foam tape to back to give it some height.
 Use picture if needed for placement.


Monday, November 18, 2013

Animal Print Headband with Connie Crystal

Hi Everyone,

I absolutely love the versatility that I have with Connie Crystal products!  You can take these gorgeous crystals and beads and add them to just about anything you can think of to add that extra bling to your projects!

For this project, I decided to create a headband that will bring some animal charisma to your look with the leopard print ribbon and of course some Connie Crystal bling!  With the Fall season upon us and the luscious colors that come along with the season, this headband would be great in anyone's wardrobe.  And by adding some Velcro to the headband, you can easily switch the bow out with another embellishment for a whole different look.

Thank you for joining me.  Until next time...
 
Crafty hugs,
 
Lisa
&


Animal Print Headband
 
Materials
 
Crimp Bead
Jump Ring
Headband- Orange
Animal Print Ribbon
Jewelry Wire
 
Instructions
 
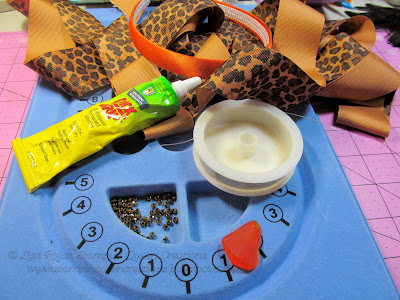
Gather all of your supplies.
 
Cut jewelry wire 6" long.  String mini gold beads onto
the wire.  Add a jump ring to the tear drop crystal and
add to the beaded wire.

Pull beaded wire through the sea glass bead and secure
in place with a crimp bead.  Cut off excess wire.
Adhere the beaded wire to the bow with Quick Grip glue.
Attach a Velcro oval to the back of the bow and also to
the headband.  That's it you're done!