Wednesday, August 8, 2012

Best New Product at CHA Summer Show


Hi Everyone, 

As I mentioned in an earlier post, I just returned from the Craft and Hobby show that was held in Rosemont, IL. Each time I attend one of the CHA shows I always come home and write a post or two on the show and the great new products that I saw while I was there. 

Well, this time it’s going to be a little different. Although I was super busy working this show, I did have a little time to walk the show in search of fabulous new products and I must say that even though I found some cool new stuff the only product that I’m going to blog about is Kelly Craft Innovations Get-it-Straight Laser Square.


This new product is going to change the way scrapbookers and card makers alike, change the way they work on their projects! The product is so fabulous and I love it so much that nothing else that I saw at the show even comes close to this new tool, and that is the reason I only want to post about one product. For me, this is the product that every crafter is going to want to have in their studios and work spaces!!! 

The Get-it-Straight Laser Square takes all the guessing out of layering your pages and projects. With the laser built right into the tool, you can see exactly where you want your items to be placed. No more guessing or eyeballing your page elements, it lines everything up exactly to where they need to be. 

I was so excited about this tool, that I bought it right there at the show! I even tried talking the guys into letting me take their demo product home with me because I didn’t want to wait for mine to arrive after the show. Heck, if they would had let me take it with me, I would have been playing with it on the plane ride home!!!


I am so excited about this new tool that I’ll let you in on a little secret. After every CHA show that I attend I come home and make a list of the new products that I saw and I pick one that I think is going to be a HUGE success. I have been playing this game with myself for about five years now and every single product that I have picked in the past has turned out to be one of the “It” products that everyone just has to have! Can you guess which new product I picked after this show? You guessed it! The Kelly Craft Innovations Get-it-Straight Laser Square! I can’t wait for mine to be delivered and after you visit their website and see what I saw…you’ll be just as excited as I am!!! 

For more information about this fabulous new product, please check out their website at www.kellycraftinnovations.com. You’ll be happy that you did!! 

Thank you for joining me. Until next time… 

Crafty hugs, 

Lisa
Stampin’ Queen Creations 

Give The Queen A Call!!!

Monday, August 6, 2012

Designer Craft Connection- Crafting with School Supplies


Hi Everyone! 

Guess what today is! If you’ve been following my blog for any time, you know that today is the first Monday of the month and that means the professional designers at Designer Craft Connection are blog hopping! Our theme for this month’s hop is “Crafting with School Supplies”.  With summer coming to an end and kids everywhere heading back to school, what better time to start your school crafting! 

We have anywhere from 30 to 50 professional designers that participate in this blog hop each month so, we have a never ending supply of inspiration for you. Each designer that participates has the Designer Craft Connection blinkie on their blog somewhere. To get started, click on my blinkie that you will find on the right side of my blog, then “hop” from one blog to another. Hours of fabulous inspiration is awaiting you with a click of your computer mouse. Enjoy and have fun!!! 

Thank you for joining me. Until next time…

Crafty hugs,

Lisa
Stampin’ Queen Creations 

Give The Queen A Call!!!


Teacher Gift Basket Set 

My whole entire life has been spent around educators. First, growing up with my dad the teacher, principal, and assistant superintendent and then marrying my husband, the teacher. So, naturally I grew up with a strong appreciation of teachers. As a child, I remember my mom creating hand crafted gifts to give to all of my teachers to show her appreciation (probably thankful for tolerating me!). When I had my own children, I carried on the tradition. By making hand crafted gifts like this basket set, I believe you’re letting these wonderful men and women know how truly special they are. This basket set is a quick and easy way to let that special teacher in your child’s life know how much you care for all of their hard work and kindness.  Go ahead, make a teacher smile.

 SUPPLIES FOR BASKET 

Basket
Foam core board
School themed pattern paper
Ruler frame
Blue card stock
White card stock
Various buttons
Blue, yellow & green gingham ribbon
Blue braided trim
Zip DryÔ Paper Glue by Beacon AdhesivesÒ
Watercolor pencils by Faber-CastellÒ
ColorBox® Archival Dye inkpad Wicked Black by Clearsnap®
Paintbrush
Preserve It!Ô Paper Protectant by Krylon ProductsÒ
Rubber Stamps-
Alphabet stamp set by Unknown
School border by Provo CraftÒ 


INSTRUCTIONS FOR BASKET 

Step 1.   Measure and cut foam board to fit top of basket. Adhere blue card stock to bottom of foam board. Cut yellow ribbon 4”. Fold in half to make a loop. Adhere to top center of foam board. Cut three pieces of green ribbon 2”. Adhere ½ of ribbon to top of foam board in the back 3” apart. Leave other half of ribbon free. These will be your hinges. 

Step 2.  Adhere school themed paper to top of foam board. Adhere blue trim around foam board, again leaving green ribbons free. Cut white card stock 4” x 6”. Stamp words and school border with black inkpad. Color with watercolors pencils. Spray all stamped images with Preserve It! Paper Protectant. 

Step 3. Adhere white card stock to ruler frame. Adhere frame to top of foam board. Lay foam board on top of basket. Adhere green ribbons to the back of basket for your hinges. Adhere three red buttons to green ribbons. 

Step 4.  Make bows with blue ribbon. Attach to each side of handles. Adhere buttons to ruler frame. Adhere red heart button to front center of basket. Loop yellow ribbon around heart button to close lid.

SUPPLIES FOR NOTEPAD 

5” X 7” Blank book by Hot Off The PressÒ
School themed pattern paper
Yellow pattern paper
White card stock
Assorted fibers
Assorted colored brads- ¼” & 1/8”- four of each size
ColorBox® Archival Dye inkpad Wicked Black by Clearsnap®
ColorBox® Pigment inkpad Green by Clearsnap®
Clear embossing powder by Clearsnap®
Zip DryÔ Paper Glue by Beacon AdhesivesÒ
Watercolor pencils by Faber-CastellÒ
Paintbrush
Preserve It!Ô by Krylon ProductsÒ
Heat tool
Rubber Stamps-
School border by Provo CraftÒ
Time To Enjoy by Hero ArtsÒ 

INSTRUCTIONS FOR NOTEPAD 

Step 1.  Adhere school themed paper to front and back notebook covers. Cut yellow pattern paper 3” x 5”. Cut white card stock 2” x 4” for wording and 1 ½” x 3 ¼” for tag.

Step 2.  Stamp wording with green pigment inkpad. Ink edges. Emboss with clear powder. Stamp school border with black inkpad. Ink edges. Color image with watercolor pencils. 

Step 3.  Attach wording and yellow pattern paper to notebook front with brads. Attach fibers and tag. 


SUPPLIES FOR KEYCHAIN 

Foam core board
Mat board
School themed pattern paper
White card stock
ColorBox® Archival Dye inkpad Wicked Black by Clearsnap®
ColorBox® Pigment inkpad Sky Blue by Clearsnap®
Clear embossing powder by Clearsnap®
Zip DryÔ Paper Glue by Beacon AdhesivesÒ
Watercolor pencils by Faber-CastellÒ
Paintbrush
Preserve It!Ô by Krylon ProductsÒ
Assorted fibers
Blue ribbon
Heat tool
Key ring
¼” Hole punch
Rubber Stamps-
Alphabet set by Unknown
School border by Provo CraftÒ 

INSTRUCTIONS FOR KEYCHAIN  

Step 1.  Cut foam board into tag shape 2 ½” x 4”. Adhere school themed paper to front and back of tag. Adhere ribbon around edges. Cut mat board into tag shape 1 ½” x 3 ¼”.

Step 2.  Stamp word and school border with black inkpad. Color with watercolor pencils. Ink edges. Punch holes into both tags. Attach key ring and fibers to both tags.

Step 3.  Stamp Post It notes with black inkpad. Tie ribbons around glue gun and large chalks for an added touch.


Friday, August 3, 2012

New Video from CHA

Hi Everyone,

As I said earlier, I just returned from the Craft and Hobby Show in Chicago. As a council member for the Designer Section of CHA, I had the opportunity to meet with CHA's President and CEO, Andrej Suskavcevic. At our meeting, Andrej shared some information and a video of a new "movement" that CHA will be unveiling at the winter show in Anaheim in January 2013. I will be posting more information about this in the coming months.

So, get yourself something to drink and sit back to watch this video. It brought tears to my eyes and I'm sure you will feel the same! Enjoy!!!

http://www.youtube.com/watch?feature=player_detailpage&v=xsB0Dg8UX0g#t=13s


Thank you for joining me. Until next time...

Crafty hugs,

Lisa
Stampin' Queen Creations

Give The Queen A Call!!!


Wednesday, August 1, 2012

CHA Summer Show in Chicago


Hi Everyone, 

I’m sorry it’s been a while since I’ve posted last, but sometimes life gets in the way of being creative! But, now I’m back and I have so much to share with you. 

I have just returned from the CHA show in Chicago and what a great show it turned out to be! First of all, I want to share a short story about a couple of things that happened to me. As I was unloading my bags at the hotel, I realized that I left my brand new iPad2 on the airplane. If that wasn’t bad enough a few days later I lost my wallet at the show!!! Now I bet you’re thinking, what a very unlucky woman, but I’m here to tell you that there was an angel on my shoulder. Not only did I get my iPad2 back from the airlines, some wonderful person found my wallet and turned it in with all of my credit cards and money still inside! 

If you have been following my blog for any amount of time, you know that while I have suffered from Crohn’s Disease all of my adult life, I have a very strong faith in God and I always try to look for the good in people. The events that took place just proved to me once again that there are still wonderful, honest people out there and I am blessed to have been able to experience their kindness. 

Also at the show I taught a sold out workshop for Beacon Adhesives and Daily Window Bags with my creative partner, Ann Butler. The workshop was a HUGE success and the students in the workshop walked away with a beautiful canvas tote bag decorated with products from not only Beacon and Daily Window, but also Graphic 45 papers, Expo International trims, Hampton Art stamps, Velcro Brand fasteners, Buttons Galore buttons, Clearsnap inks, Neenah Papers and Westcott scissors. It was a fabulous workshop and Ann & I had such a positive response from those who attended,  that we will be doing another workshop with some of the same manufacturers at the winter show in Anaheim in January 2013. Check back for more information as we get closer to the show. 

I have more things to share about the CHA summer show that I will be posting about in the next week or so. Come on back for more details!!! 

Thank you for joining me. Until next time… 

Crafty hugs, 

Lisa
Stampin’ Queen Creations 

Give The Queen A Call!!!

These are a few of the samples that we made for the workshop!


Wednesday, July 11, 2012

Wordless Wednesday- Zebra Candle Holder

Wordless Wednesday's are the days that I post just a project without instructions or a supply list.
Hi Everyone,

For today's Wordless Wednesday project, I'm sharing a very easy candle holder. The zebra stamp that I used was designed by my very good friend, Vicki Schreiner. For more of Vicki's designs, please visit her website at www.bazooples.com.

Thank you for joining me. Until next time...

Crafty hugs,

Lisa
Stampin' Queen Creations


Give The Queen A Call!!!


Friday, July 6, 2012

Guest Blogger- Melony Bradley!!!

Hi Everyone,

I just love Fridays! With each Friday comes another opportunity to share with all of you the talents of some very special people and today is no different! My Guest Blogger for today is my friend and fellow CHA Designer, Melony Bradly!!!

I have know Melony for a few years and I have had the pleasure to work closely with her on the Board of the CHA Designer Section. Melony is a fabulous designer and has a heart of gold! Here's a little information about my friend, Melony.

Living in a small town in south Georgia, Melony has been designing full-time for the creative industry since 2004. Strapped to a cube in a marketing job prior to that, she dreamed of combining her marketing skills and talent for her love of all things art! Her work has been published in national consumer craft and lifestyle magazines and websites including Women's World, Cloth Paper Scissors, Crafts’ n Things, Create & Decorate, Green Craft Magazine, Altered Couture, Somerset Life, Sew Somerset and Somerset Gallery. More of her work can be seen on her blog www.mel-designs.typepad.com or in her etsy shop http://www.etsy.com/shop/MelonyBradley.

For instructions on how to create this beautiful necklace or to purchase it from Melony's Etsy shop, click on the links above.

To Melony, Thank you so much my friend for allowing me to feature your gorgeous work on my blog. Your talent and wonderful spirit never ceases to amaze me!!!

Thank you for joining me. Until next time...

Crafty hugs,

Lisa
 Stampin' Queen Creations

Give The Queen A Call!!!


Completed necklace 1


Wednesday, July 4, 2012

Wordless Wednesday- Diva Turn About Card

Wordless Wednesday's are the days that I post just a project without instructions or a supply list.

Hi Everyone,

For today's Wordless Wednesday project, I am sharing my Diva Turn About Card. Looks difficult but it's very simple to do. I hope you like it! Happy 4th of July!!!

Thanks for joining me. Until next time...

Crafty hugs,

Lisa
Stampin' Queen Creations


Give The Queen A Card!!!


Monday, July 2, 2012

Designer Craft Connection- "By the Sea" Lamp


Hi Everyone, 

My most favorite place on the planet besides a stamp or scrapbook store is the beach! I just love the beach!!! I love everything about it. I love to feel the sand between my toes and the sun on my face and every summer we head off to our beach house to spend the month. For me, it’s the best month of the year and one day I hope to retire here with my wonderful husband and my girls, the furkids. 

Unfortunately, I can’t spend all of my time at the beach right now so, I brought the beach to my home by creating this cute little lamp. By using chalks, you can achieve a soft pastel look to your lampshade. When using chalks in a palette form here’s a tip: Instead of using make-up applicators, try tweezers and mini pompoms. Pick up the pompoms with tweezers and apply color. Getting into those small areas on stamped images will be a breeze!  

Since today is the first Monday of the month, that means that the Designer Craft Connection will be hopping!!! This month’s theme is “Summer Vacations” and since I spend part of my summer every year at the beach, I thought my beach lamp would fit in there nicely. And don’t forget since we are hopping today to go to the right side of my blog and find the Designer Craft Connection’s blinkie. Once you click on that blinkie, it will take you around to each of the designer's blogs that are participating in the hop this month. Normally that means anywhere from 40 to 50 different projects can be seen by hopping from one blog to the others. 

There is lot and lots of fun to be had, so please join me and my fellow designers in another round of fun and fabulous blog hopping with the terrific designers of the Designer Craft Connection. You won’t be disappointed!!! 

Thanks for joining me. Until next time…

Crafty hugs, 

Lisa
Stampin' Queen Creations 

Give the Queen A Call!!!


SUPPLIES 

Stamps- Little Girl, Beach ball,  Sand, Clouds
Lampshade
Mason jar
Electrical lamp kit
Various sea shells
Sand
Trim
Beaded trim
ColorBox Dye-Based Inkpad-Wicked  Black & Putty
Decorating Chalks by Craf-T Products
Faber-CastellÒ Chalk Pencils
Pompoms
Tweezers
Spray Sealer
Glue Gun 

INSTRUCTIONS 

Step 1.   Stamp girl, clouds and beach ball with Black inkpad. Stamp sand with Putty inkpad. Color stamped images with chalk pencils. Add color to sky and sand using decorating chalks, tweezers and pom poms. 

Step 2.   After stamping and coloring is done, spray lampshade with sealer. Next, glue trims to top and bottom of lampshade with glue gun. Assemble lamp kit following manufacturer’s instructions. Pour sand into mason jar and add sea shells.

Friday, June 29, 2012

Guest Blogger- Candice Windham!!!


Hi Everyone,

In my business, I have the wonderful opportunity to meet and become friends with some very talented professional designers. Today's Guest Blogger is one of those talented designers and also a friend of mine, Candice Windham!

Candice is a CHA Designer who loves to paint, sing with her hubby, play with her pups, and create art out of nothing much, she says. Candice is a fabulous designer who's designs take my breath away and I know that you'll want to see more of her work! So, for instructions on this great project and many more, please visit her blog at http://candicewindhamdesigns.blogspot.com/2012/06/several-birds-one-stone.html
You will love what you see!!! I know I do each and every time I visit it.

And to Candice, thank you so much for allowing me to feature just a small sampling of your wonderful work. You are definately one of the best designers I know and I'm glad to call you my friend!

Thank you for joining me. Until next time...

Crafty hugs,

Lisa
Stampin' Queen Creations

Give The Queen A Call!!!


© 2012 Candice Windham Designs

Tuesday, June 26, 2012

Wordless Wednesday- Sunflower Happy Birthday Card

Hi Everyone,

Sorry I missed posting on Monday. I've got a lot going on getting ready for the CHA show in Chicago and I didn't get a chance.

For today's Wordless Wednesday, I'm posting my Sunflower Happy Birthday card. It's a great card that you're loved ones would want to receive. Create it for the next birthday in your family!

Thank you for joining me. Until next time...

Crafty hugs,

Lisa
Stampin' Queen Creations

Give The Queen A Call!!!

Friday, June 22, 2012

Guest Blogger- Ann Butler!!!


Hi Everyone,

I am so happy to be featuring my very close friend, Ann Butler, as my Guest Blogger this week!! I met Ann 12 years ago at a convention for the Society of Creative Designers. We started talking and we were so surprised by how much we had in common. We ate lunch together and after that, we spent the remainder of the convention together. I felt like I had met my long lost sister!!! 

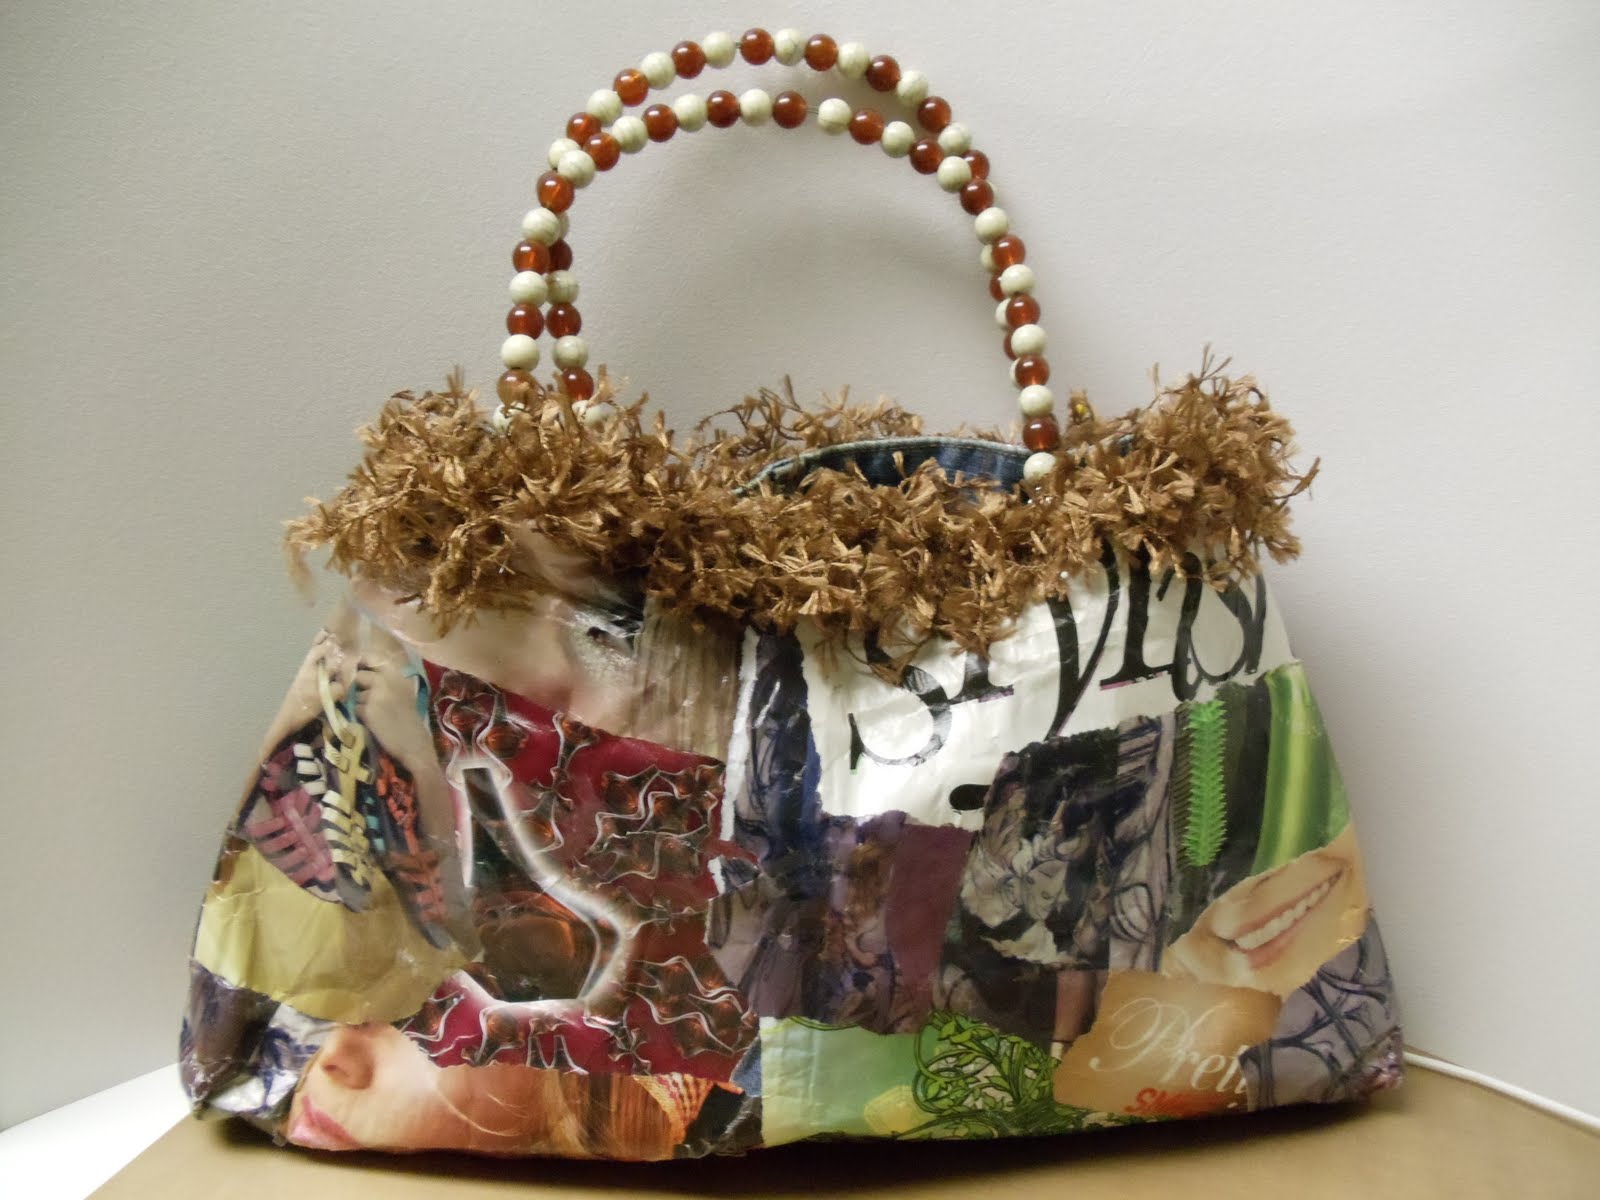
As a friend, you couldn’t ask for one as special as she is to me.  As a designer, she is truly amazing! Ann has the ability to take two toothpicks and turn them into something awe inspiring! And she can create it in record time! Her designs are simple, clean and always fabulous! 

One of my favorite projects that Ann has designed is her magazine purse. As you can see for yourself, Ann’s purse is truly amazing! For instructions on this purse and to see more of Ann’s great designs, check out her blog at- 


And to Ann, thank you my very dear friend for letting me share your wonderful talent with all of my blog friends. You are a true blessing in my life and a wonderful asset to the craft industry!!!

Thank you for joining me. Until next time… 

Crafty hugs, 

Lisa
Stampin’ Queen Creations

Give The Queen A Call!!!


© 2012 Ann Butler
Ann Butler Designs


Wednesday, June 20, 2012

Wordless Wednesday- Graduation Card

Hi Everyone,

I created this fun Pocekt Card for my son's graduation a few years ago and I thought since graduation season is upon us, I would share it with you.


Thanks for joining me. Until next time...

Crafty hugs,

Lisa
Stampin' Queen Creations

Give The Queen A Call!!!


Monday, June 18, 2012

Cell Phone Cases- Part 4


Hi Everyone, 

I hope you all had a wonderful Father’s Day with the men in your life that you love! For those of you who are out there that don’t have their fathers around anymore (like me) I hope that you spent the day thinking of all the fond memories you shared with him while he was here with you. I know I did! 

As promised, this is the last segment on my series about cell phone cases. This cell phone case holds a special place in my heart because it’s so colorful, fun, and queenly, like me!!! 

If you’re looking for something fun to wear this cell phone case is right up your alley, but let me say now, it’s so fun & funky that it is not for the week of heart. You definitely need to be confident to pull this look off and queenly too! So, I say if you choose to create this crazy and colorful cell phone case and wear it out in public, make sure your crown is placed firmly on your head!!!


Thanks for joining me. Until next time… 

Crafty hugs, 

Lisa
Stampin’ Queen Creations 

Give The Queen A Call!!!


SUPPLIES 

Blue Gingham material- 11”L x 4 ½” W
Mary EngelbrietÒ material panel
Eyelash trim- # IR1785 Yellow by Expo International Inc.Ò
Blue beaded trim
Yellow cording- 1 yard
Fabri-TAC™ glue by Beacon Adhesives®
Sewing machine
Needle
Thread
Iron
Aleene’sÒ Paper Glaze by Duncan Enterprises

 INSTRUCTIONS

Step 1.  Cut material to measure 11”L x 4 ½”W. Turn each end under ½” press and sew. With right sides together, sew each side ½” from edge of material. Cut excess material close to stitching. Turn material inside out.
        
Step 2.  With needle and thread, stitch cording to each side of phone case. Cut out Mary Engelbriet designs from panel. Apply Aleene’sÒ Paper Glaze to highlights on the jewels and flowers. Let dry.  

Step 3.  Adhere designs to case with fabric glue. Glue trims to top and bottom edge with fabric glue. 

NOTE: Slide a piece of card stock into the case when using the fabric glue to avoid sticking together.