Friday, May 11, 2012

Impress Art Blog Hop


Hi Everyone,

I am so happy to announce that tomorrow a few designers from the Designer Craft Connection will be hosting a special manufacturer blog hop! What is this you ask? Well, let me explain. If you have followed the Designer Craft Connection blog hops with me, you'll know that each of us are professional designers in the craft industry. Every once in a while we are notified by a manufacturer who want us to design projects around their product. And that's exactly what we're going to be doing tomorrow!!!

So, if you're looking for some fabulous projects with this wonderful product, join me for a fun day of hopping. In order to hop from blog to blog all you need to do is clink on the Designer Craft Connection blinkie on the right side of my blog. Happy hopping!!!

Thanks for joining me. Until next time...

Crafty hugs,

Lisa
Stampin' Queen Creations

Give The Queen A Call!!!

Thursday, May 10, 2012

Guest Blogger- Molly Smith

Hi Everyone,

Today I am very please to announce that my good friend and designer, Molly Smith, is my Guest Blogger. I have know Molly for the last twelve years, when we first met at a Society of Creative Designers conference. She is a sweet Texas lady with an accent that I absolutely adore! And she is the sweetest person you will ever meet!!! But, Molly's talents are just amazing! What this woman can do with quilling paper will blow your mind! I myself, don't really know how to quill so, I thought what a great person to have on my blog. Molly can show you things that I would never begin to know how to do!

Molly created this beautiful Mother's Day card that I felt I just needed to share and with Mother's Day right around the corner, what a better time! You can see how she created this card by going to her blog. So, please do me a favor and visit Molly's blog for more of her amazing work at www.itsmollysmith.blogspot.com. And thank you Molly for allowing me to feature your beautiful work on my blog. You're the best!!!

Thank you for joining me. Until next time...

Crafty hugs,

Lisa
Stampin' Queen Creations

Give The Queen A Call!!!


©2012 Molly Smith


Wednesday, May 9, 2012

Wordless Wednesday- Pocket Card-Bathtime


Thank you for joining me. Until next time...

Crafty hugs,

Lisa
Stampin' Queen Creations

Give The Queen A Call!!!

Monday, May 7, 2012

Designer Craft Connection- Jewelry


Hi Everyone, 

Starting this week I have decided to cut my blogging back to three times a week. I have tried to do my blog post five times a weeks but I’m finding that it’s taking more and more time away from my designing work. Even thought I’ll only be blogging three times a week, with maybe some surprises thrown in now and then, I will still try to bring you quality posts. I really feel like the amount of time doesn’t matter near as much as posting good quality projects and information. So, I hope you’ll bear with me as I try some new things, but things I know you’ll enjoy. Stay tuned for that!!! 

Now that we have the business stuff out of the way, let’s have some fun! Today is the first Monday of the month and that means Designer Craft Connection Blog Hop! This month our theme was Jewelry. Now, everyone that knows me knows that I’m not a jewelry maker, but I am a mixed media artist so, my piece of jewelry is done with rubber stamps (of course!!!) and shrink plastic. Then I added a few beads, some charms and that’s it! I had myself a very beautiful pin! 

Since it is a Designer Craft Connection Blog Hop day, please don’t forget to click on the blinkie that is on the right side of my blog so that you can hop to all of the other designer’s blogs to see what fabulous creations they all came up with. On some of the blogs you may have to look around a bit to see the Designer Craft Connection blinkie, but each of us has one and that is how you will get around to each of our blogs. I hope you have a wonderful time hopping from blog to blog. 

Thanks for joining me. Until next time….

Crafty hugs,

Lisa
Stampin’ Queen Creations

Give The Queen A Call!!!


Face Pin- Cross


Materials

Ÿ  Italian Poetry Background by Hero Arts

Ÿ  Dance of the Butterflies by Paper Inspirations

Ÿ  Shrink plastic- Black and White

Ÿ  Brilliance pigment inkpad- Starlite Silver

Ÿ  Stab On solvent inkpad- Black

Ÿ  Versa MarkÔ Watermark Inkpad

Ÿ  Ultra Thick Embossing Powder- Clear

Ÿ  Assorted beads

Ÿ  Jewelry findings

Ÿ  Micro silver beads

Ÿ  Cross charm

Ÿ  Hole punch- ¼”

Ÿ  Heat tool

Ÿ  Diamond GlazeÔ

Ÿ  Faber-CastellÔ Color Pencils

Ÿ  Deckle scissors

Ÿ  Sandpaper

Instructions

1.  Prepare the shrink plastic by following manufacturer’s instructions. Stamp Italian Poetry on black shrink plastic with Starlite Silver. Stamp Dance of the Butterflies (face stamp) on white shrink plastic with black inkpad. 

2.  Color lips on Dance of the Butterflies image with a red color pencil. Cut out both stamped images with deckle edge scissors.  Punch hole in the bottom center of the Italian Poetry image. Shrink plastic with heat tool or oven, following manufacturer’s directions. 

3.  Apply VersaMarkÔ inkpad to Dance of the Butterflies image. Pour Ultra Thick Embossing Powder over image, shake off excess powder and heat with heat tool. Repeat process three more times. 

4.  Using Diamond GlazeÔ adhere four tiny beads to the back of the Dance of the Butterflies image. Add a jump ring with a small bead to top of cross charm. Adhere cross charm and Dance of the Butterflies image onto ItalianPoetry image                                                               

5.  Using Diamond GlazeÔ adhere silver micro beads and a few small beads to the lower right side of the Italian Poetry image. Add large square bead and assorted beads to a silver jewelry rod.     

6.  Add jump ring to Italian Poetry image and attached beaded jewelry rod to jump ring. Adhere a pin back to the back of the finished piece with Diamond GlazeÔ.


Friday, May 4, 2012

Looking into the Past- Around the World Lamp

Hi Everyone,

I told you all at the beginning of the week that I was going to go back into my archives of published projects and today I wanted to share my "Around the World"Travel Lamp"  with you. I created this project in 2001 and it was published in The Rubber Stamper magazine that year.

This is a project that will never go out of style and right now it lights up at my brother, Jeff's house. When he saw it he said that he just had to have it and I'm glad it has a great home! I knew that you wouldn't be able to see the directions from the magazine so I  managed to find them in case you wanted to create you very own. If there is a product that is not available in stores now, just substitute it with what's out there now.

Thanks for joining me. Until next time...

Crafty hugs,

Lisa
Stampin' Queen Creations

Give The Queen A Call!!!


Around The World Travel Lamp
SUPPLIES
Wood base by Walnut Hollow
Lampshade
Electrical lamp kit
Papier-mâché box
Papier-mâché picture frame
Old wire frame glasses
Tan Mulberry Paper by PSX
VersaMark Watermark Stamp Pad by TSUKINEKO
VersaColor Ultimate Pigment Inkpad in Sage Green & Paprika by TSUKINEKO
Brilliance Pigment Inkpad in Coffee Bean by TSUKINEKO
Delta Ceramcoat Matte Interior Spray Varnish
Delta Ceramcoat All Purpose Sealer
Delta Ceramcoat GLEAMSÔ Acrylic Paint- Metallic Kim Gold
Delta CeramcoatAcrylic Paint- Dark Brown
Delta Ceramcoat Satin Decoupage Medium
Delta Ceramcoat Brown Antiquing Gel
Primary Elements Polished Pigment Powders by Angelwings Enterprises
Spray Adhesive
4- 1” Wooden balls
2- Gold tassels
Gold braided trim
Assorted charms
Miniature postcards for decoupage
Paintbrush
Glue gun
Glue stick
Rubber Stamps by Rubber Stampede
Shipboard  Crossing- 3010H
Travel Map- 3007F
Nostalgic Pocket Watch- A2528D
Medium Feather- A2585C
Passport- 2825B

INSTRUCTIONS

Step 1. Paint wood base with Metallic Kim Gold acrylic paint. Paint box and wooded balls with Dark Brown acrylic paint. Let dry. Using a paintbrush, apply Antiquing gel to base then wipe off with a soft cloth until you reach the look you desire.
Step 2. Lay lampshade onto a large piece of butcher paper. Slowly roll lampshade on paper and trace the lampshade with a pencil. Cut out pattern leaving a ½” border along all sides. Next, trace pattern    on mulberry paper.
Step 3. Stamp Shipboard Crossing four times with Coffee Bean inkpad. Stamp Travel Map with Paprika inkpad randomly. Stamp Passport with Sage Green inkpad. Stamp Pocket Watch and Medium Feather with VersaMark inkpad.
Step 4. Dip a small paintbrush into the pigment powders and lightly brush over Pocket Watch and Feather images. Spray stamped mulberry paper with varnish. To adhere paper to the lampshade, spray adhesive on lampshade. Working in small sections, apply mulberry paper to lampshade. Glue trim, tassel and charm to lampshade with glue gun. NOTE: Tassel and charm are on the back of the lampshade.
Step 5. Place pictures in papier-mâché frame. Lay frame on a piece of mulberry paper. Cut paper to size of rame. Cut out the sections where the photos are placed. Stamp Feather along openings with the VersaMark inkpad and brush pigment powders over stamped images.
Step 6. Apply glue stick to the front of the frame and adhere mulberry paper, covering the entire frame. With glue gun, add trim along the edges of the frame, the tassel and charm to the center.
Step 7. For the papier-mâché  box, stamp feather with VersaMark inkpad along the front and sides of the box. Apply pigment powder to images. Cut out miniature postcards and decoupage to top of box. Cover entire box with decoupage medium.
 Step 8. Cut a piece of mulberry paper into a 5” square. Stamp feather randomly over entire piece of paper with VersaMark inkpad and apply pigment powder to images. Glue wood balls to the bottom of the base with glue gun.
Step 9. Spray wood base with varnish. Let dry thoroughly. Assemble electrical kit to base following the manufacturers instructions. Glue items to the base of the lamp with glue gun.


Thursday, May 3, 2012

Stampin' Queen Creations: Guest Blogger- Phyllis Dobbs

Stampin' Queen Creations: Guest Blogger- Phyllis Dobbs: Hi Everyone,   I am so excited to introduce to you my Guest Blogger this week is my designer friend, Phyllis Dobbs ! I have known P...

Guest Blogger- Phyllis Dobbs


Hi Everyone, 

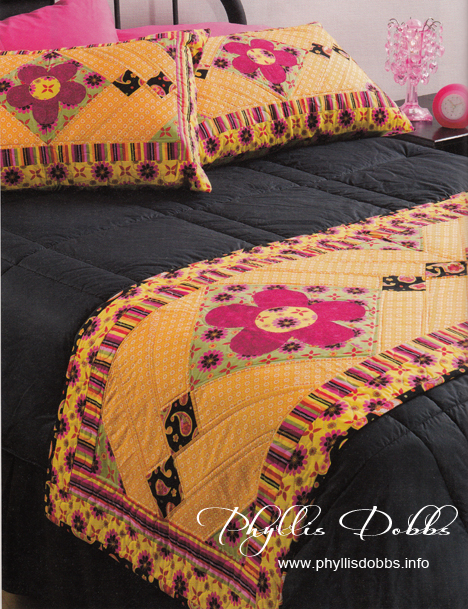
I am so excited to introduce to you my Guest Blogger this week is my designer friend, Phyllis Dobbs! I have known Phyllis for many years and I have always admired her work as a designer, but I have to tell you when I went to her website for this post, I was just blown away!!! 


Phyllis's website is chalk full of beautiful pictures of all of her gorgeous sewing projects. I, myself cannot sew very well so, I am in awe of my talented friends that can. All I can say about Phyllis’s designs is that each and every one is a work of art!!! Please check out her website http://www.phyllisdobbs.info  Be prepared to be amazed!!! 

Thank you for joining me. Until next time…


Crafty hugs, 
Lisa
Stampin’ Queen Creations
 
Give The Queen A Call!!!


Bed Runners and More quilt Summer Blossoms by Phyllis Dobbs

Wednesday, May 2, 2012

Wordless Wednesday- Sunflower Pocket Card


Thanks for joining me. Until next time...

Crafty hugs,

Lisa
Stampin' Queen Creations

Give The Queen A Call!!!

Tuesday, May 1, 2012

Looking into the Past- Apron Recipe Book and Magnet


Hi Everyone, 

I thought for this week of posts I would go through my archive of published projects and share with all of you some projects that I designed years ago. A lot of people think that if a project was created years ago, it won’t be popular. Sometimes that thought is true, but a wonderful design in my humble opinion, will always be worth repeating! 

So, take a look at a few of my designs this week and then you tell me. Are they worth re-creating? If so, pull out those supplies and re-create some of that old magic!!! 

Thank you for joining me. Until next time…

 Crafty hugs,

Lisa
Stampin’ Queen Creations 

Give The Queen A Call!!!


Published in Craft Home & Style Magazine

Monday, April 30, 2012

Scrapbooking with Children


Hi Everyone,
I am a firm believer that you should teach children the art of crafting at a young age and continue to nurture them as they grow. For me, there is nothing more exciting than throwing a bunch of craft supplies onto a table and watching to see what a child decides to do with them. But what is really fun to do with children is to scrapbook with them, especially if they use pictures they took by themselves. Kids love that! And instead of worrying about your kids dropping your good camera buy them their own disposable one.
One of the great things about scrapbooking is it is a project that can be worked on and put aside throughout the year. Children from the age of eight and up can create an album on their own. But children under the age of eight will need a little more help.

What do you need to get started? Well, first of all keep in mind that the album you are going to be working on is something for your child, not you. Don’t worry if everything is not perfect or totally acid-free. It’s their project, so let them lead the way. When you’re ready to shop for materials, take them with you to the store and let them pick out all the things they want to include in their album. Your child can make an album without breaking your bank account. You can purchase materials at your local discount store. The items you will need to get started should be some card stock, colored pencils or some of those glitter gel pens kids love to draw with, a few stickers and embellishments and a glue stick. Of course if you are a rubber stamper like me, you’ll also want your children to have a stamp (or two!) And a dye based ink pad probably in black, so they can color the image. Once you have your materials together, you’re ready to start the fun!

©2012 Richelle Rojas Stampin’ Queen Creations
The scrapbook page I have included was created by my daughter Richelle, when she was a little girl. She had found the picture and letter she had made for the tooth fairy that I had saved for her and decided she wanted to create a page using the items. Here’s how she did it-She used decorative scissors around both items and layered them onto yellow card stock. She cut out yellow stars and drew lines and dots around the edges. Next, she glued blue ribbon, the stars and her pictures onto a 12″ x 12″ piece of blue card stock.


©2012 Richelle Rojas Stampin’ Queen Creations
I printed out the text for her on my computer. She made stars from white card stock and glued them onto the yellow stars. I had made her a small pouch from ribbon. She drew a small tooth, cut it out and attached some string to it. She sewed a button on the pouch and attached the small tooth. Then she adhered the pouch to a piece of dark blue card stock, used decorative scissors around the edges and adhered it to her page. The second page was made with pattern paper.  She adhered the ribbon and stars like the first page, then we drew a picture of a tooth on white card stock which sh cut out and added her pictures to.
My little girl is now a beautiful grown woman who is now pregnant with her first child.  We had so much fun creating this page together and my hope for her and her child is that they take the time to create a scrapbook page or two together. Of course with Nana being around, I see lots of different crafting going on in this child's life.  I hope that you find that same joy scrapbooking with your children. It really is a blast!

Thank you for joining me. Until next time...
Crafty hugs,
Lisa
Stampin' Queen Creations
Give The Queen A Call!!!

Friday, April 27, 2012

It's All About the Fur Kids

Hi Everyone,

Since I shared a very simple scrapbook page on Wednesday about fur kids, I decided to follow up with a story about my grandfur kid, Coca Cola. Do you have a pet story to tell? I'd love to hear about it!

Okay, tell me if I’m wrong, but I’m pretty sure most of you have faced this scenario at least once or twice in your lives.
Here goes… you’re lying down on your recliner taking a well-deserved nap, having a wonderful dream about this cool, new product you saw earlier in your scrapbook magazine. You imagine all the great ways you’re going to use it. Then, you’re awoken by a terrible scream, followed by some crying and whining. You immediately realize that it’s not your husband finding the receipt from your most recent scrapbook store excursion; it’s the other love of your life. So, you get up from your recliner, pick her up and snuggle her to your neck, all the while soothing her and asking her what the problem is. As you’re doing this, you look into those big brown eyes and the next thing you know, she presses that cold wet nose to your cheek and starts licking you. Now your heart is breaking because you know that something is wrong with her and she is in pain, but she will never be able to tell you where it hurts because she’s a fur kid. And, unfortunately, we don’t speak the same language. I know that a lot of us have been in this same or similar situation. But, what I really want to know is: when did we become a nation that loves pets so much that we treat them like they’re human? Because, let me tell you, my heart could not have hurt any more if I was staring into my own children’s brown eyes.
The fur kid I’m referring to is Coca-Cola, my son’s (our) black and tan miniature dachshund. Now, I swear I’ve heard this from other pet owners about their own dogs, and I’ve always rolled my eyes, but really, this dog does not know she’s a dog! And even though we don’t speak the same language, I still knew she was in terrible pain, and I needed to do something.


Coca Cola

The next morning we took her to the vet. By this time she was in so much pain she couldn’t even lift her little head to look at me. All she did was whine. It broke my heart. The vet checked her out all over. He took lots of blood work and x-rays. About one hour and $500.00 later we finally had an answer, sort of. He thought there was something wrong with her neck. Are you kidding me? After all that, that was his answer to me? He thought something was wrong with her neck? I wanted to throw something at this man. He just charged me $500.00 to tell me he “thought” something was wrong with her neck. I wanted to yell, “What was your first clue; the fact that she couldn’t move her head without yelping?” I knew there was something wrong with her neck, for goodness sake! Don’t charge me $500.00 to tell me something I already know. Tell me how we are going to fix it. And tell me is exactly what he proceeded to do; I needed to take her to a doggy specialist.
The following day, we drugged her up with some pain medicine and drove two hours away to the doggy specialist. He examined her and took more lab work and x-rays. After waiting what seemed like an eternity and paying another $500.00, we finally had an answer. Our beautiful, Coca-Cola had a ruptured disc in her neck, and she wouldn’t get any better without surgery. I thought my heart was really breaking. We had a tough decision to make. Do we put her down, or do we pay another $3,500 to make her all better. I looked at my son and said, “I need to call your dad.” Now, let me just say that my husband loves our fur kids as much is I do, but he also makes decisions with his head, not his heart like me. Do we really have $3,500.00, especially after just spending $1,000.00 to get a diagnosis? I picked up my cell phone and called my husband. I was truly dreading the call because I was so afraid of what he was going to say. After listening to everything I had to tell him, from what the doctor had to say, to what our son’s and my feelings were, he said, “Do what you have to do to save her.” At that, I burst into tears. Wow! (Have I mentioned how much I love this man?) With that done, my son and I gave our little wiener dog hugs and kisses and left her with this wonderful group of people who were going to look after and take care of our precious little girl. The ride back to our house seemed extra long. I worried so much about her. She was in so much pain and she looked so scared when we left her. The following afternoon, we received one of the best phone calls ever. Our little wiener was out of surgery and doing just fine! I cried my eyes out again. I was so relieved she did well and she would be home in a few days.

I am so happy to say that our little wiener girl is back to normal. She’s not allowed to jump up on things anymore or walk up the stairs in our house. But aside from that, she’s back to her old stubborn, “I’ll come over to you if I want to,” attitude and I’m loving every minute of it! We now also have another weiner dog in our house. After losing my beloved Cocker Spaniel, Tawnee Renee, almost two years ago after 13 years of loving her, we brought home our newest fur kid, Ruby Renee!
Ruby Renee
And after going through all that terrible stress with Cola, I realized something very important. I’m going to have to sell a lot of scrapbook pages and rubberstamped projects to pay for that vet bill. I’d better get busy.
Thanks for joining me. Until next time…
Crafty hugs,

Lisa
Stampin’ Queen Creations
Give The Queen A Call!!!

My Girls!

Thursday, April 26, 2012

Guest Blogger- Nathalie Kalbach

Hi Everyone,

Today I am please to announce that Nathalie Kalbach is my Guest Blogger! Here's a little bit of information about Nathalie-

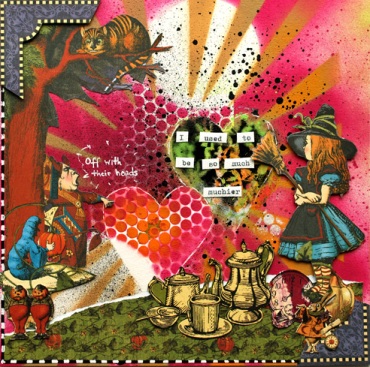
Nathalie is a European Mixed Media Scrapbooker. Her layered work is an explosion of texture, dimension and jewel tone colors. In her workshops she share her secrets for using paint and ink products to reveal texture, tips and tricks for embedding found objects and embellishments and how to unlock your personal creativity.

She loves to design, teach and write — doing all of it wholeheartedly. Besides her creative passion, she loves to read and travel.

Nathalie was kind enough to share her Wonderland scrapbook page using papers by Graphic 45. To see more of Nathalie's beautiful work, please visit her website at
www.nathaliesstudio.com She has tons of designs in the "N*Gallery" section on her website. Be prepared to be amazed! Thank you so much Nathalie, for sharing your designs!

Thank you for joining me. Until next time...

Crafty hugs,

Lisa
Stampin' Queen Creations

 Give The Queen A Call!!!


©2012 Nathalie Kalbach

Wednesday, April 25, 2012

Wordless Wednesday- Fur Kids Scrapbook Page


Thanks for joining me. Until next time...

Crafty hugs,

Lisa
Stampin' Queen Creations

Give The Queen A Call!!!

Tuesday, April 24, 2012

Scrapbooking Made Simple

Hi Everyone,
With all of the cool stuff out there to make great scrapbooking pages, which products do you choose to create your very first scrapbook page? When you’re a newbie to the scrapbooking world, how can you walk into a scrapbook store and not suffer from what I call “Product Overload?” I can spot a newbie a mile away. They are always the ones you see walking aimlessly around the store looking like their heads are going to explode! And how do I know this, you ask? I was one of those people. Only it was not nearly as bad back then as it is now. So much stuff these days! I thought I would write this article for all the newbies out there so that I can save you from your head exploding. If you’re going to have your head explode, I would much rather it be due to all the great ideas you have for your scrapbook pages.
To begin, you are going to want to try to organize your photos. If you’re like most people, your pictures are probably thrown into boxes somewhere in the back of your closet. Or, due to the digital world, they are in a folder somewhere on your computer waiting to be printed. Either way, getting your photos organized is the first step in scrapbooking. In my opinion, the best way to do that is to sort them by year. Go through them again and decide on a theme for your first scrapbook page/album. Once that task is completed, with your photos in hand, you are ready for your trip to the scrapbook store.
O.K. Lets talk about Acid and Lignin Free papers. Acid Free relates to the PH balance in the paper. Papers and products that you use in your albums should also contain alkaline which will stop the acid from your pictures transferring to your papers. Lignin is a natural material present in plants and should be removed when making paper to ensure the papers are safe for your pictures. Nowadays, almost all of your scrapbooking products are Acid Free and Lignin Free, but it’s always best to double check. If you’re going to spend a lot of time with your pages, you want to be sure that your pictures are safe and will be around for generations to come.
The next step is to pick an album to store all your beautiful pages in. Albums come in all shapes, sizes and colors. I prefer to use a 12”x12” album that is refillable. That way, I can add lots of embellishments to my pages and I’m not limited to the number of pages I can put in my album. I think that picking an album is a personal choice. So, browse through your scrapbook store, look at all the different ones they have, and pick one that will suit your needs the best.
Next up…papers! With all of the wonderful companies out there that produce hundreds of different papers, you could spend all day long just looking at papers. I happen to LOVE papers. I always say that I could use 10 papers a day from my stash from now until the day I die and I would still have enough left over for two more generations of my family to be able to use! I may not be the best person to ask about papers because my advice would be “Buy it All!” But, because I don’t want to be responsible for the rising divorce rate, let me give you a few guidelines. Take your pictures with you to the store. It makes it so much easier to match the colors. I recommend that you mat your pictures with a color card stock instead of a pattern paper. Pattern paper can overwhelm your pictures if you don’t choose the right ones. With your card stock colors picked, now you can play with the pattern papers. Choose your pattern papers to match the theme you have picked out for your scrapbook page/album. Now, you are ready to move onto the embellishments. This would be a really good time for me to reiterate the fact that I mentioned above about picking your theme before you walk into the store. This is still the best way I know of to avoid “Product Overload!” Most scrapbook stores have their products arranged by themes, making it so much easier to choose the papers and embellishments you really want.
You have your pictures, your papers and embellishments. So, how do you stick it all together? Adhesives! There is a huge array of adhesives on the market today. Which ones are best? Again, if you ask 5 different people, you’re likely to get 5 different answers. But here are my favorites. Zip Dry Paper Glue™ by Beacon Adhesives® is my all time favorite. It dries clear and doesn’t wrinkle your papers. My next choice would be the E-Z Runner™ Scrapbook Adhesives by 3L®. It’s quick and easy to use. And, last but not least, I love Terrifically Tacky Tape™ by Provo Craft®. This red liner tape will stick to any and everything, so make sure your papers etc. are exactly where you want them before applying this tape!
Now that I have given you the basics, you are ready to create your own beautiful scrapbook pages. The main thing to remember is that even though there are tons of products to choose from, start off easy. Scrapbooking is all about cherishing those special moments with your family and having a great time doing it.
Thanks for joining me. Until next time…
Crafty hugs,
Lisa
Stampin’ Queen Creations
Give The Queen A Call!!!

Monday, April 23, 2012

Scrap & Stamp Arts Magazine


Hi Everyone, 

I swear my life just keeps getting better and better! And with all the health issues that I face every day of my life, I’ll take all the good news I can get!!!
Last Monday I posted about my becoming a first time grandma. Although that news cannot be beat by anything in my personal life, my good news this week is all about my crafty life. 

I received an email last week from Warren Gruenig. If you’re involved in the craft industry you know all about Warren. Not only is he the husband of one of the most popular rubber stampers on the planet, Dee Gruenig, he is also very involved in the industry himself and he writes a monthly column for Scrap & Stamp Arts magazine. 

Warren contacted me to ask if he could do a feature article on me for his column! I was like Oh My Gosh!! I am going to be the subject of a feature article in my very favorite stamp magazine!!! Holy Moly! How did that happen? When did I become a person that anyone would want to write an article about? Well, I guess that time is now! How very exciting!!! I will be in an upcoming issue in the “Creative Spaces” section of the magazine. Needless to say I am so excited about this I could barely think straight when I read the email. 

After a little bit of time passed and I came back down to the earth plane, that’s when reality set in. My next thought was Oh My Gosh! Now I have to clean up my studio so the readers don’t see the mess that is a part of my everyday life. If I took pictures of it now, everyone would think a bomb went off and I just know that with my luck someone would call the health department and have me arrested! 

I’m thinking that I better get started. I’ll be sure to make the announcement of when my article will be published. Please make sure you keep checking back for that, unless of course I get lost trying to find the bottom of my studio. If that happens I’ll send out an SOS. Please send help!!!

Thanks for joining me. Until next time…

Crafty hugs,

 Lisa
Stampin’ Queen Creations

Give The Queen A Call!!!

Friday, April 20, 2012

What Tools Do I Really Need Just Starting Out?

Hi Everyone,

If you are just starting out in the world of paper arts, going to your local scrapbook or rubber stamp store can be very scary. I know it was for me when I first started out. Even back then when scrapbooking and rubber stamping were first becoming the hot new hobby, there were lots of “tools” to buy. I remember going into my first store and thinking, “Holy Cow! I need to win the lottery to pay for all these great things.” Well, I never did win the lottery, although Rich says you need to play the lottery if you plan on winning the lottery. But, I did learn a few tricks since then. Although I do own most everything you can find in a store, I still have the tendency to return to my tried and true tools. Here are a few of my favorite tools that I think every paper crafter needs in her toolbox.

Ruler, Trimmer, Scissors

Paper Trimmer – I have owned many different paper cutters through the years from the side sliders to the guillotine cutters, but my all time favorite one is the Ultimate Trimmer™ with 11 different click blades from Purple Cows®. This cutter is just awesome and with the 11 different cutting blades included, it alleviates the need for multiple decorative scissors. For something a little smaller that you can travel with, I like the Fiskars® 12 inch Portable Paper Trimmer.

Ruler – My all time favorite ruler is an 18” clear, metal edged, quilter’s ruler. With the ½” squares in the ruler, it makes layering your papers a breeze.

Scissors and Tweezers – Having a nice pair of scissors is a must for your tool box. The Cutter Bee™ by EK Success ® is my favorite. The scissors have a cover on them for safe traveling. I also keep a pair of tweezers in my tool box, but again, my favorite in this category would be a pair of hemostats. I have had mine since my nursing days (more than 25 years ago) and I love to use them for picking up items. This is a wonderful tool if you have long or artificial nails. I even use mine outside of my studio. And don’t forget the Exacto knife. No tool box is complete without one.

Adhesives

Adhesives - For adhesives, I have a few different options that I like to use. First of all, I LOVE Zip Dry Paper Glue™ by Beacon Adhesives®. This is the first glue I have ever worked with that won’t ripple your paper! The next adhesive I like is Scrapbook Adhesives™ E-Z tape runner by 3L®. It goes on smooth and rarely (if ever) gets tangled up in its dispenser. Lastly would be Terrifically Tacky Tape™ by Provo Craft®. This tape can be used on paper, glass, wood, metal and it will hold beads, glitter, foils, etc. You can even emboss with it!

Inks

Inks – O.K. I’ll admit it. My favorite inks are from Clearsnap, and not just because I work for them. In my humble opinion, they have the best inkpads on the planet! For your tool box you’ll need a waterproof dye based inkpad for watercoloring, etc. a pigment inkpad for embossing and a watermark inkpad for a watermark effect (they are also great for embossing). I will go into more detail about inkpads later in my blog series.


Coloring Tools

Coloring Tools – You’ll need to have some kind of coloring tools to add color to your scrapbook page or your rubber stamped cards. You have a few different options for this one. You can use markers, watercolors, watercolor pencils, chalks, chalk pencils, color pencils. The list goes on. My favorite technique is watercoloring. I love the look of watercolors, but I don’t always have the time to pull out my watercolor palettes or pencils and to do watercolor correctly; it sometimes can take time. When I don’t have the time, I use my very favorite coloring tool, chalk pencils and a Dove® Blender Pen™. I can create the beautiful look of watercolors in a lot less time. I buy my chalk pencils from Faber-Castell®, but The General Pencil Company® also has some great chalk pencil sets.

Now that I have given you a few ideas on what tools you need to get started, you can go into your local store and spend your money on some great new pattern paper or maybe that stamp that you’ve been wanting. And, I promise, the rest of those cool tools that are out there… they will eventually find their way to your house! I know they found their way to mine.

Thanks for joining me. Until next time…

Crafty hugs,
Lisa
Stampin’ Queen Creations
Give The Queen A Call!!!