Monday, October 22, 2012

Bracelets & Boxes- 3 part series- Part 1

Hi Everyone,

I thought for the next three Mondays I would share some stylestone bracelets that I created a little while ago. The stylestone that I used to create the bracelet are no longer available through Clearsnap, but you can buy a similar product that works just as well through Stampbord www.stampbord.com.

I just love the different looks that I received when I designed these bracelets and the boxes that I made to go with them. All of the boxes where made with those nifty little Altoid boxes. Those boxes are perfect to use for small jewelry.

Be sure you come back here on the next two Mondays for my follow up bracelets and boxes. You're not going to want to miss any of these and with the holidays right around the corner, these bracelets and boxes would make wonderful gifts for all of those lovely ladies in your life!

Thank you for joining me. Until next time...
 
Crafty hugs,
 
Lisa
Stampin' Queen Creations
 
Give The Queen A Call!!!
 
 
Beautiful Boxes
Japanese
 
 
Supplies for Box
Ÿ  Altoid tin box
Ÿ  KrylonÒ 18KT Gold Plate Finish spray paint
Ÿ  KrylonÒ Preserve It!
Ÿ  Beacon AdhesivesÒGlass, Metal & MoreÔ glue
Ÿ  Japanese pattern paper
Ÿ  White, black and gold card stock
Ÿ  Faber-CastellÒ color pencils
Ÿ  Jump rings-6
Ÿ  Bamboo- 4 ½” long
Ÿ  Black fiber trim
Ÿ  Black & tan embroidery floss
Ÿ  ClearsnapÒ Style Stone
Ÿ  Black Japanese beads
Ÿ  ColorboxÒ Chalk Finish inkpad- Ice Blue
Ÿ  Staz OnÔ Solvent inkpad- Black
Ÿ  Sponge
Ÿ  1/8” Hole punch
Ÿ  All Night MediaÒ Japanese Set
Ÿ  All Night MediaÒ Chinese Images Set
 
Instructions For Box
Step 1.   Spray entire tin box with 18KT Gold Plate Finish spray paint. Let dry. Lay box upside down on pattern paper and trace box lid with pencil. Repeat for inside lid.  Lay box bottom side down  for inside bottom lid. Cut out papers. Glue papers to inside and outside of tin. 
 
 
Step 2.   Stamp Japanese lanterns on white card stock using Black Staz OnÔ inkpad. Color with pencils and cut out. Spray images with Preserve It! Lay images on black and then gold card stock, cutting each image slightly larger then the last. Adhere papers together. Punch each lantern with 1/8” hole punch at the top. Attach two jump rings to each lantern.
 
Step 3.   Adhere black fiber trim to outside of top lid. Attach black embroidery floss to top jump ring and tie to bamboo stick. Repeat with other two lanterns. Adhere bamboo stick and lanterns to lid top. Sponge Ice Blue inkpad to style stone. Stamp “Good Luck” on style stone with black solvent inkpad. 
 
Step 4.   Cut tan embroidery floss in two strips of 5”. Tie a knot at the end of each piece of floss. Add beads and style stones to floss tying a knot between each one. When last bead is attached, tie a knot at the end of the floss. Adhere beads and floss to box lid with glue.

Supplies For Bracelet 


 Nylon Coated Jewelry Wire- 15” long, two pieces
 Clearsnap Style Stones
Assorted beads by Blue Moon Beads
Bracelet clasp- Gold
Crimp beads- Gold
Colorbox Chalk inkpad- Ice Blue
Staz On Solvent inkpad- Black
Sponge
Jewelry tools- Round nose pliers and wire cutters
Krylon Crystal Clear Coating
Japanese Images set #26095 by All Night Media 

Instructions For Bracelet 

1.  Using a sponge, lightly cover three style stones with blue ink. Add a darker layer of ink around the edges. Stamp images on stones with black ink. 

2.  Cut two pieces of jewelry wire 15” long. Thread a crimping bead to each wire and one end of clasp to the end of the wire. Pass wire back through crimping bead, leaving a slight tail. Use pliers to crimp together. 

3.  Separate wires. Thread gold spacer, light blue bead, floral bead, light blue bead, gold spacer, style stone, gold spacer, light blue bead, floral bead, light blue bead, gold spacer. Pull wires together. Thread large floral bead. Repeat two more times ending with gold spacer. 

4.  Thread a crimping bead to each wire and one end of clasp to the end of the wire. Pass wire back through crimping bead, leaving a slight tail. Use pliers to crimp together. Excess wire should be tucked into next spacer bead.


Wednesday, October 17, 2012

Wordless Wednesday- Flower Power Girl!

Wordless Wednesday's are the days that I post just a project without instructions or a supply list.
 
Hi Everyone,
 
For today's Wordless Wednesday post I thought I would share a scrapbook page that I made a few years ago from pictures of my daughter when she was just a little girl. Now that she is pregnant and ready to deliver a little girl of her own, just makes this page that much more special!
 
What I love about this page besides the trip down memory lane that looking at the pictures sends me, is all of the fun colors that just seem to pop right off the page. I love color and I love using lots of color in my designs. The brighter, the better!
 
Thank you for joining me. Until next time...
 
Crafty hugs,
 
Lisa
Stampin' Queen Creations
 
Give The Queen A Call!!!


Monday, October 15, 2012

Creepy Halloween Photo Book & Box

Hi Everyone,

If you've been reading my blog, you now know that I along with 3 of my professional designer friends, Ann Butler, Carol Heppner and Theresa Cifali, have started a new magazine called Bella Crafts Quarterly™ www.bellacraftsquarterly.com. If you haven't seen a copy of it, be sure to check out our website to download your FREE copy.

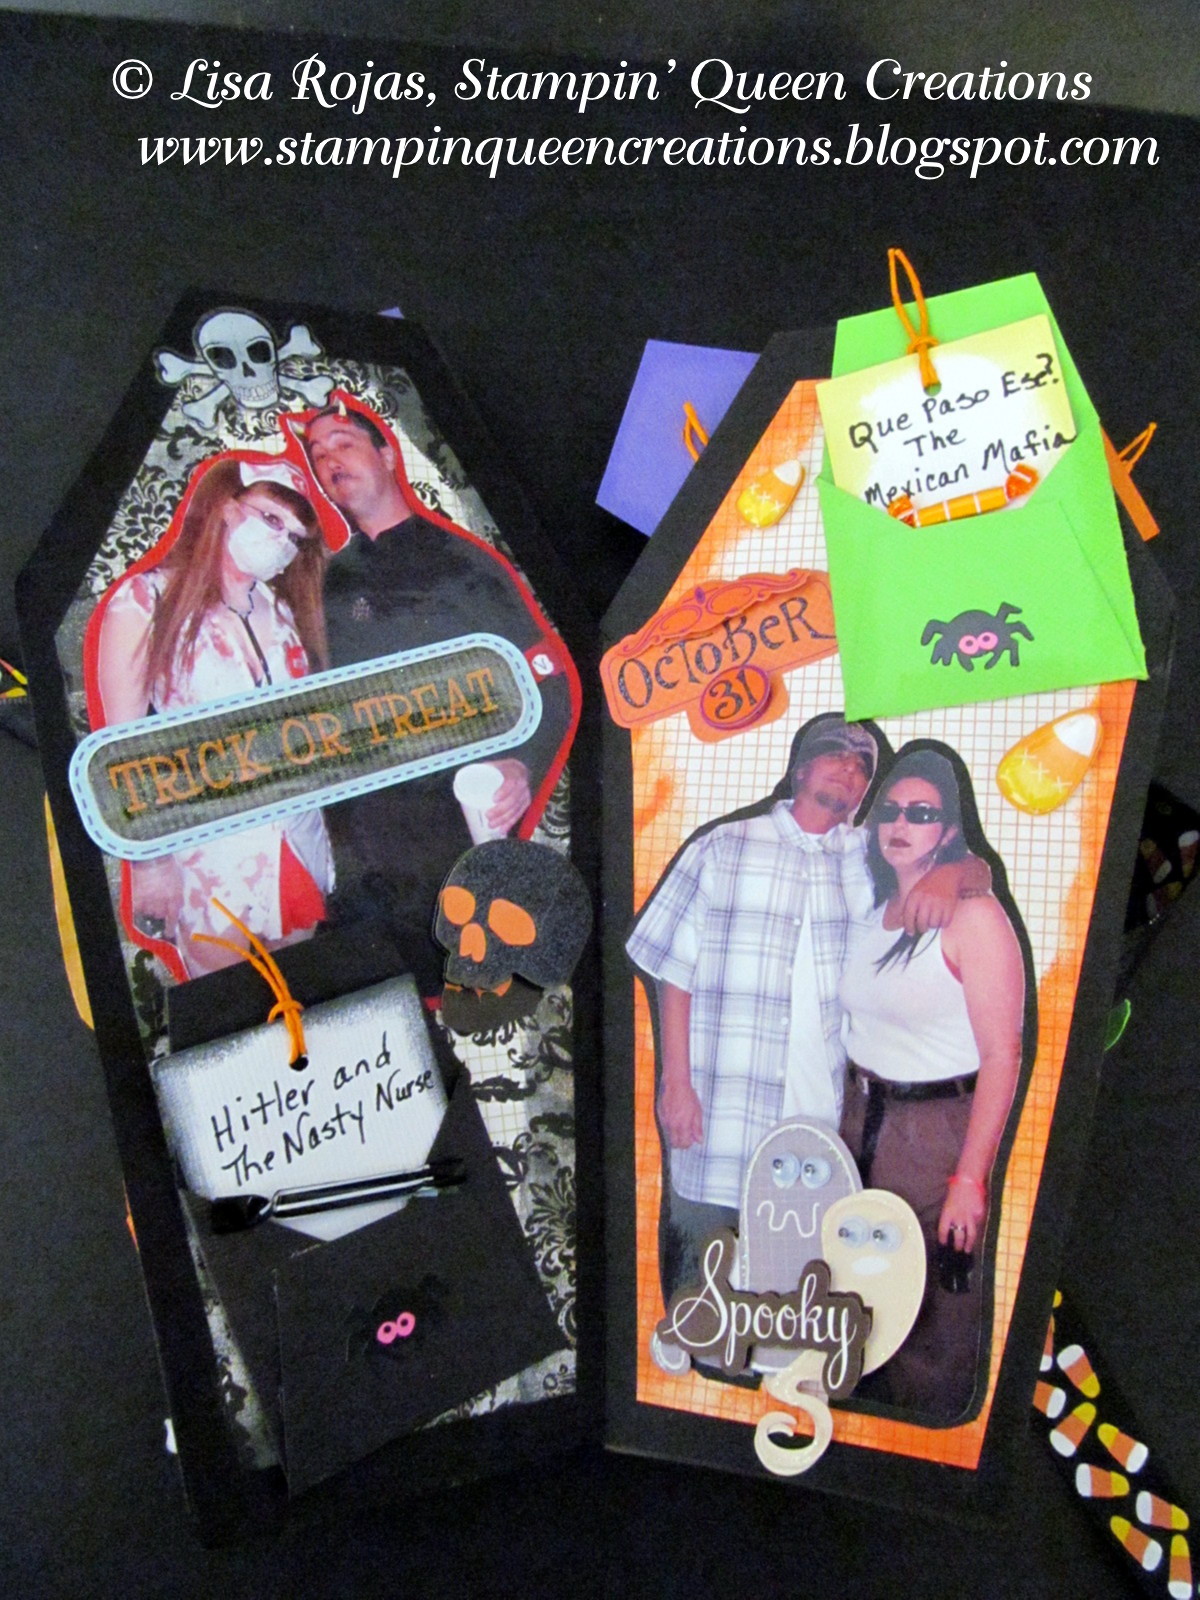
In our current Halloween issue, there is a picture of a project I designed and I thought I would share the whole project with you. It's a really cool and creepy Halloween coffin photo book and a coffin box to put it in.

It's a super fun project to create with lots of Halloween stickers, ribbons, etc. The coffin book and box are from Pine Cone Press www.pineconepressdesign.com  and the pattern papers and rubber stamps are from Pink Paislee www.pinkpaislee.com. The inkpads I used are from Clearsnap www.clearsnap.com and the cardstock is from Bazzill Basics
www.bazzillbasics.com. My glue of choice is as always Zip Dry Paper Glue from Beacon Adhesives www.beaconadhesives.com  

I hope you get the chance to create this awesome project for yourself. I'm sure you have lots and lots a spooky pictures to add to this very cool book and box set. I know I sure did!

Thank you for joining me. Until next time...
 
Crafty hugs,
 
Lisa
Stampin' Queen Creations
 
Give The Queen A Call!!!


Saturday, October 13, 2012

DCC Makin's Clay Blog Hop


Hi Everyone,

I know that you're probably wondering why we're doing a Designer Craft Connection Blog Hop on a Saturday right? Well, every once in a while we have what we call a manufacturer challenge. That's where about 10 to 12 of us get product from a manufacturer and we play and experiment with it, then design a project with that product. For today's hop, we're working with product from the fantastic Makin's Clay!

Makin's Clay is an air dry clay and is so simple to use I was a little shocked. I have never used Makin's Clay and I was expecting it to be a lot harder to create with. Oh boy, was I surprised! This clay is so easy and fun to work with and the results that you can achieve are just fabulous!!!

Be sure to click on the Designer Craft Connection's blinkie that is on the right side of my blog so you can hop from blog to blog and see all the wonderful new projects that the designers created with this great product.

If that's not enough, we also have a terrific  prize package that Makin's Clay will be giving out during this hop. The prize package is worth $111.00 retail cost. In order for you to be entered into the contest, you need to go to Makin's Clay Blog and leave a comment. Here's the link-http://www.makinsclayblog.blogspot.com/2012/10/makins-clay-blog-hop-contest.html


The winner will be randomly drawn from all entries on or about October 24th. We will announce the winner on the Makin's Clay blog so please check back Thursday, October 25th to see if you have won!

I hope you enjoy my project and all of the others. Have a good time hopping and good luck in the contest!

Thank you for joining me. Until next time...
 
Crafty hugs,
 
Lisa
Stampin' Queen Creations
 
Give The Queen A Call!!!
 
 
"Love & Sunflowers" Frame
 
Supplies
 
Makin's Clay- Vineyard & Earth Tones
Makin's Clay Roller & Cutter Set
Makin's Clay Push Molds- Leaves & Florals
Wooden Frame
Graphic 45 Pattern Paper
Bazzill Basics Cardstock
Recollections Rhinestone Stickers
Kreinik Wire Threads
Angelwings Radiant Pearls
K & Company Chipboard Stickers
Beacon Adhesives Zip Dry Paper Glue
Glue Gun
Trim
Ribbon- Black
 
 
Instructions
 

 Take a small amount of cornstarch and brush it around the inside of the mold to avoid sticking. Roll clay into a ball and push into the mold. Use the roller to spread the clay in the mold.
Release clay from mold and trim excess clay with scissors. Once clay is dry color the clay pieces with Radiant Pearls. Let the Radiant Pearls dry.

Next, adhere pattern paper to frame with Zip Dry Paper Glue. Adhere trim to four corners and around the heart opening. Place cardstock into heart opening and adhere stickers. Adhere rhinestone stickers to front of frame. Adhere clay pieces and bow to frame  (see photos for placement) . Curl wired thread around a paintbrush and adhere curls to clay pieces with glue gun. That's it! You're done!!!
 

© Lisa Rojas, Stampin’ Queen Creations


© Lisa Rojas, Stampin’ Queen Creations


Friday, October 12, 2012

Guest Blogger- Holly Simoni

Hi Everyone,

It's Guest Blogger Day here at Stampin' Queen Creations! What does that mean you ask? Well, it means that every Friday I will take off my crown and pass it on to a fabulous professional designer who's work I respect more than words can say. Today I pass my crown to my friend, professional designer, Holly Simoni!!!

To be honest, I haven't really known Holly for that long. We met about 6 months ago through our friend, Theresa Cifali, and her group called "Socially Sensible Creatives". But even though I haven't known Holly long, I know by seeing her work, what an extremely talented designer she is!!! Her work just makes me say "Wow!" She is fabulous!!!

Since I would like for you to know her a little better, this is what Holly has to say about herself-

I live in a small rural town in Wyoming. I have a fabulous husband that supports my
creativity. My art can be a bit wild, grungy, distressed and at times have a graphic
feel to it. Scrapbooking became a hobby for me when my two little girls were born.
It has evolved into an expression of art for me. Photography, scrapbooking, altered
items and other forms of mixed media have become a great outlet for my artistic
endeavors. I have taught altered art, altered books, stamping, Photoshop Elements
and scrapbook classes. I have enjoyed being published in scrapbooking and altered
art magazines. I was a 2006, 2007 and 2009 Spellbinders Design Team Member, am a current Spellbinders Special Projects Designer, Spellbinders Travel Team Member and Spellbinders Blog Author. I have volunteered my time with “Stars in Heaven” – a group of parents who have had a child pass away, and want to make paper arts as a form of therapeutic expression. I have a B.S. Degree in Health and Human Development, and am a Certified Massage Therapist.


So now that you know a little bit more about Holly, make sure you stop by her blog and check out her work for yourself. You will be as amazed as I am with her design style. Holly's blog can be found here-

http://hollysimoni.typepad.com/my_weblog/2012/09/spellbinders-grand-labels-fall-card.html

Holly, I can't begin to thank you enough for allowing me to feature your beautiful work on my blog. Thank you so much!!!

Thank you for joining me. Until next time...
 
Crafty hugs,
 
Lisa
Stampin' Queen Creations
 
Give The Queen A Call!!!


Hs joanns fall card


Wednesday, October 10, 2012

Wordless Wednesday- Colorful Thinking of You Card

Wordless Wednesday's are the days that I post just a project without instructions or a supply list.
 
 
Hi Everyone,
 
For today's Wordless Wednesday project, I thought I would share a card I made with my designer friend, Brenda Pinnick's, rubber stamps. These stamps are great to work with and I know that if you purchase some for yourself, you'll love them as much as I do.
 
For more information on Brenda's stamps, please visit her website at www.brendapinnick.com.
 
Thank you for joining me. Until next time...
 
Crafty hugs,
 
Lisa
Stampin' Queen Creations
 
Give The Queen A Call!!! 
 

Tuesday, October 9, 2012

Bella Crafts Quarterly

Hi Everyone,

I have had lots of blessed events in my life and most of them I have shared with all of you, but today I'm going to tell you about a dream of mine that has finally come true!

I have always dreamed of having my own magazine and after lots of hard work I, along with three of my designer friends Ann Butler, Carol Heppner and Theresa Cifali, have made that dream come true with our brand new FREE digital craft publication called Bella Crafts Quarterly™!


Bella Crafts Quarterly™ is a free downloadable, digital craft publication that you can view on all mobile devices such as cell phones tablets, laptops, computers and e-readers. The digital magazine is free and you can download it on our website. You can also read it free online and a printed version of the magazine is available for a minimal price through MagCloud. Bella Crafts Quarterly™ is like an e-book but in a magazine layout. It is downloadable, which means that it is portable.

Here is what you'll find in this first edition of our magazine-


The Bella Crafts Quarterly™ Halloween issue contains:
  • Socially Sensible™ column with Theresa Cifali covers how social media is important to your craft business
  • Ann Butler’s Artist-to-Artist interview is with Kathy Cano-Murillo, The Crafty Chica
  • Carol Heppner’s Trending Thoughts talks fall trends with craft professionals Laura Bray, Eileen Hull, Julie McGuffee, Debra Quartermain and Marisa Pawelko
  • Ann Butler’s Blog Star column features craft blogger Alexa Westerfield
  • Lisa Rojas’ column, Lessons with Lisa™, discusses Scrapbooking and Rubber Stamping’s burning question.
  • Photo Talk™ with Carol Heppner helps you take better Halloween photos of your little ghouls.
  • This month’s giveaway is by Duetica
  • The Bella Crafts’ Creative Team, Ann Butler, Carol Heppner, Lisa Rojas and Theresa Cifali share Spooktacular craft projects for this Halloween season
  • Free classy wine label downloads to alter bottles for Halloween
Make sure to tell your crafty friends about us. They can download their own FREE copy. Join us on Facebook, Twitter and Pinterest.
 
I am so thriled about this new venture and I hope that you will help me by spreading the word on Bella Crafts Quarterly™. It really does have everything you need in a craft magzine! After you have downloaded your FREE copy, please leave me a comment here on my blog and let me know what you think about it, or you can email us at info@bellacraftsquarterly.com. For your free copy of the magazine, please visit us at www.bellacraftsquarterly.com
 
Thank you for joining me. Until next time...
 
Crafty hugs,
 
Lisa
Stampin' Queen Creations
 
Give The Queen A Call!!!
 
Advertising inquires at info@bellacraftsquarterly.com


Visit the Bella Crafts Quarterly™ http://bellacraftsquarterly.com/ to choose how you would like to read this publication.

The publishers of the Bella Crafts™, the Creative Team, are four of the craft industry’s top professional designers, Ann Butler, Carol Heppner, Lisa Rojas and Theresa Cifali. We have a lifetime of knowledge and expertise in all things that are craft-industry related.


Monday, October 8, 2012

Looking Into The Past- Halloween Basket


Hi Everyone,
Aside from Christmas, Halloween is my favorite holiday. I love everything about it. I love the decorations, the costumes, the make-up and of course, the candy. Every year from the time my children were infants, I spent weeks designing and making each of their Halloween costumes. With all of that time and effort I put into making their costumes each year, I couldn’t let them collect their candy in store bought bags! I used to love watching them run up to our neighbor’s doors, push their candy baskets forward and scream “Trick or Treat!” Once we got back to our house, my kids would pour their baskets of goodies onto the kitchen table and we would sort through all of it to make sure it was safe for them to eat.
Through the years, my children’s trick or treat baskets went from something very simple like a bag sewn from matching material, to hand stamped and painted baskets, depending on what their costumes were for that year.
This project was created years ago so the stamps will no longer be available, but as I have stated before any project that I have shared in my "Looking into the Past" posts can be recreated with the stamps that are on the market today.
So, if you ever come across a project that was made years before, don't cast it off and think that you can never make another one. Just because your supplies may be different, the techniques that are involved remain the same!
Thanks for joining me. Until next time…
Crafty hugs,
Lisa
Stampin’ Queen Creations
Give The Queen A Call!!!
 
Supplies
  • Miss October and Cat S-164 from Close To My Heart
  • Trick or Treat (word stamp) from Penny Black
  • Spider 612-A from All Night Media
  • Bats A-224 from Hero Arts
  • Wood basket from Provo Craft
  • White copy paper
  • Versacolor pigment inkpad- black and purple from TSUKINEKO Inc.
  • Clear embossing powder
  • Aleene’s Premium-Coat Acrylic Paints- True Orange, True Lime
  • Aleene’s Instant Decoupage Matte Finish
  • Paintbrush
  • Foam brush
  • Micron pen- black
  • Prismacolor Color Pencils
  • Ribbon- orange and green
  • Exacto knife
  • Heat tool

Instructions
Step 1. Using a paintbrush, paint lid of basket with orange acrylic paint. Paint handle and top rim of basket with green acrylic paint. Set aside to dry.
Step 2. Stamp witch and cat onto white copy paper. Color both images with color pencils and cut out. Next stamp bats and spider along handle, top rim and lid of basket with black pigment pad. Emboss all images with clear powder.
Step 3. Stamp “Trick or Treat” on lid of basket with purple pigment inkpad and emboss with clear powder. Apply instant decoupage with foam brush to lid, lay stamped images down and apply decoupage over images. Be sure to work fast. Instant decoupage dries quickly.
Step 4. Cover entire lid, handle and top rim with decoupage. Let dry, then repeat the step. When basket is completely dry, add ribbon bows to each side of handle. Add stitch marks to lid with Micron pen.


Wednesday, October 3, 2012

Wordless Wednesday-Halloween Card

Wordless Wednesday's are the days that I post just a project without instructions or a supply list.


Hi Everyone,

For today's Wordless Wednesday post I have a extra surprise for you! I don't include instructions on my Wordless Wenesday's post, but if you want to know how I created this fabulous Halloween card, please head over to the KellyCraft website. There you will not only find the instructions for this card, but I also did step by step photos! Be sure you check it out!

Thank you for joining me. Until next time...
 
Crafty hugs,
 
Lisa
Stampin' Queen Creations
 
Give The Queen A Call!!!


Monday, October 1, 2012

Designer Craft Connection Hop


Hi Everyone,

It’s the 1st Monday of the month and that means it’s Designer Craft Connection Blog Hop Day! And this month’s theme is Halloween! I just love Halloween! It’s one of my favorite holidays and the project I created for this hop is a Halloween Centerpiece. 

I also have some wonderful news to share with you. I am so pleased to announce that I am joining Ann Butler, Carol Heppner and Theresa Cifali as part of the Creative Team for Bella Crafts Quarterly™.  It is a completely FREE digital craft publication that you can download on your computer, laptop, tablet, e-reader and cell phone. 

In this fabulous new publication, you will find a variety of columns written with you in mind.  The Socially Sensible™ column addresses topics related to social media for those in the creative industry. Artist to Artist is an in-depth interview with the craft industry’s hottest personalities. Trending Thoughts offers top professionals’ opinions on the newest trends for the season.  Blog Star introduces you to the Internet’s best craft bloggers.  

You can improve your skills with Bella Crafts Quarterly’s™ mini classes.  My column, Lessons with Lisa™ covers craft technique topics to boost your skills and Photo Talk™ helps you take your photography to the next level. 

Do you love giveaways? The first 100 people  to like and message Bella Crafts Quarterly™  on Facebook and then send a Facebook message with their name an email address will receive an amazing Duetica font absolutely FREE! Of course, there are fabulous craft projects.

Check out Bella Craft Quarterly™ Halloween Video here-

You can find Bella Crafts Quarterly™ on Facebook, Twitter and Pinterest. Let us know what you are creating.  Share your craft pictures on our Facebook Page and with us on Pinterest.  

Other items in the Halloween issue:
  • Socially Sensible™ covers how social media is important to your craft business
  • Artist to Artist interviews Kathy Cano-Murillo, The Crafty Chica
  • Trending Thoughts talks fall trends with craft professionals Laura Bray, Eileen Hull, Julie McGuffee, Debra Quartermain and Marisa Pawelko
  • Blog Star features craft blogger Alexa Westerfield
  • Lessons with Lisa™ discuss Scrapbooking and Rubber Stamping’s burning question.
  • Photo Talk™ helps you take better Halloween photos of your little ghouls.
  • This month’s giveaway is by Duetica
  • The Bella Crafts’ Creative Team, Ann Butler, Carol Heppner, Lisa Rojas and Theresa Cifali share Spooktacular craft projects for this Halloween season
  • Free boo-tiful wine label download to alter bottles for Halloween

So, after you have finished hopping, please head over to MagCloud to download your FREE issue of Bella Crafts Quarterly™

Also in October the DCC Manufacturer Blog Hop features Makin's Clay so be sure to come back here Saturday October 13th to see some fabulous project showcasing Makin's No Bake Polymer Clay.
Makin's Clay will be giving away a prize package just over $100 retail cost to one lucky reader! In order to enter go to the Makin's Clay Blog between Saturday October 13 – Wednesday October 24; here is the link: http://makinsclayblog.blogspot.com/2012/09/makins-clay-blog-hop-contest.html  details for entering and winning will be posted there.
Thank you for joining me. Until next time...
 
Crafty hugs,
 
Lisa
Stampin' Queen Creations
 
Give The Queen A Call!!!
 
 Instructions to this project can be found by downloading you FREE issue of Bella Crafts Quarterly™ at www.bellacraftsquarterly.com!!!