Saturday, May 12, 2012

Designer Craft Connection- ImpressArt Blog Hop


Hi Everyone,

 The day is finally here! The Designer Craft Connection professional designers have been very busy creating wonderful designs with the fabulous products from ImpressArt Metal Stamps and embellishments.

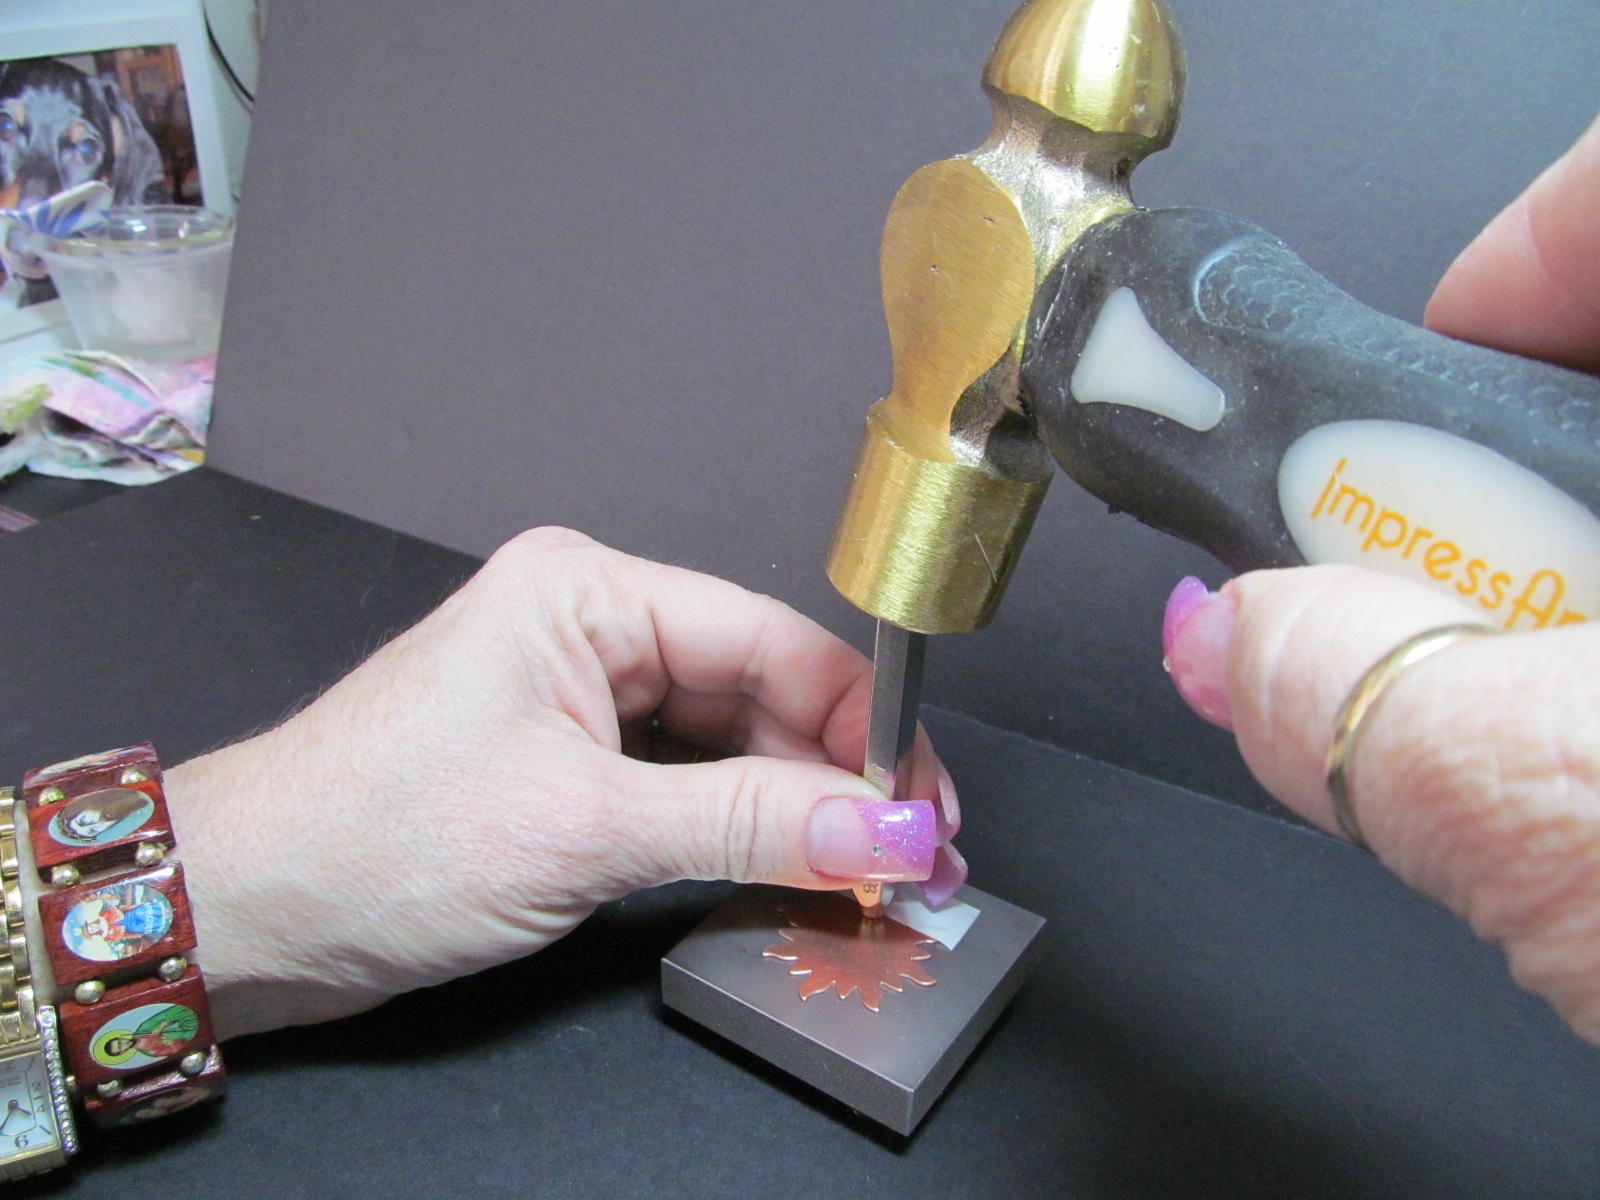
I must admit that this was the very first time I used these metal stamps and I was a little nervous that they would be hard to use. My first thought was I was going to break one of my fingers, or worse than that, I would break a new manicured nail! Oh my gosh, we cannot have that! But I realized that after I practiced a few times and I made sure that I taped the metal embellishment down to the metal pounding block, these little metal stamps were very easy to use.

Well, that was all it took to have me hooked! I began pounding these little metal stamps on everything. I finally had to stop because the constant pounding was scaring my little wiener dog so badly that I was sure she was going to have a doggie heart attack!!!

So with scared wiener dogs aside, if you’re looking for great ideas using these terrific metal stamps, you have come to the right place. All you need to do is clink on the Designer Craft Connection blinkie on the right side of my blog to begin hopping from one blog to the next. And for more information on the ImpressArt Metal Stamps and embellishments, please visit their blog at www.impressart.com. I hope you have a wonderful time hopping from blog to blog. I know I will!!!

Thank you for joining me. Until next time…

Crafty hugs,

Lisa
Stampin’ Queen Creations

Give The Queen A Call!!!

Contest*Contest*Contest*
ImpressArt Metal Stamps will be hosting a very cool contest. For more details on the contest, check back with me on Monday and I'll have all the terrific details!


“Let it Shine” Key Ring

Materials for Project

Materials

ImpressArt Alphabet Stamp Set, Jeanie, (lowercase)
ImpressArt Design Stamp, Whimsy Flower
ImpressArt Metal Stamping Blanks, Sun & Star
ImpressArt Metal Stamping Hammer
ImpressArt Metal Stamping Block
ImpressArt Stamp Straight Tape
Mat board
Pattern paper
Tan cardstock
Jewels
Micro Beads
Key ring
Fibers
ColorBox Pigment Inkpads- Gold, Copper& Moss Green by Clearsnap
Clearsnap Clear Embossing Powder
Smooch Pearlized Accent Ink- Pumpkin by Clearsnap
Heat tool
Hole punch
Super Tape
Zip Dry Paper Glue by Beacon Adhesives
Dazzle Tac Jewelry Glue by Beacon Adhesives
Marker
Sun & Star Rubber Stamps

Instructions

1.    Cut mat board into the shape of a tag. Adhere pattern paper to the front and back of tag. Cut tan cardstock into tag shape smaller then mat board. Stamp sun & stars randomly on cardstock with pigment inkpads, cover with embossing powder and heat.


2.   Adhere cardstock to tag. Color center of the sun with Smooch. Adhere Super Tape around edges of tag and cover with micro beads.  Set aside.
3.    Place metal sun embellishment onto the Steel Stamping Block. Tape into place with Stamp Straight Tape. Using Metal Stamping Hammer, stamp “let it shine” on the sun. Repeat with metal star embellishment using small flower stamp. Scribble impressions with a marker. Wipe off excess marker ink.


4.    Punch hole in tag. Tie fibers through the tag and key ring. Using Dazzle Tac, adhere jewels to metal embellishments and three jewels to bottom of tag. Tie metal embellishments to key ring.


©Lisa Rojas, Stampin’ Queen Creations


Friday, May 11, 2012

Impress Art Blog Hop


Hi Everyone,

I am so happy to announce that tomorrow a few designers from the Designer Craft Connection will be hosting a special manufacturer blog hop! What is this you ask? Well, let me explain. If you have followed the Designer Craft Connection blog hops with me, you'll know that each of us are professional designers in the craft industry. Every once in a while we are notified by a manufacturer who want us to design projects around their product. And that's exactly what we're going to be doing tomorrow!!!

So, if you're looking for some fabulous projects with this wonderful product, join me for a fun day of hopping. In order to hop from blog to blog all you need to do is clink on the Designer Craft Connection blinkie on the right side of my blog. Happy hopping!!!

Thanks for joining me. Until next time...

Crafty hugs,

Lisa
Stampin' Queen Creations

Give The Queen A Call!!!

Thursday, May 10, 2012

Guest Blogger- Molly Smith

Hi Everyone,

Today I am very please to announce that my good friend and designer, Molly Smith, is my Guest Blogger. I have know Molly for the last twelve years, when we first met at a Society of Creative Designers conference. She is a sweet Texas lady with an accent that I absolutely adore! And she is the sweetest person you will ever meet!!! But, Molly's talents are just amazing! What this woman can do with quilling paper will blow your mind! I myself, don't really know how to quill so, I thought what a great person to have on my blog. Molly can show you things that I would never begin to know how to do!

Molly created this beautiful Mother's Day card that I felt I just needed to share and with Mother's Day right around the corner, what a better time! You can see how she created this card by going to her blog. So, please do me a favor and visit Molly's blog for more of her amazing work at www.itsmollysmith.blogspot.com. And thank you Molly for allowing me to feature your beautiful work on my blog. You're the best!!!

Thank you for joining me. Until next time...

Crafty hugs,

Lisa
Stampin' Queen Creations

Give The Queen A Call!!!


©2012 Molly Smith


Wednesday, May 9, 2012

Wordless Wednesday- Pocket Card-Bathtime


Thank you for joining me. Until next time...

Crafty hugs,

Lisa
Stampin' Queen Creations

Give The Queen A Call!!!

Monday, May 7, 2012

Designer Craft Connection- Jewelry


Hi Everyone, 

Starting this week I have decided to cut my blogging back to three times a week. I have tried to do my blog post five times a weeks but I’m finding that it’s taking more and more time away from my designing work. Even thought I’ll only be blogging three times a week, with maybe some surprises thrown in now and then, I will still try to bring you quality posts. I really feel like the amount of time doesn’t matter near as much as posting good quality projects and information. So, I hope you’ll bear with me as I try some new things, but things I know you’ll enjoy. Stay tuned for that!!! 

Now that we have the business stuff out of the way, let’s have some fun! Today is the first Monday of the month and that means Designer Craft Connection Blog Hop! This month our theme was Jewelry. Now, everyone that knows me knows that I’m not a jewelry maker, but I am a mixed media artist so, my piece of jewelry is done with rubber stamps (of course!!!) and shrink plastic. Then I added a few beads, some charms and that’s it! I had myself a very beautiful pin! 

Since it is a Designer Craft Connection Blog Hop day, please don’t forget to click on the blinkie that is on the right side of my blog so that you can hop to all of the other designer’s blogs to see what fabulous creations they all came up with. On some of the blogs you may have to look around a bit to see the Designer Craft Connection blinkie, but each of us has one and that is how you will get around to each of our blogs. I hope you have a wonderful time hopping from blog to blog. 

Thanks for joining me. Until next time….

Crafty hugs,

Lisa
Stampin’ Queen Creations

Give The Queen A Call!!!


Face Pin- Cross


Materials

Ÿ  Italian Poetry Background by Hero Arts

Ÿ  Dance of the Butterflies by Paper Inspirations

Ÿ  Shrink plastic- Black and White

Ÿ  Brilliance pigment inkpad- Starlite Silver

Ÿ  Stab On solvent inkpad- Black

Ÿ  Versa MarkÔ Watermark Inkpad

Ÿ  Ultra Thick Embossing Powder- Clear

Ÿ  Assorted beads

Ÿ  Jewelry findings

Ÿ  Micro silver beads

Ÿ  Cross charm

Ÿ  Hole punch- ¼”

Ÿ  Heat tool

Ÿ  Diamond GlazeÔ

Ÿ  Faber-CastellÔ Color Pencils

Ÿ  Deckle scissors

Ÿ  Sandpaper

Instructions

1.  Prepare the shrink plastic by following manufacturer’s instructions. Stamp Italian Poetry on black shrink plastic with Starlite Silver. Stamp Dance of the Butterflies (face stamp) on white shrink plastic with black inkpad. 

2.  Color lips on Dance of the Butterflies image with a red color pencil. Cut out both stamped images with deckle edge scissors.  Punch hole in the bottom center of the Italian Poetry image. Shrink plastic with heat tool or oven, following manufacturer’s directions. 

3.  Apply VersaMarkÔ inkpad to Dance of the Butterflies image. Pour Ultra Thick Embossing Powder over image, shake off excess powder and heat with heat tool. Repeat process three more times. 

4.  Using Diamond GlazeÔ adhere four tiny beads to the back of the Dance of the Butterflies image. Add a jump ring with a small bead to top of cross charm. Adhere cross charm and Dance of the Butterflies image onto ItalianPoetry image                                                               

5.  Using Diamond GlazeÔ adhere silver micro beads and a few small beads to the lower right side of the Italian Poetry image. Add large square bead and assorted beads to a silver jewelry rod.     

6.  Add jump ring to Italian Poetry image and attached beaded jewelry rod to jump ring. Adhere a pin back to the back of the finished piece with Diamond GlazeÔ.


Friday, May 4, 2012

Looking into the Past- Around the World Lamp

Hi Everyone,

I told you all at the beginning of the week that I was going to go back into my archives of published projects and today I wanted to share my "Around the World"Travel Lamp"  with you. I created this project in 2001 and it was published in The Rubber Stamper magazine that year.

This is a project that will never go out of style and right now it lights up at my brother, Jeff's house. When he saw it he said that he just had to have it and I'm glad it has a great home! I knew that you wouldn't be able to see the directions from the magazine so I  managed to find them in case you wanted to create you very own. If there is a product that is not available in stores now, just substitute it with what's out there now.

Thanks for joining me. Until next time...

Crafty hugs,

Lisa
Stampin' Queen Creations

Give The Queen A Call!!!


Around The World Travel Lamp
SUPPLIES
Wood base by Walnut Hollow
Lampshade
Electrical lamp kit
Papier-mâché box
Papier-mâché picture frame
Old wire frame glasses
Tan Mulberry Paper by PSX
VersaMark Watermark Stamp Pad by TSUKINEKO
VersaColor Ultimate Pigment Inkpad in Sage Green & Paprika by TSUKINEKO
Brilliance Pigment Inkpad in Coffee Bean by TSUKINEKO
Delta Ceramcoat Matte Interior Spray Varnish
Delta Ceramcoat All Purpose Sealer
Delta Ceramcoat GLEAMSÔ Acrylic Paint- Metallic Kim Gold
Delta CeramcoatAcrylic Paint- Dark Brown
Delta Ceramcoat Satin Decoupage Medium
Delta Ceramcoat Brown Antiquing Gel
Primary Elements Polished Pigment Powders by Angelwings Enterprises
Spray Adhesive
4- 1” Wooden balls
2- Gold tassels
Gold braided trim
Assorted charms
Miniature postcards for decoupage
Paintbrush
Glue gun
Glue stick
Rubber Stamps by Rubber Stampede
Shipboard  Crossing- 3010H
Travel Map- 3007F
Nostalgic Pocket Watch- A2528D
Medium Feather- A2585C
Passport- 2825B

INSTRUCTIONS

Step 1. Paint wood base with Metallic Kim Gold acrylic paint. Paint box and wooded balls with Dark Brown acrylic paint. Let dry. Using a paintbrush, apply Antiquing gel to base then wipe off with a soft cloth until you reach the look you desire.
Step 2. Lay lampshade onto a large piece of butcher paper. Slowly roll lampshade on paper and trace the lampshade with a pencil. Cut out pattern leaving a ½” border along all sides. Next, trace pattern    on mulberry paper.
Step 3. Stamp Shipboard Crossing four times with Coffee Bean inkpad. Stamp Travel Map with Paprika inkpad randomly. Stamp Passport with Sage Green inkpad. Stamp Pocket Watch and Medium Feather with VersaMark inkpad.
Step 4. Dip a small paintbrush into the pigment powders and lightly brush over Pocket Watch and Feather images. Spray stamped mulberry paper with varnish. To adhere paper to the lampshade, spray adhesive on lampshade. Working in small sections, apply mulberry paper to lampshade. Glue trim, tassel and charm to lampshade with glue gun. NOTE: Tassel and charm are on the back of the lampshade.
Step 5. Place pictures in papier-mâché frame. Lay frame on a piece of mulberry paper. Cut paper to size of rame. Cut out the sections where the photos are placed. Stamp Feather along openings with the VersaMark inkpad and brush pigment powders over stamped images.
Step 6. Apply glue stick to the front of the frame and adhere mulberry paper, covering the entire frame. With glue gun, add trim along the edges of the frame, the tassel and charm to the center.
Step 7. For the papier-mâché  box, stamp feather with VersaMark inkpad along the front and sides of the box. Apply pigment powder to images. Cut out miniature postcards and decoupage to top of box. Cover entire box with decoupage medium.
 Step 8. Cut a piece of mulberry paper into a 5” square. Stamp feather randomly over entire piece of paper with VersaMark inkpad and apply pigment powder to images. Glue wood balls to the bottom of the base with glue gun.
Step 9. Spray wood base with varnish. Let dry thoroughly. Assemble electrical kit to base following the manufacturers instructions. Glue items to the base of the lamp with glue gun.


Thursday, May 3, 2012

Stampin' Queen Creations: Guest Blogger- Phyllis Dobbs

Stampin' Queen Creations: Guest Blogger- Phyllis Dobbs: Hi Everyone,   I am so excited to introduce to you my Guest Blogger this week is my designer friend, Phyllis Dobbs ! I have known P...

Guest Blogger- Phyllis Dobbs


Hi Everyone, 

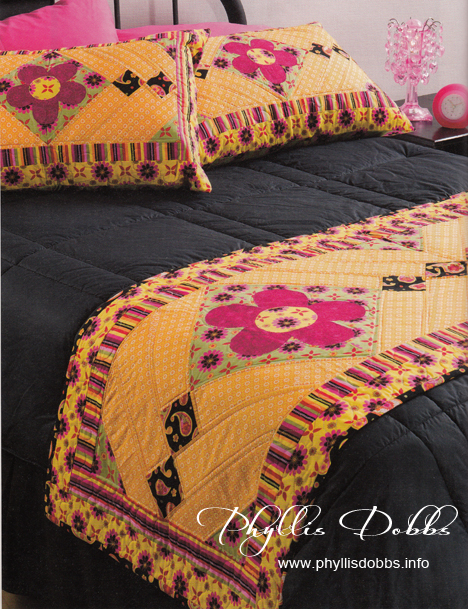
I am so excited to introduce to you my Guest Blogger this week is my designer friend, Phyllis Dobbs! I have known Phyllis for many years and I have always admired her work as a designer, but I have to tell you when I went to her website for this post, I was just blown away!!! 


Phyllis's website is chalk full of beautiful pictures of all of her gorgeous sewing projects. I, myself cannot sew very well so, I am in awe of my talented friends that can. All I can say about Phyllis’s designs is that each and every one is a work of art!!! Please check out her website http://www.phyllisdobbs.info  Be prepared to be amazed!!! 

Thank you for joining me. Until next time…


Crafty hugs, 
Lisa
Stampin’ Queen Creations
 
Give The Queen A Call!!!


Bed Runners and More quilt Summer Blossoms by Phyllis Dobbs

Wednesday, May 2, 2012

Wordless Wednesday- Sunflower Pocket Card


Thanks for joining me. Until next time...

Crafty hugs,

Lisa
Stampin' Queen Creations

Give The Queen A Call!!!

Tuesday, May 1, 2012

Looking into the Past- Apron Recipe Book and Magnet


Hi Everyone, 

I thought for this week of posts I would go through my archive of published projects and share with all of you some projects that I designed years ago. A lot of people think that if a project was created years ago, it won’t be popular. Sometimes that thought is true, but a wonderful design in my humble opinion, will always be worth repeating! 

So, take a look at a few of my designs this week and then you tell me. Are they worth re-creating? If so, pull out those supplies and re-create some of that old magic!!! 

Thank you for joining me. Until next time…

 Crafty hugs,

Lisa
Stampin’ Queen Creations 

Give The Queen A Call!!!


Published in Craft Home & Style Magazine