Tuesday, April 10, 2012

An Unforgettable Wedding

Hi Everyone,

Today I thought I would share an altered book project of my parents wedding. There are tons of altered book ideas out on the internet and some of them are very difficult, but I assure you this is a very simple version of one. So, you don't need to be an expert to create this project. All you need is an old book, some good glue, pictures, and some beautiful papers and embellishments.

If you decide to re-create this project I hope you have as much fun making yours as I did when I designed this one. Get you supplies together and lets make an altered book!

Thanks for joining me. Until next time...

Crafty hugs,

Lisa
Stampin' Queen Creations

Give The Queen A Call!!!


An Unforgettable Wedding

SUPPLIES

Old book
Pattern paper by K & CompanyÒ
Butter cream card stock
Mat board
3D Tags by K & CompanyÒ
Metal charms by Karen Foster DesignsÒ
Soft Spoken EmbellishmentsÔ by Me & My Big IdeasÒ
ArchitextureÔ Stone Frame by E.K. SuccessÒ
Expressions Word Charms by All My MemoriesÒ
Delta CeramcoatÒ Acrylic Paint- AC Flesh
JacquardÒ Lumiere Paint- Metallic Bronze
FrescoÔ Chalk Finish inkpads- Medici Marble, Golden Parchment, Olive Grove, Florentine Rose
VersacolorÔ Pigment inkpad- Ash Rose by TSUNKINEKOÒ
Assorted fibers
Gold string
Beaded trim
Beaded string
Piece of gold netting
Fabric bag filled with rice
Small Glass bottle filled with dried flowers
Perfect Paper AdhesiveÔ- Matte Finish by US ArtquestÒ
Super TapeÔ by Therm O WebÒ
Glue gun
Computer font used- Amazone BT
Rubber stamp- Sprig Engraving by Rubber StampedeÒ

INSTRUCTIONS

Step 1. On card stock type lettering using computer font Amazone BT. NOTE: Leave enough room between the lettering to make your tags. Cut mat board and card stock the size of a 1 ¾”H x 3 ¾”W tag. Adhere card stock to mat board with Super TapeÔ.   

Step 2. Using the Direct to Paper technique, apply Fresco inks to tags. Stamp sprig on tags with Ash Rose inkpad. Adhere metal charms to three of the tags with gold string. Add fibers to all six tags.

Step 3. Paint the cover with acrylic paint. Adhere pages together with Perfect Paper AdhesiveÔ. When dry, paint page edges with Lumiere paint. Adhere pattern paper to the book’s front cover and the book’s center (which is now your focal point).

Step 4. With an exacto knife, make three slits on each side of the book to separate the pages and gently slide tags into place. Glue tags to pages with Perfect Paper AdhesiveÔ.

Step 5. Adhere the picture frames, word tags, charms, and other items to book with Super TapeÔ 
(see picture for placement). Adhere beaded trim and metal charm corners with Super TapeÔ.

Monday, April 9, 2012

The Best News Ever!!!


Hi Everyone,

I hope you all had a wonderful, blessed Easter with everyone you love. And for those of you who could not be with your loved ones, I hope that you will be united with them very soon!

My Easter was a lovely one that was even more special with the announcement that I will be a first time Grandma! My only daughter found out she was pregnant and my new grandbaby is due in December, hopefully just in time for Christmas. I am just over the moon with excitement!!!

Of course we have already begun making plans for the baby’s nursery. I have said before that I am so very fortunate to have a wonderful group of professional designer friends. A few years ago my designer friend, Vicki Schreiner, started designing a collection of fun and fanciful characters she called “Bazooples”.  She had just started a nursery line with her Bazoople characters and she gave me a bedding set to give to my daughter who was trying at the time to get pregnant. Well, we pulled the set out of the storage and we spent the weekend searching the internet for more Bazoople material so we can finish making curtains and other things for the nursery. We had the greatest time!!! For more information on Vicki and her Bazooples, check out her website at www.vickischreiner.com and www.bazooples.com

What make this even more special is that 30 years ago this week, I found out I was pregnant with my daughter! So, I would like to dedicate my post for today to my daughter, Richelle Elisabeth.

My very special girl, may your child bring you as much joy and happiness to your life that you have brought to mine. I love you Mija!!!

Thank you for joining me. Until next time…

Crafty hugs,

Lisa Rojas
Stampin’ Queen Creations

Give The Queen A Call!!!

Friday, April 6, 2012

Bunny Bag on the Cool2Craft Easter Show

This past Monday the Cool2Craft Web TV Show had a great show dedicated to Easter Crafts....these are quick and easy projects that you can still make in time for Easter....

One of which is this adorable Bunny Bag made by my creative girlfriend Tiffany Windsor. You can check out the replay of the show by going to the Cool2Craft web site; the show replays 24 hours a day until the following Monday when the new show airs!

Thanks for joining me. Until next time...
Crafty hugs,
Lisa
Stampin' Queen Creations

Give The Queen A Call!!!

Thursday, April 5, 2012

Spring Bouquet in Recycled Glass- Guest Designer Eileen Hull

Hi  Everyone!

Every Thursaday I'm going to share with you some projects that are created by my very talented professional designer friends. This is one of those projects. This beautiful spring bouquet was created by Eileen Hull. For more of Eileen's project ideas, please visit her blog at www.eileenhull.blogspot.com

Thanks for joining me. Until next time...

Crafty hugs,

Lisa
Stampin' Queen Creations

Give The Queen A Call!!!


The glass jars in my recycling bin keep finding their way down to my studio. I am trying to slowly reorganize and glass containers are great because I can see what's in them and also they're free! But kind of boring...
Here's what I did with a larger jar. It had no lid- I don't know where this came from. I thought it was a good size for a vase. All I did was add a 12" piece of pretty packing tape around the circumference of the jar. I thought about adding ribbon but then I won't be able to send it through the dishwasher. So this is how it will stay!
The only flowers I have blooming right now are daffodils but there aren't that many (in fact I just went out to pick some and saw that my zealous husband had just mowed them in a fit of spring fever! I will not repeat what I may have said. Don't worry- he didn't hear because he had returned to the mowing). So I picked the few remaining daffodils and some pretty forsythia and greens.

I used the lid of a to-go cup from Subway to support the stems (daffodils are so floppy!). Using a Crop-a-dile and awl, I punched some holes to stick the stems in and there you have it- a pretty spring bouquet!

Wednesday, April 4, 2012

Free Easter Books

Just in time to help you get ready for Easter 2 FREE eBooks for you: "8 Easter Sewing Projects" and "Easter Eggs" from FaveCrafts!

"8 Easter Sewing Projects" has 8 cute & simple sewing projects that you still have time to make this week for Easter! Plus it is FREE so click here to download!

"Easter Eggs: Easter Egg Design, Tips for Perfect Hard Boiled Eggs & Egg Recipes" is full of fun ideas for Easter. You will learn how to make your own Easter Egg Dye and get tips on how to cook hard boiled eggs. This eBook is a collaboration of FaveCrafts and RecipeLion and includes recipes for your hard boiled eggs!
Check it out here and get it FREE!
 
Thanks for joining me. Until next time...
 
Crafty hugs,
 
Lisa
Stampin' Queen Creations
 
Give The Queen A Call!!!

Tuesday, April 3, 2012

Keeping Track of Your Stamps!


If you are just starting out with rubber stamping and you only have a few stamps, you may not think it’s all that important to have a filing system. Trust me, it is! Because when your little hobby grows into a full blown obsession, that shoebox you were using to store those 20 rubber stamps you started with are not going to hold the thousands of stamps you have managed to purchase through the years. You need a filing system!

Here are a few ideas you can consider.

First, you are going to need some place to store your rubber stamps. If you’re lucky, you can ask your handy man husband to build you some shelves to hang on the walls. For me, this was not a good option. My studio room was added on to my house and three out of the four walls are windows. So, I went to the next best thing. I began purchasing the seven and eight drawer Iris carts. You can place two layers of stamps in the smaller drawers and up to four layers in the larger drawers. Believe me, you can get a lot of stamps in those carts. If you plan on having layers of stamps in the drawers, place them first in the Lucite picture frames that you can purchase from places like Target or Wal Mart. It is so much easier to pull out a tray of stamps then to pick up each stamp individually to see what’s under it. Place your stamps into categories such as holidays, people, backgrounds, etc. Next, label your trays and drawers with the category and numbers, #1, #2, etc. Once your stamps are put into your Iris carts, you are ready to begin to catalog them. Here are a few different options for doing just that.

Three-Ring Binder- You can purchase a three-ring binder from any office supply store, or discount store. Fill binder with white card stock and dividers. Each time you purchase a new stamp, decide what category it will go into. Stamp the image on the card stock. Next to the image, list the manufacturer, the price, etc. and the number of the Iris cart where it will be stored. You can now take your binder with you the next time you go shopping. This is a good way to alleviate buying duplicate stamps.

Index Cards & Recipe Box- This method is pretty much the same as the three-ring binder. Stamp your image on a 3”x5” index card. List all the information about the stamp on the card. Separate the cards into categories. Keep them filed in a small recipe box. Place the recipe box onto your work table for easy access to all your stamps.

Photograph Your Stamps- Place your stamps in Lucite frames. Place the frame on a table and take picture of the tray. Print out the pictures and label which drawer the stamps will be stored in. Keep pictures in a file box or three-ring binder. Another option is to create a folder in your computer and keep the pictures and information in that file. Be sure to back up all your information on a disk.

There are a number of ways to keep track of your stamps and supplies. I have just given you a few tried and true ways that stampers have been using for years. If you need more information on this topic, try searching the internet. There are thousands of articles written about this topic. I can never stress this topic too much. If you are just beginning to get into rubber stamping and scrapbooking, start keeping track of your supplies now! It may not seem like a big deal now with your 20 or 30 stamps, but when you are into the thousands, you will thank me!

Thanks for joining me. Until next time…
Crafty hugs,

Lisa
Stampin’ Queen Creations
Give The Queen A Call!!!

Monday, April 2, 2012

Designer Craft Connection Blog Hop- Theme- Spring!


Hi Everyone,

It’s the first Monday of the month and everyone knows what that means. The professional designers of the Designer Craft Connection have put together another wonderful blog hop for all of you. Be prepared to feast your eyes on over 50 fabulous projects from this terrific group of designers. 

Our theme for this blog hop is anything “Spring”. As you hop around each of our blogs, I hope our projects will inspire you to create some project for this wonderful time of year. For those of you that are just joining us and you’ve never attended one of our hops before today, it is sooo easy to do. You just click on the hop forward on the Designer Craft Connection blinkie on the right side of my blog and you’re done! Where else can you find over 50 different projects all in one area? HERE! That’s where! Have fun and happy hopping!!! 

Thanks for joining me. Until next time…

Crafty hugs,

Lisa
Stampin’ Queen Creations

 Give The Queen A Call!!!


A Home is a Blessing Photo Display


materials

Ÿ Create & Treasure® Ready to Go Blank Board Book™

Ÿ Midwest Products® Basswood Piece & Strips

Ÿ K & Company® Chipboard Frames & Words

Ÿ K & Company® Pattern Paper

Ÿ Bazzill Basic Papers® Cardstock- French vanilla, pink, light green, gold, lilac, light blue

Ÿ Bazzill Basic Papers® Just the Edge™ Cardstock Strips- vanilla

Ÿ Various Fibers

Ÿ Gold Key

Ÿ Flower Soft®- sage, spring, fuchsia, nut brown, pale green

tools

Ÿ Midwest Products® Easy Cutter Ultimate™

Ÿ Stamps: Mason Creation Stamps- House Set, Flower Soft® Quiet Corner Bench Set™, Moments in Time™

Ÿ Decorative Scissors

Ÿ 24 Gauge Wire- green

Ÿ Inky Antics® Gamsol Mineral Spirits, Blending Stump

Ÿ Clearsnap® Vivid! dye inkpads- Tuscan tan, brown, black

Ÿ Krylon® Preserve It! Paper Protectant™

Ÿ Beacon Adhesives® Zip Dry Paper Glue™, Flower Soft® White Glue, Foam Tape


basic supplies
scissors, craft knife

 directions

1   Front Cover- Adhere pattern papers to both sides of blank book. Adhere trim pieces to both edges and down the center of the inside.

2   Stamp house set with black inkpad. Color images with color pencils, cut out, and spray with Preserve It!

3   For the door- cut two pieces of card stock 2 ½”W x 31/2”H. Using the Easy Cutter, cut one piece of basswood 2 ¼”W x 31/2”H and one 3/8”W x 3 ½”H. Adhere wood pieces to cardstock, scoring down 3/8” from the left edge to create the “hinge”. Ink edges with brown inkpad. Adhere door image to wood piece. Adhere second piece of cardstock to front of blank board. Next, adhere door on top of cardstock making sure to glue the door hinge only, leaving door to open and close. Print saying on computer, cut out with decorative scissors. Ink edges with brown and Tuscan tan inkpads and adhere to inside of door.

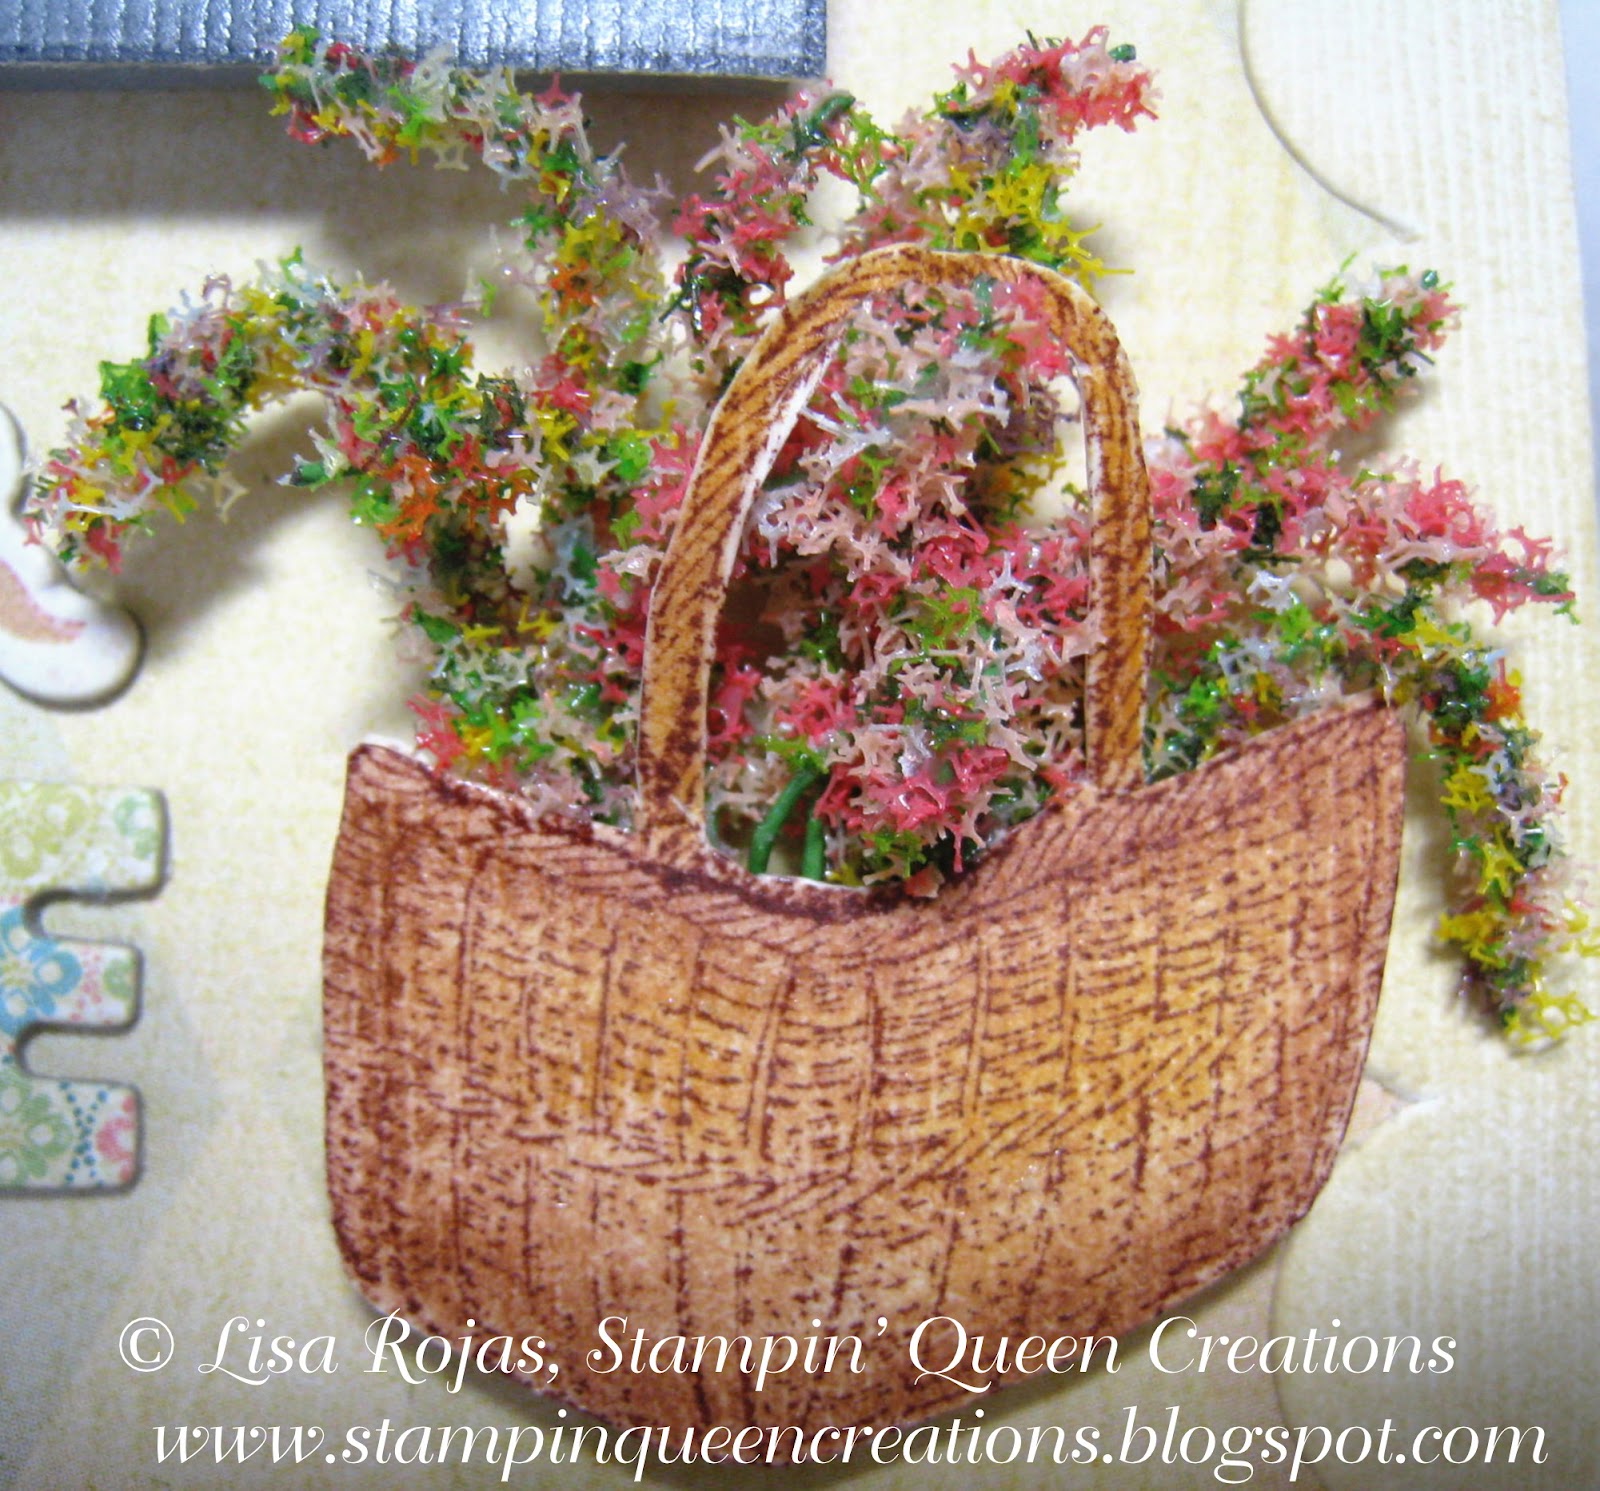
4   For the steps- cut two pieces of basswood 3”W x 1/8”H and 4”W x 1/8”H. Adhere to back of stairs and then to blank board cover. Stamp baskets four times with brown inkpad, color, cut out and adhere to blank board cover with foam tape.

5   Cut wire into 2” strips. Add Flower Soft glue to wires. Sprinkle Flower Soft over wires and let dry. Shape flower branches and adhere to inside of baskets. Attach key to chipboard word with various fibers. Adhere chipboard pieces to blank board cover.

6   Inside Cover- Stamp girl two times with black inkpad. Color image and cut out. Spray with Preserve It! Adhere Flower Soft to kitty and flowers with Flower Soft glue. Adhere foam tape between images and adhere to inside cover.

7   Place pictures in chipboard frames. Adhere frames and chipboard pieces to inside cover. Use project picture for placement if needed.
tips: Use Zip Dry Paper Glue for project unless otherwise noted.

Friday, March 30, 2012

Happy Birthday to Me!!!


Hi Everyone, 

Well, I don’t have any great projects to share with you today or any wonderful words of wisdom, I just want to say that tomorrow is my birthday and I’m really excited about it. If all goes well and my health holds up, Rich & I are going to see Jeff Dunham in Los Angeles. If you have never seen this ventriloquist in person, you really have to check him out on television. He makes me laugh so hard, it’s easy to forget the problems of everyday life. Here’s his website is you want more information. www.jeffdunham.com


Thanks for joining me. Until next time…

 Crafty hugs,

Lisa
Stampin’ Queen Creations


Give The Queen A Call!!!

Thursday, March 29, 2012

Guest Blogger- Ken Oliver


Hi Everyone!

I have decided to make a couple of changes on my blog that I know you will love! Since I have so many extremely talented designer friends, I have decided that each Thursday I will spotlight a project from one of these great people.

Now of course I asked each guest blogger for permission to put their work on my blog and I ask that you pretty please, respect all of the copyright laws that go with each design that I post. 

My first guest blogger is Ken Oliver www.vertigographic.com There is nothing I can say about Ken’s work that doesn’t speak for itself. He is simply amazing and it is my pleasure to feature Ken as my first guest blogger. I think that you will agree! Feast your eyes and enjoy!!!


Thank you for joining me. Until next time…

Crafty hugs,

Lisa
Stampin’ Queen Creations

Give The Queen A Call!!!


Copyright of Ken Oliver
List of Tools and Supplies:

Spellbinders Grand Calibur Die Cutting MachineSpellbinders Classic Rectangles LGSpellbinders M-Bossabilities Flower FunSpellbinders Labels EightSpellbinders Bitty BlossomsCore’dinations Core Essentials SnowflakeCore’dinations Core Essentials Satin RoseGlue Arts Glue Glider ProGlue Arts 3-D Raisen’sAleene’s Original Tacky GlueQuick Quotes Powder Puff Chalking Ink Amaretto


Wednesday, March 28, 2012

The Love of my Life


Rich & I October 2011
Always the goofball!!!
Hi Everyone,


I know that today is Wordless Wednesday, but today I have a lot to say! Today is my 31st wedding anniversary! And I want to share some pictures of the love of my life, my husband, Rich.

Rich & I met in 1977 when I was 17 years old and a junior in high school. He was an “older man” at 20 years old and we met through our good friends, Mike & Mel. One of the first times I saw Rich, I literally fell through a bathroom door and landed on my butt! Thankfully Rich was walking by and didn’t see me making a complete fool out of myself!!! Needless to say, Rich found out about my little bathroom incident and I have never lived it down. 

We dated for four years and married on March 28th 1981, three days before my 21st birthday. Our daughter Richelle, came 9 months later and then our son Michael, was born almost 5 years after that in 1986. The three best things I have ever done in my entire life!

Our Wedding Picture on our 25th Anniversary cake
 Through the years, we like every other couple, have had our share of ups and downs. In between the births of my two children I was diagnosed with Crohn’s Disease and that has been the biggest cross that we have had to bear as a married couple. I can tell you now without hesitation that my husband has saved my life on more than one occasion and without him I would be lost. He’s not just my husband, but he’s my very best friend and I love him with all that I am.

So Honey, this one is for you! You are the best thing that has ever happened to me, and with you, I have celebrated all the things in my life that have ever meant anything at all to me. With you by my side I can get through anything that life throws our way. You are my everything, the love of my life and the sunshine of my existence. I thank God everyday for bringing you into my life. Happy Anniversary!!! I’m hoping for 31 more years together. Thank you for loving me no matter what!!!!


Thank you for joining me. Until next time…

Crafty hugs,

Lisa
Stampin’ Queen Creations

Give The Queen A Call!!!

Our 25th Anniversary Party 2006

Our 25th Anniversary Party 2006


Halloween 2011

Tuesday, March 27, 2012

Memories of My Father


Does the pain of losing a loved one ever really go away? My dad had been sick for some time and my mom needed a short break from taking care of him, so we decided he would come spend the week with me and my family. My dad had been here for four days when I awoke on the fifth day to my husband yelling in the phone to 911, “I have someone in my house who’s not breathing!” My husband and I pulled my dad from his bed and began CPR, but to no avail. He had passed away in his sleep. The remainder of the day was somewhat of a blur due to the fact that I was in shock. Here was this man that had been my hero, lying on my living room floor, dead. I was supposed to be taking care of him for my mom. I had let her down, I let myself down, but most importantly, I let my dad down. The pain was unbearable. It feels like it was just yesterday, but it wasn’t. My dad passed away ten years ago.

I remember the pain of that day. I remember thinking to myself, “If one more person says to me that the pain will go away with time” I’m going to scream or even worse, I’m going to hit someone. How is a simple thing like the passage of time, ever going to heal the pain in my heart? And not just the pain, but what about the guilt I felt. Is that ever going to go away?

Well, here it is ten years later and even though I will never forget the events of that day, I can say that day no longer occupies my thoughts every second of every day any more. I don’t carry around the weight of that guilt any more either. Although I still miss my dad all the time, I have learned new ways to honor and remember him. I have taken all of my pain and channeled it into my love of crafting by creating wonderful projects that allow me to remember my love for my dad and his life. Not the pain and heartbreak from his death.

That is exactly what I did when I created this project that I am sharing with you today. But instead of creating a scrapbook page that would be placed in an album, I wanted to create a project that could be placed on a table and viewed by everyone who entered my house. Now when I see it I don’t think about the day my dad passed away, I think about the day the picture was taken of the two of us, how happy we were that day and how much I loved him then, now and always.

If you’re looking for a project to create to remember someone you love, consider using your scrapbook supplies out of the scrapbook album. This project was created using all of my scrapbook supplies but instead of leaving it on a 12”x 12” paper, I adhered the scrapbook papers to two 9” x 12” art canvases. By adding the clock works to the project, it not only creates a wonderful remembrance of your loved one, but also a working clock to any of your home’s table tops.

 Thank you for joining me. Until next time…

Crafty hugs,

Lisa
Stampin’ Queen Creations

Give The Queen A Call!!!

Memories of My Father


SUPPLIES

Fredrix Archival Watercolor Canvas 9” x 12”
Delta Ceramcoat Acrylic Paint- Mellow Yellow
Loew-Cornell 1” Wash paint brush
Paper Adventures Tan Striped paper
White, Tan, Brown and Rust card stock
Manila tag 4 3/4” W x 2 ½”H
My Mind’s Eye paper frame
K & Company 3D stickers
Ranger Distress inkpads- Old Paper, Vintage Photo & Tea Dye
Fresco Chalk Finish inkpad- Vesuvian Ash
Black permanent inkpad
Magic Mesh- tan
Eye Monocle and gold chain
Westrim Crafts Scrabble Letters, Metal Letters and Metal Key
Walnut Hollow Clock works
4 Bronze eyelets and 1 mini gold brad
Gold hinges
Assorted fibers
Straw ribbon
Computer font- Adler
Family Treasures Slotted Paper Punch
Eyelet setter & Hole punch ¼”
Xyron Machine 510 with Permanent Adhesive
Beacon Adhesives Zip Dry Paper Glue
Beacon Adhesives Glass, Metal & More Glue
Rubber Stamps-
Watch Face #H 960 by Stamp It!
Nostalgic Pocket Watch #A2528D by Rubber Stampede
Sybil #P2-923 by Acey Duecy
Large Picture Frame # R 158 by Close to My Heart
INSTRUCTIONS

1)      Using a 1” wash paint brush, paint both canvases with Mellow Yellow acrylic paint. Randomly stamp small and large watches on both canvases using Ranger Distress inkpads. Stamp “Sybil” once using Fresco Chalk Finish inkpad. See picture for placement

Designer Tip: To make stamping on canvas easier, place a book under the canvas before you begin stamping. This will give you a firmer base to stamp on.
 
2)      Using the picture as a guide, tear tan striped paper and adhere to the canvas with Zip Dry glue.

Designer Tip: Because the paper is thinner than card stock, I backed the paper with a tan card stock after I tore the edges. This will help with the paper buckling in high humidity areas. Use a brayer to spread the glue and work quickly.
3)      Print wording out on computer using white card stock. Cut all card stock as follows; for “In Memory of” white card stock- 3”W x ½”H Tan card stock- 3 ¼”W x ¾”H Rust card stock- 3 ½”W x 1”H. For the Name, White card stock- 4 ¼”W x 1 ¾”H Tan card stock-4 ½”W x 2”H Rust card stock- 4 ¾”W x 2 ¼”H. For “Only Time…” White card stock 3 ½”W x 1 ½”H Rust card stock-4”W x 2”H Manila Tag- 4 ¾”W x 2 ½”H.

4)      Sponge ink onto word images on using a sponge and the Ranger Distress inkpads. Layer all word images and adhere together with Zip Dry glue. Use picture for placement if needed. For the manila tag, punch holes around four edges with slotted punch. Slid word image into slots. Punch hole and add fibers.

5)      For large picture frame, cut stock as follows; Rust card stock-2 ¾’W x 3 7/8”H Tan card stock-3 ¼”W x 5”H. Layer card stocks together with picture and large picture frame. Adhere with Zip Dry glue. Lay picture frame down on canvas. Punch holes in four corners of frame. Adhere bronze eyelets with eyelet setter following directions from manufacturer.  

6)      Cut straw ribbon into three pieces, one 10”, one 3 ½” and one 2”. Run ribbon through Xyron machine. Adhere ribbon to canvas. Adhere “My Hero” on ribbon with Glass, Metal & More glue. To finish left side of canvas, adhere word images and 3D stickers with Zip Dry glue. Add fibers to key and adhere to canvas with Glass, Metal & More glue. Use picture for placement if needed. 

7)      To finish right side of canvas, punch small hole in upper right hand corner for clock works. Assemble clock works following manufacturer directions. Sponge clock face with tea dye inkpad. Adhere to canvas. 

8)      Lay Magic Mesh onto canvas, press firmly. NOTE: Magic Mesh is self adhesive. No need for further glues. Punch small hole in manila tag to attach monocle and chain. Lay tag on mesh and adhere with Zip Dry glue. Attach monocle to canvas with miniature gold brad.  

9)       For small picture frame, stamp with black inkpad on brown card stock. Cut out center for picture. Cut Rust card stock- 2 ¼”W x 3 ¼”H and Tan card stock 3 ¼”W x 3 ¾”H. Layer and adhere to picture frame with Zip Dry glue. Lay on canvas and adhere with glue. Adhere metal letters to canvas with Glass, Metal and More glue. Adhere ribbon and 3D stickers to canvas.